
Step-by-step guides
A plain-language walkthrough for each Pro planner: what to have on hand, what to enter in each section, and how to read the results and take them to your board.
The basics for every planner
- Sign in at housingproplanners.ca/sign-in with the email your licence or team invitation was sent to. First time? Choose First time here? Create your password. Your account page lists your planners.
- Team plans: select Start editing before you make changes and Done editing when you finish. One person edits at a time, and everyone else sees each change as it saves.
- Your work saves as you go. Before a board meeting, save a named version, and use Save planner file to keep a backup copy.
- Undo and redo with the curved arrows in the bottom-right corner, or Ctrl+Z and Ctrl+Y (Cmd on a Mac).
- Help inside each planner: select ? Help & tour for a two-minute guided tour, or press ? on your keyboard.
Financial planning
Budget & Forecast Planner Pro
Build a one-year operating budget and a multi-year forecast for a housing provider, seniors lodge, or community organization, with one site or many, in one or more provinces or territories.
Read the guide →Rent Setting & Affordability Planner Pro
Test rent changes against what tenants can afford, what your programs and tenancy law allow, and what the buildings cost to run.
Read the guide →Operating Agreement Expiry & Sustainability Planner Pro
Set next year's housing charges or rents and test them over ten years, through the end of the mortgage and the operating agreement.
Read the guide →Development and assets
Multifamily Feasibility Planner Pro
Test whether an affordable or mixed-income apartment project works before you apply for funding: the development budget, rent bands, capital stack, operations, financing, and program checks for your province and Build Canada Homes.
Read the guide →CRPF Acquisition Planner Pro
Test a building against the Canada Rental Protection Fund (CRPF) before you apply to the Canadian Housing Acquisition Fund (CHAF): organization pre-qualification, property eligibility, the 40% affordability screen, the CRPF request, and the year-10 refinance.
Read the guide →Portfolio Asset Strategy Planner Pro
Decide what to do with every building in your portfolio.
Read the guide →Funding Stack & Capital Planner Pro
Build the funding stack for a housing project and test it before you apply: sources and uses, the funding gap, debt coverage, stress tests, an Alberta AHPP application check, and a ten-year capital plan with the reserve fund.
Read the guide →Project Management Planner Pro
Run a renewal, development, merger, or your whole strategic plan from one place, and report on it to your board.
Read the guide →Risk and resilience
Governance
Budget & Forecast Planner Pro: step-by-step guide
Build a one-year operating budget and a multi-year forecast for a housing provider, seniors lodge, or community organization, with one site or many, in one or more provinces or territories. Each site follows its own province's rules for rent guidelines, payroll costs, and sales tax rebates.
Time to set up: about an hour for one site; longer for a large portfolio.
Have on hand: last year's actual results, this year's draft budget, mortgage statements, reserve balances, and your capital plan.
Before you start
- Sign in with the email your licence or team invitation was sent to, and select Budget & Forecast Planner Pro on your account page.
- The planner opens with a fictitious example, Cedarline Community Housing Society, which has a site in every province and territory. Explore it, then replace it with your own figures.
- On a team plan, select Start editing before you make changes and Done editing when you finish.
- Select ? Help & tour at the top for a two-minute guided tour.
Step 1: Set up your organization (section 1)
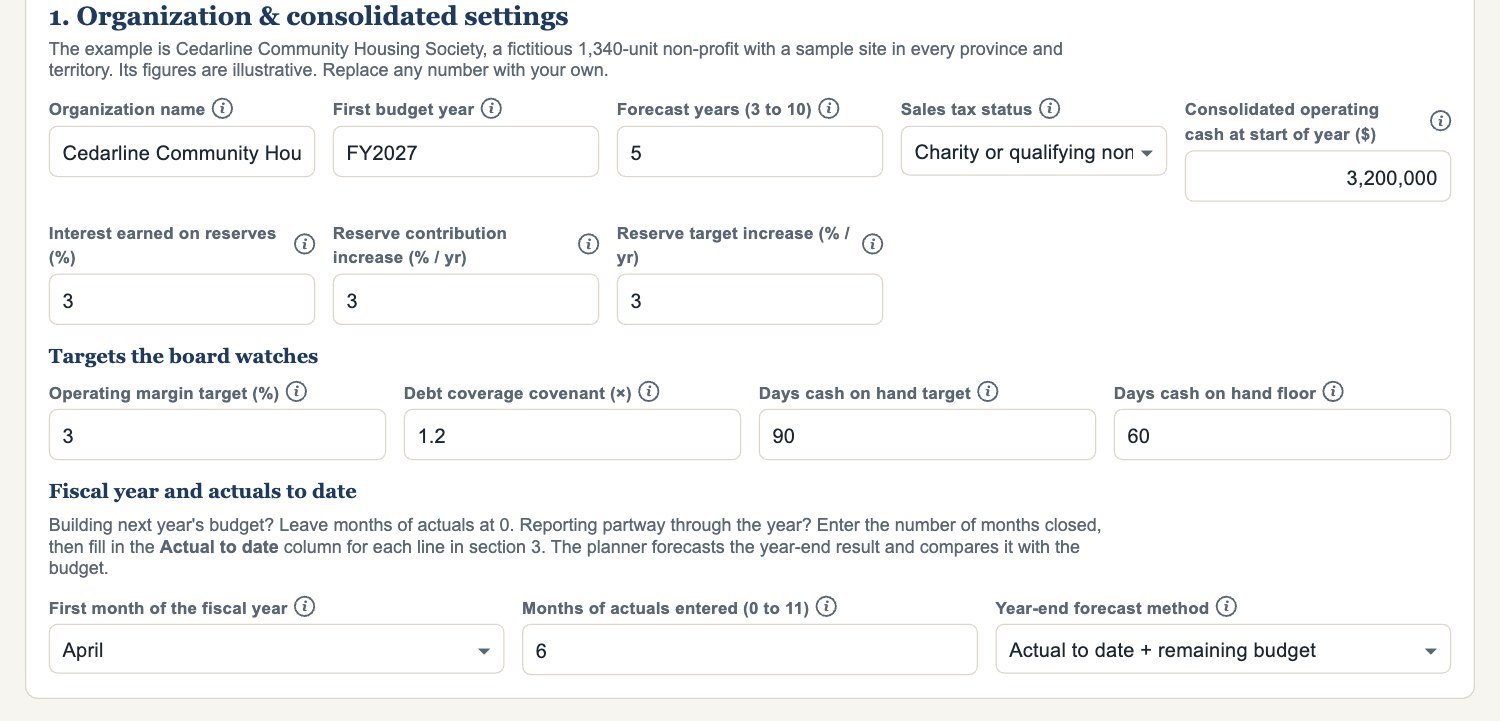
- Enter the organization name, fiscal year, and number of forecast years.
- Set opening operating cash and the replacement reserve settings.
- Under Targets the board watches, set the operating margin target, debt coverage covenant, and the days-cash target and floor.
- Under Fiscal year and actuals to date:
- Building next year's budget? Leave months of actuals at 0.
- Reporting part-way through the year? Enter the months elapsed and choose a year-end method. Actual to date + remaining budget assumes the rest of the year goes to plan; at year-to-date pace assumes the trend so far continues.
Step 2: Check the provincial assumptions (section 2)
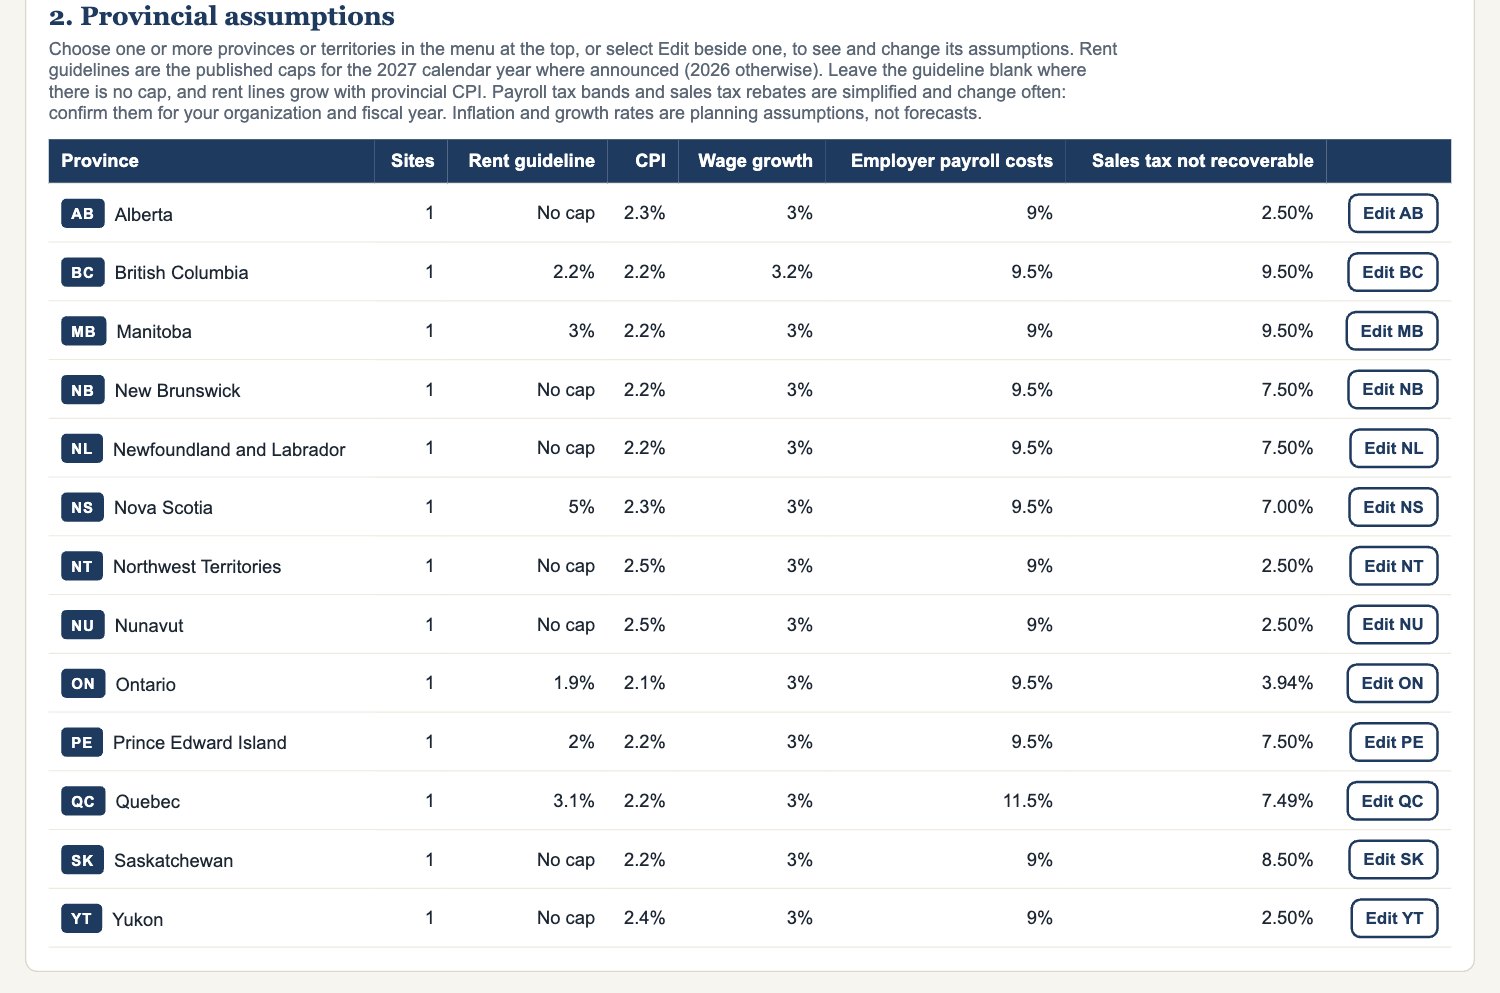
- Choose a province from the menu at the top, or select Edit beside one.
- Check each rate (rent guideline, CPI, wage, utility, property tax and insurance growth, employer payroll costs, payroll tax, and sales tax rebate) against current published figures, and change any that differ.
- Leave the rent guideline blank where there is no cap. Rent lines then grow with provincial CPI.
Tip: Payroll tax bands and sales tax rebates are simplified and change often. Confirm them with your accountant.
Step 3: Enter your sites (section 3)
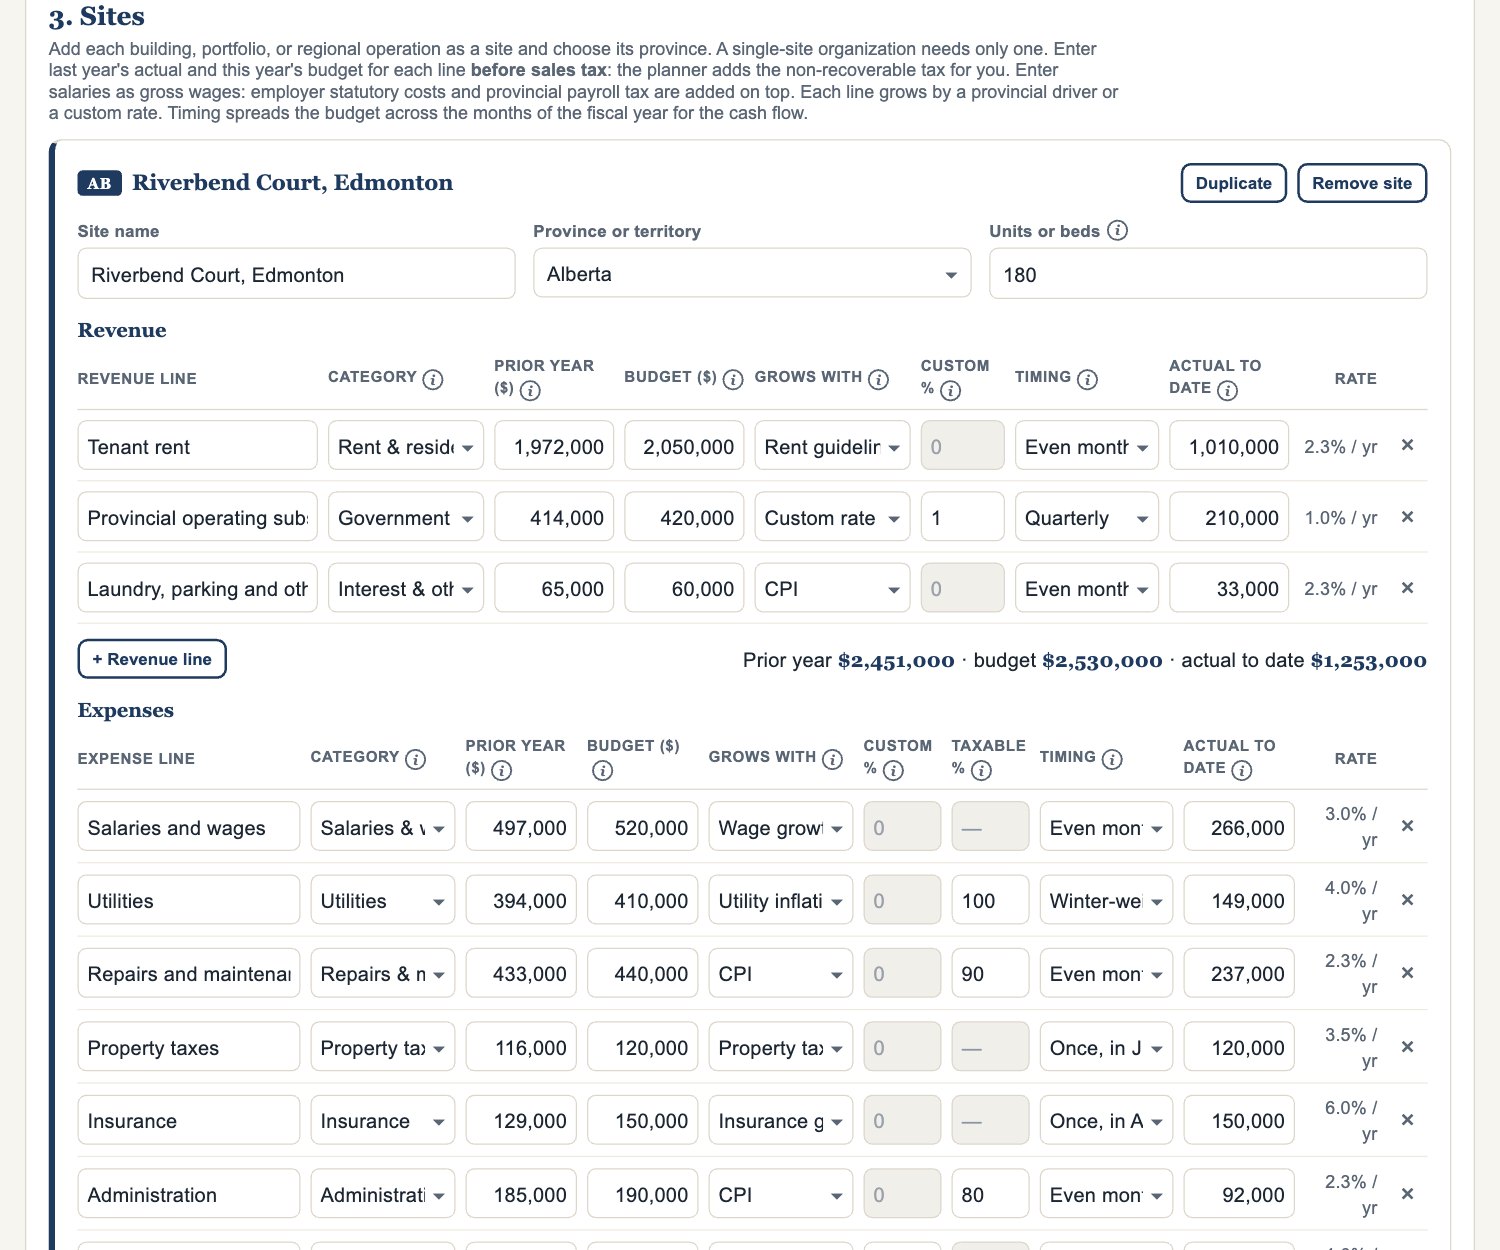
- Add a site for each building, portfolio, or regional operation, and choose its province. A single-site organization needs only one.
- For each revenue and expense line, enter last year's actual and this year's budget, before sales tax. The planner adds the non-recoverable tax for your province.
- Enter salaries as gross wages. Employer costs and payroll tax are added for you.
- Choose how each line grows: a provincial driver (CPI, wages, utilities) or a custom rate.
- Choose a monthly pattern (even, quarterly, or winter-weighted) for lines like utilities, so the cash flow is realistic.
- Enter the mortgage balance, rate, and payments, and the reserve balance and yearly contribution.
Step 4: Add capital projects (section 4)
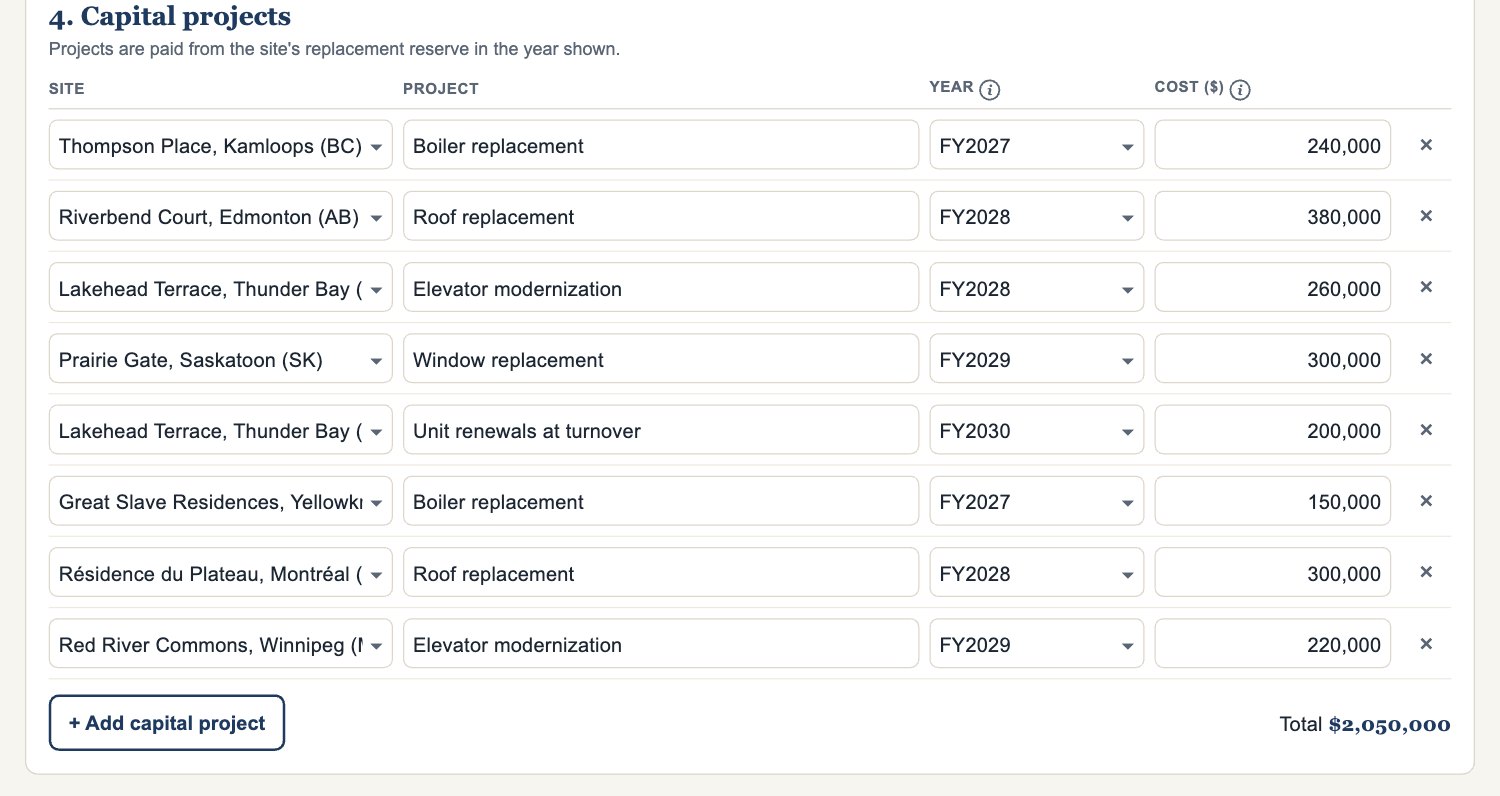
- Select + Add capital project.
- Choose the site, describe the project, and enter the year and cost. Projects are paid from that site's replacement reserve.
Tip: Projects that drain a reserve below target are flagged in the results.
Step 5: Choose what you are viewing

Use the bar at the top of the page to choose which provinces or territories the results show. Keep All provinces for the whole organization, or tick one or more and select Done. Every result updates to your choice.
Step 6: Read your results (sections 5 to 7)
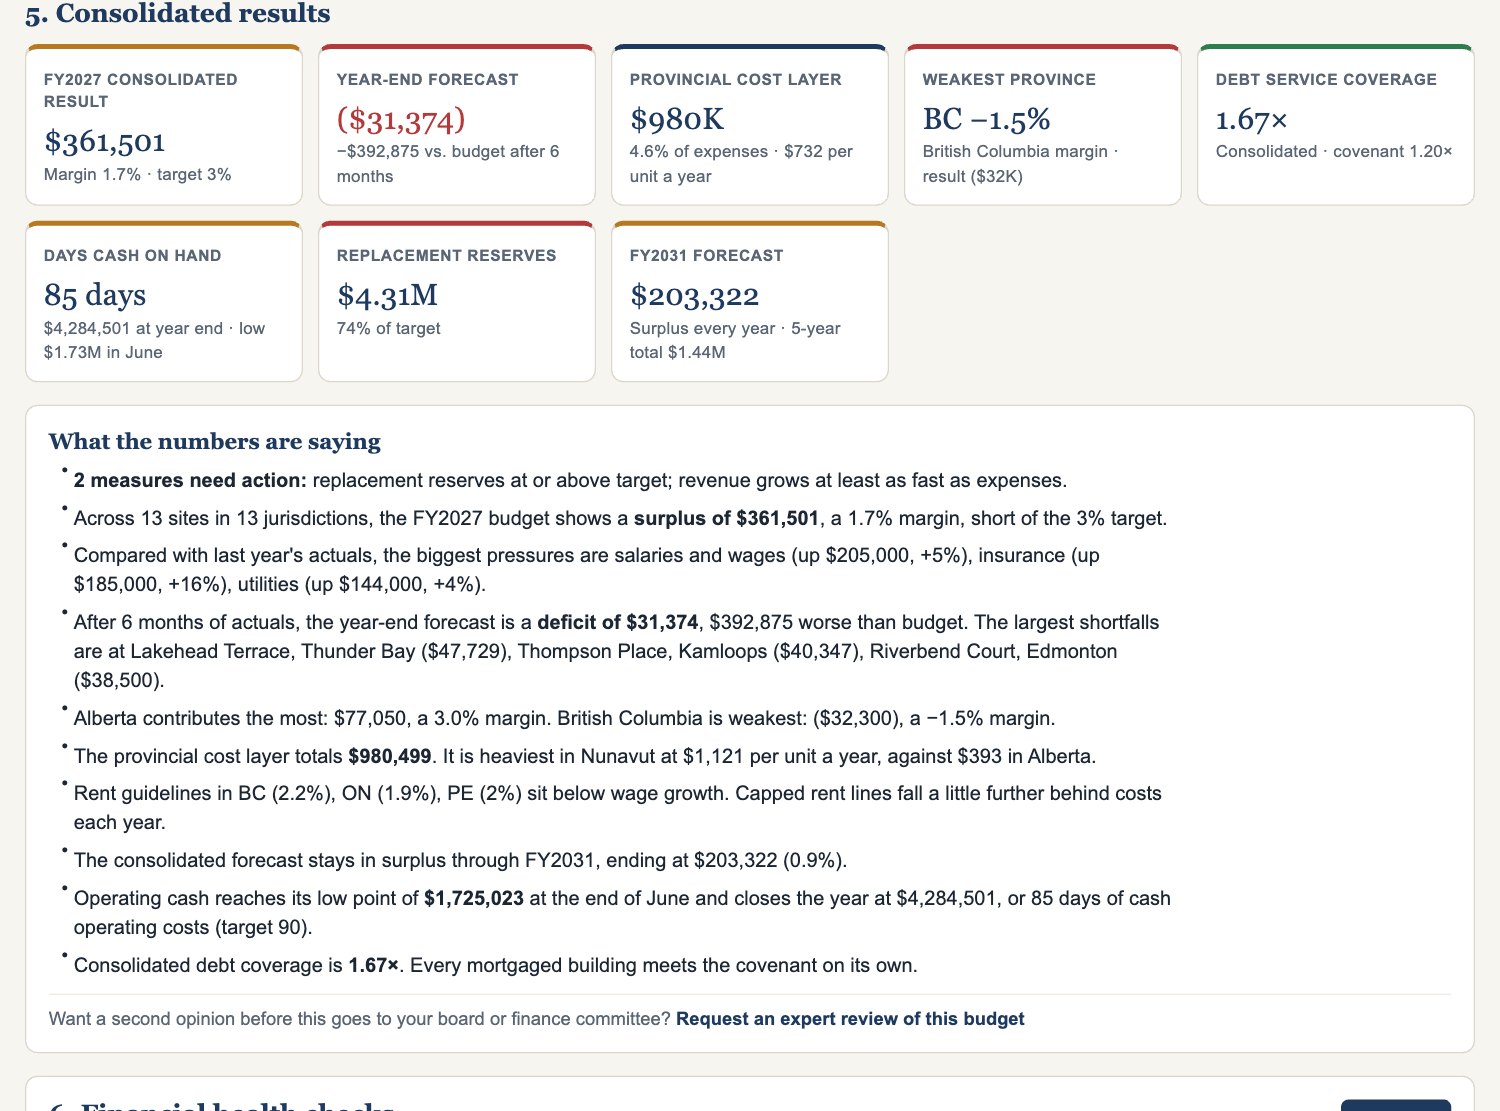
- Consolidated results (section 5): read the plain-language summary first. It names what needs attention. Then check the surplus or deficit, operating margin, debt coverage, days cash, and reserves.
- Financial health checks (section 6): On track meets the target, Watch is close to a limit, and Action needs a plan before the budget goes to the board.
- Statement of operations: this year's budget against last year's actuals.
- Year-end forecast vs. budget: appears when you have entered months of actuals.
- Monthly cash flow: months that dip below the dashed red floor line are when you may need a line of credit or a change in timing.
- Province by province (section 7): results and cost per unit per month in each jurisdiction.
- Multi-year forecast and sensitivity: the surplus or deficit and cash for each forecast year, and what happens if revenue or costs grow faster or slower than planned.
Want a second opinion? Select Request an expert review to send a summary to Dewling Strategies before the budget goes to the board.
Step 7: Present, report, and save
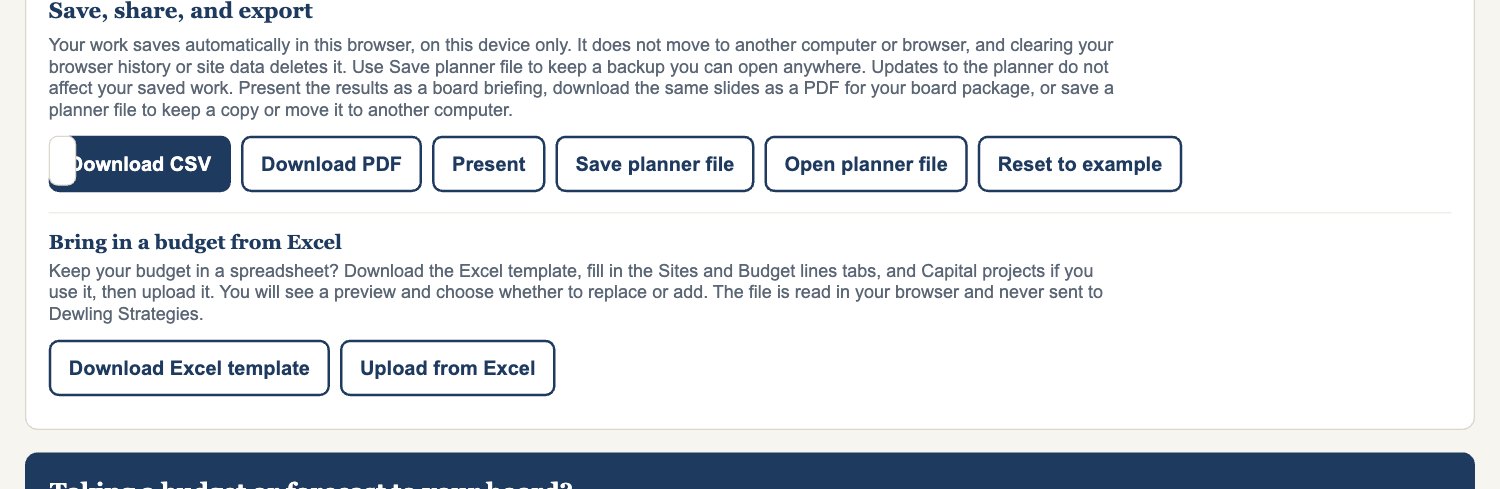
- Select Present for a full-screen board briefing. Use the arrow keys to move between slides and Esc to close.
- Select Download PDF for the board package, or Download CSV to work with the numbers in Excel.
- Your work saves to your account as you go. Before a board meeting, save a named version, and use Save planner file to keep a backup copy.
- Use the curved arrows in the bottom-right corner (or Ctrl+Z and Ctrl+Y) to undo and redo.
Good to know
- Enter amounts before sales tax.
- Lender and funding agreements set the limits that actually apply, often site by site.
- Working capital (receivables and payables) is not modelled in the cash flow.
Works with: Rent Setting & Affordability, Operating Agreement Expiry.
Rent Setting & Affordability Planner Pro: step-by-step guide
Test rent changes against what tenants can afford, what your programs and tenancy law allow, and what the buildings cost to run. You compare three rent scenarios side by side and take the recommended one to the board.
Time to set up: 45 to 90 minutes.
Have on hand: your rent roll, current market rents, operating costs per unit, operating agreements, and household counts by income band. Never tenant names or individual incomes.
Before you start
- Sign in and select Rent Setting & Affordability Planner Pro on your account page.
- The planner opens with a fictitious example, Kestrel Valley Housing Society. Select Start a blank rent review in Save, share, and export when you are ready for your own units.
- On a team plan, select Start editing before you make changes and Done editing when you finish.
- Select ? Help & tour at the top for a two-minute guided tour.
Step 1: Organization and settings (section 1)
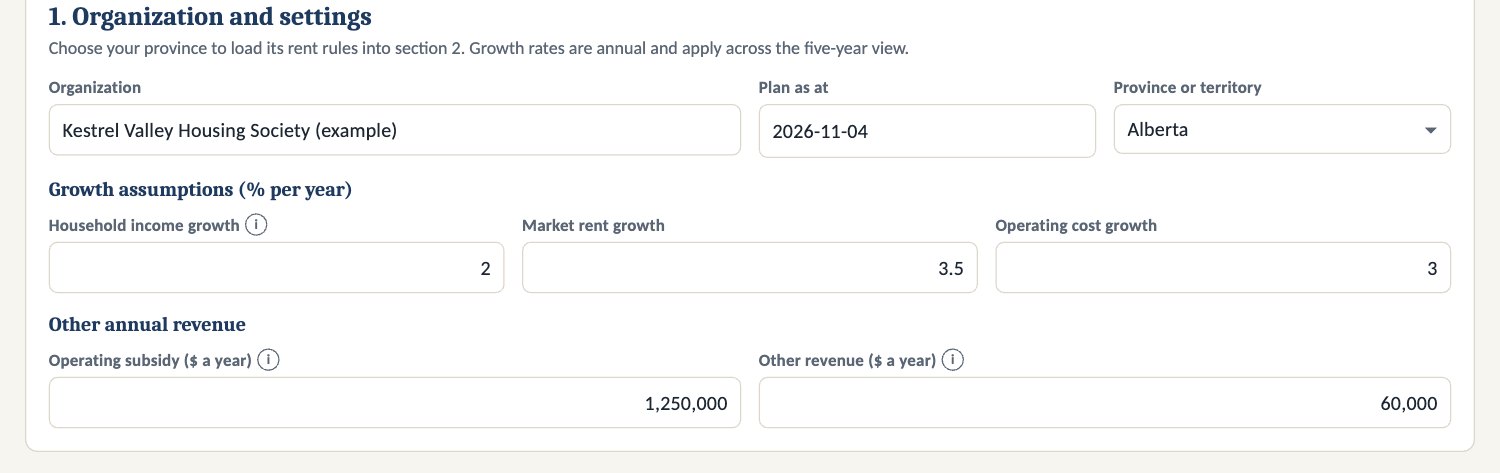
- Enter your organization and the plan date.
- Choose your province or territory. Its rent rules load into section 2.
- Set yearly growth for household incomes, market rents, and operating costs.
- Enter operating subsidy and other revenue for these units.
Step 2: Confirm the rent rules (section 2)
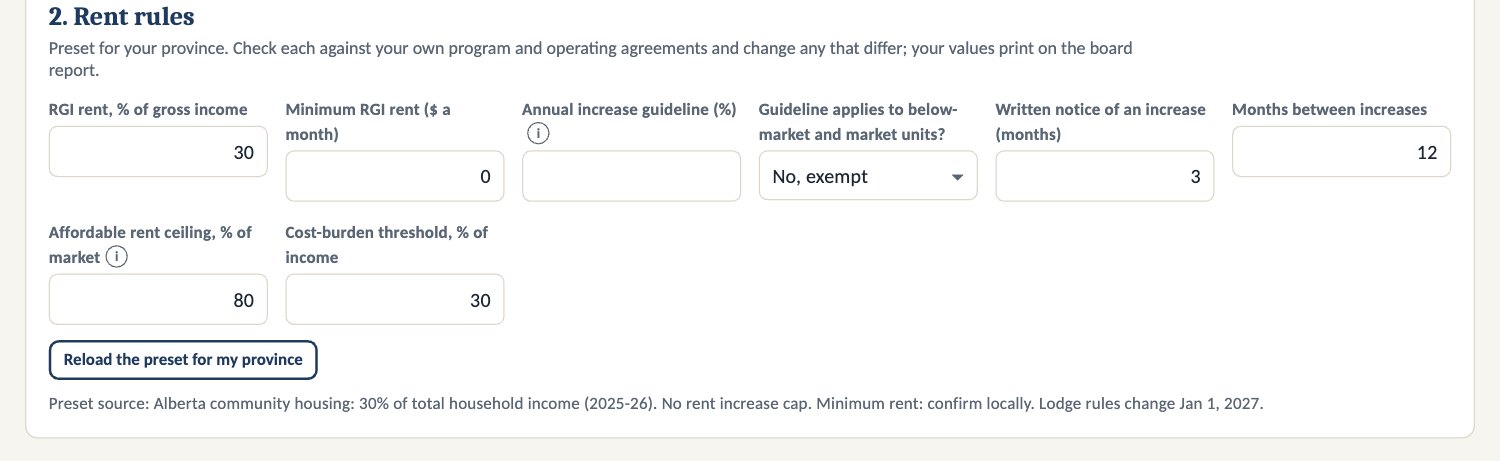
- Read the source note under the preset rules.
- Check each value (RGI share of income, minimum rent, yearly increase guideline, notice period, and the affordability tests) against your operating agreements and program rules. Change any that differ.
- Say whether the increase guideline applies to your below-market and market units.
Tip: Several provinces exempt community or social housing from the increase guideline, and some rules are set by your program, not by law. Select Reload the preset for my province to undo your changes.
Step 3: Enter units and households (section 3)
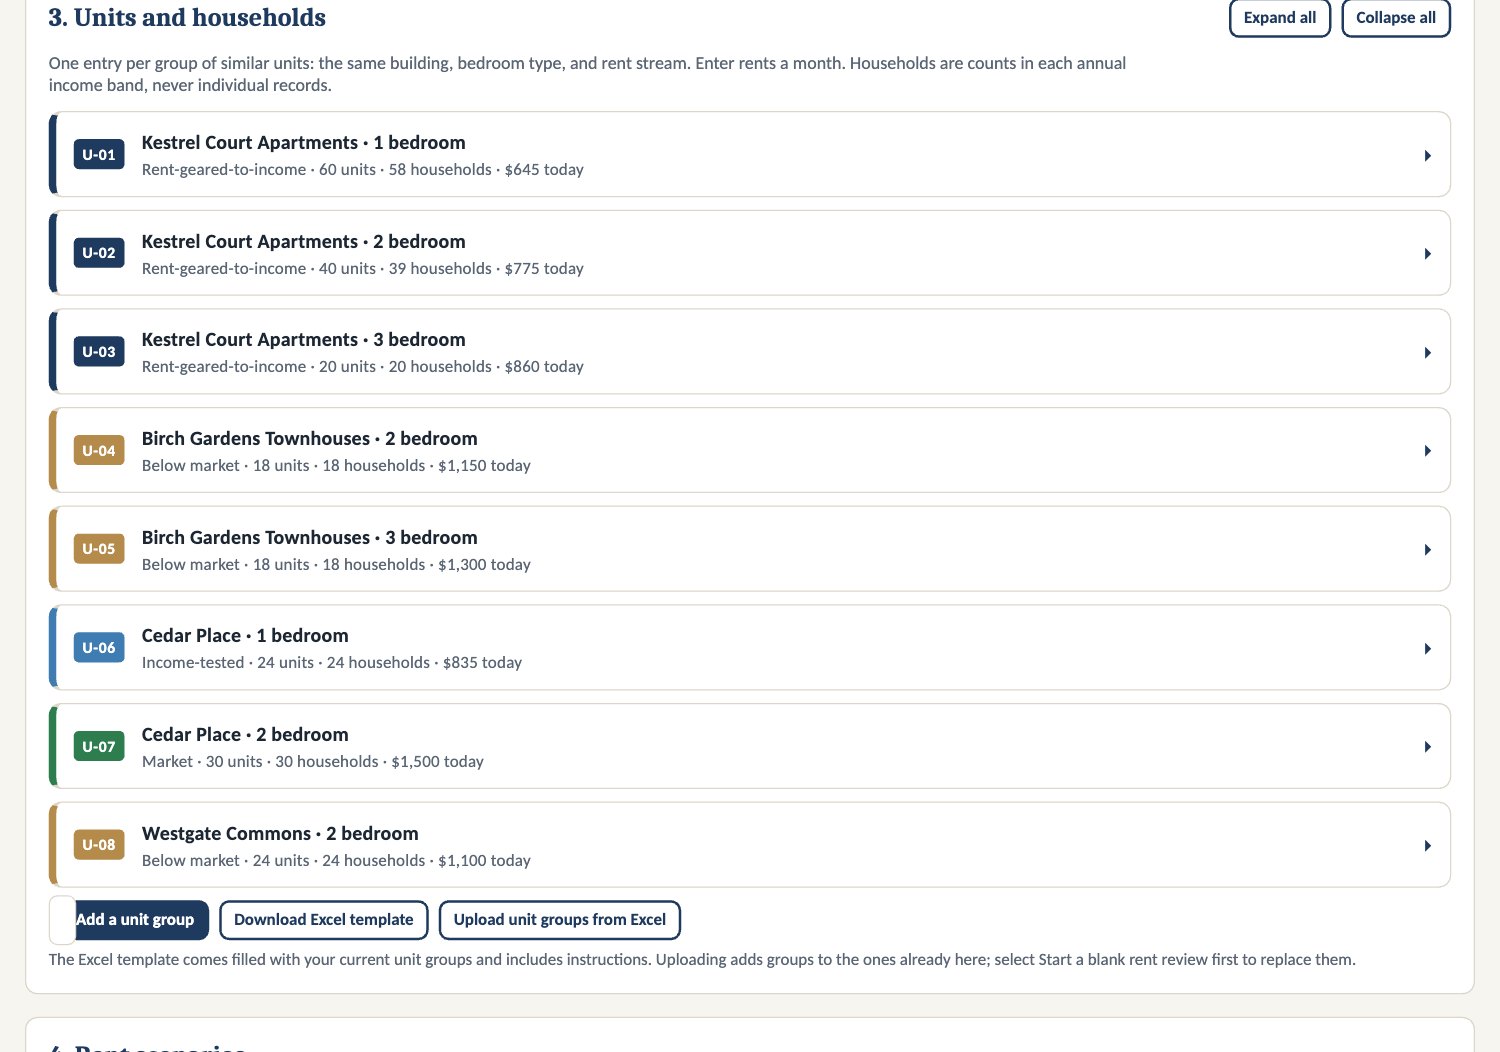
- Select a unit group to open it, or + Add a unit group. A group is one building, unit type, and rent stream.
- Choose the rent stream: RGI, income-tested, below market, or market.
- Enter today's average rent, market rent, any program maximum, and the operating cost per unit.
- Enter how many households fall in each annual income band.
Large rent roll? Select Download Excel template, fill it in, and select Upload unit groups from Excel. CSV files work too.
Step 4: Set up three rent scenarios (section 4)
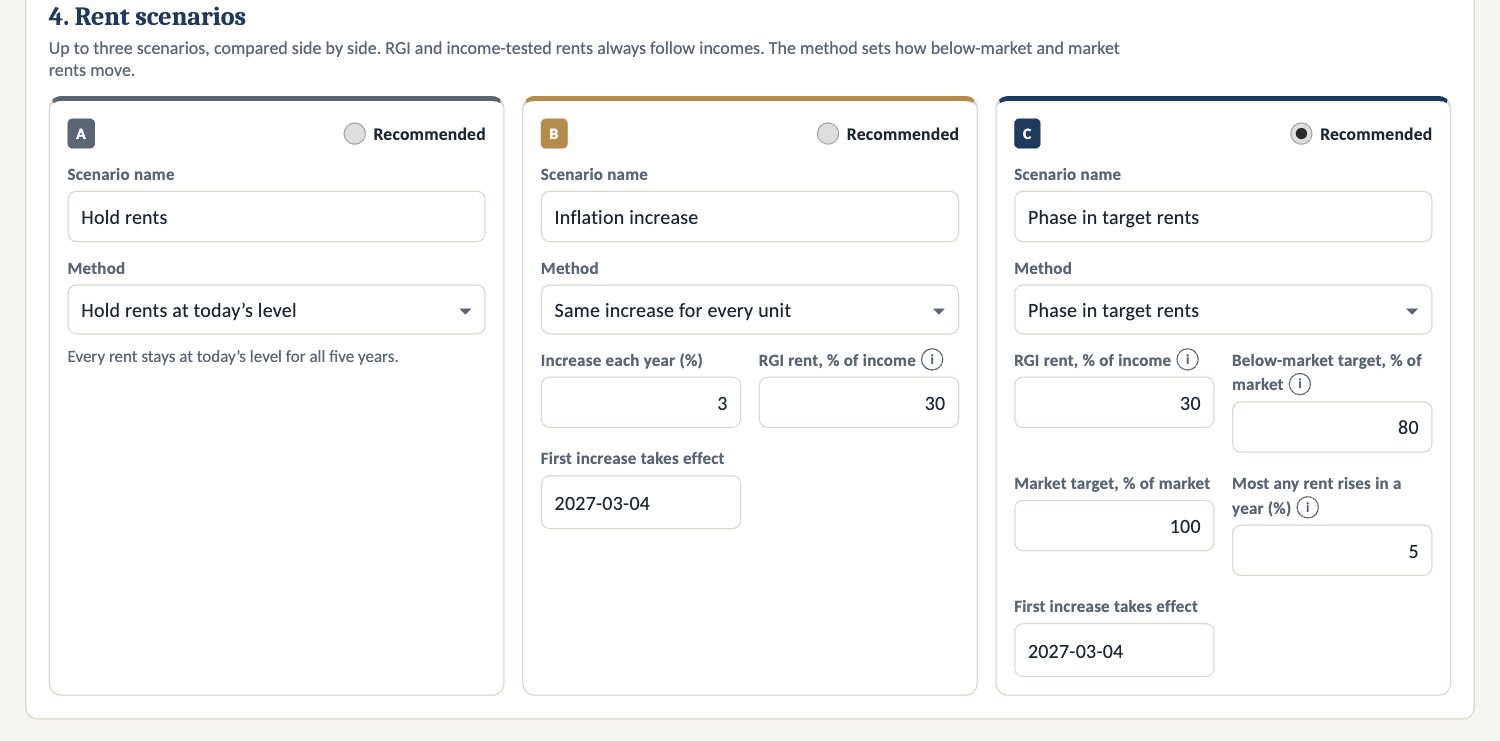
- Name each scenario and choose its method: hold rents, the same increase for every unit, or phase in target rents.
- For the target method, set the below-market and market targets and the most any rent can rise in a year.
- Set when the first increase takes effect.
- Mark one scenario Recommended. The board report and presentation always use it.
Tip: Leave scenario A as Hold rents. It shows the board what happens if nothing changes.
Step 5: Compare the results (sections 5 to 9)
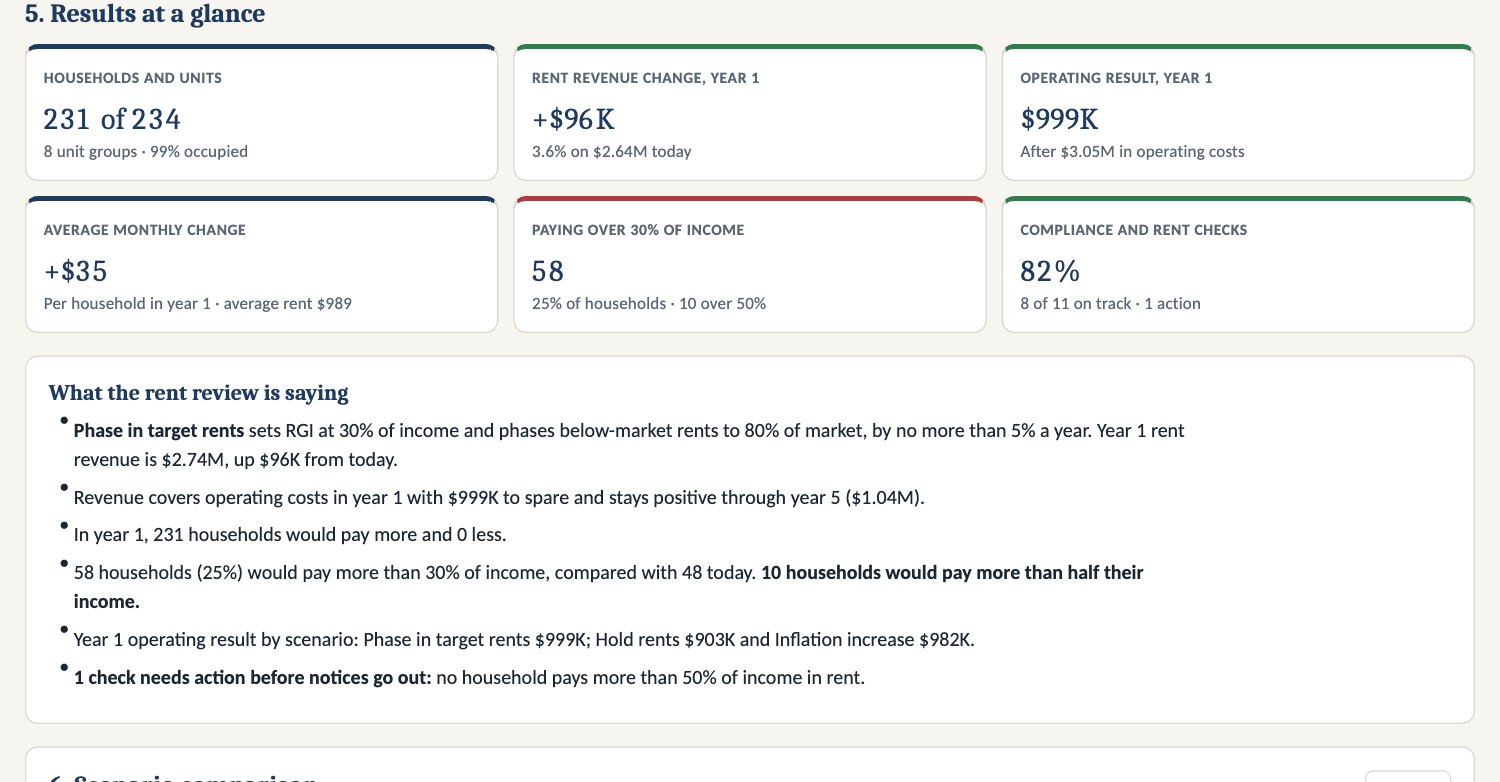
- Use the toolbar at the top to switch which scenario the results show.
- Results at a glance (5): read the summary, then the operating result and households paying over 30% of income.
- Scenario comparison (6): compare year 1 and year 5 operating results, and how many households pay over 30% and 50% of income.
- Revenue and operating result (7): watch where each revenue line sits against the dashed cost line. Holding rents often looks fine in year 1 and costly by year 5.
- Rent roll (8): check the change for each unit group and compare year 1 rents with market rent.
- Tenant impact (9): who pays more, by how much, and the income bands where rent goes above 30% of income.
Step 6: Clear the checks (section 10)
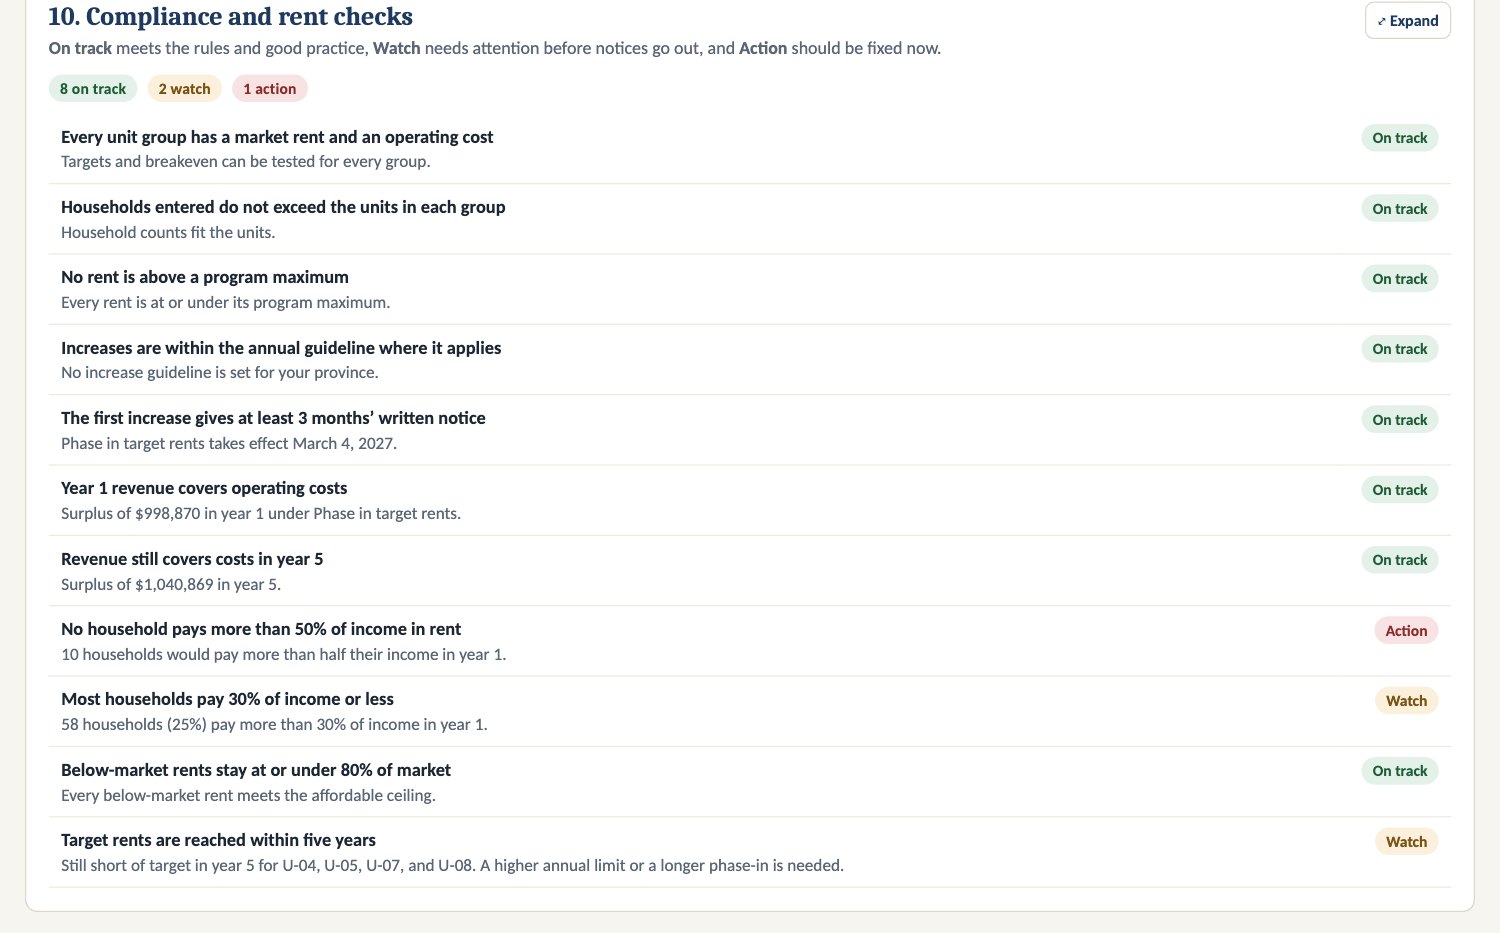
- Clear every Action before rent notices go out.
- Review the Watch items with your team.
Tip: The notice check uses the effective date you set in section 4.
Step 7: Present, report, and save

- Select Present for a full-screen board briefing, or PDF report for the rent review report.
- Work saves to your account as you go. Before a board meeting, save a named version and use Save planner file for a backup.
- Undo and redo with the curved arrows in the bottom-right corner.
Good to know
- RGI and income-tested rents always follow incomes. The scenario method sets how below-market and market rents move.
- Shares of income use the middle of each income band, so treat them as indicators.
- The planner flags possible issues but does not give legal advice on rent increases. Confirm notice periods, guidelines, and exemptions with your funder or a tenancy advisor.
Works with: Budget & Forecast.
Operating Agreement Expiry & Sustainability Planner Pro: step-by-step guide
Set next year's housing charges or rents and test them over ten years, through the end of the mortgage and the operating agreement. Find the increase that keeps the budget balanced and the capital plan funded, then take it to the board with a plain-language summary for members or tenants.
Time to set up: about an hour.
Have on hand: your operating agreement, mortgage statements, this year's budget or actuals, RGI household totals, reserve balance, and building condition assessment.
Before you start
- Sign in and select Operating Agreement Expiry & Sustainability Planner Pro on your account page.
- The planner opens with a fictitious example: Maplewood Housing Co-operative for co-ops, or Riverbend Community Housing Society for non-profits. Select Start a blank budget in Save, share, and export when you are ready.
- On a team plan, select Start editing before you make changes and Done editing when you finish.
- Select ? Help & tour at the top for a two-minute guided tour.
Step 1: Choose your provider type and settings (section 1)
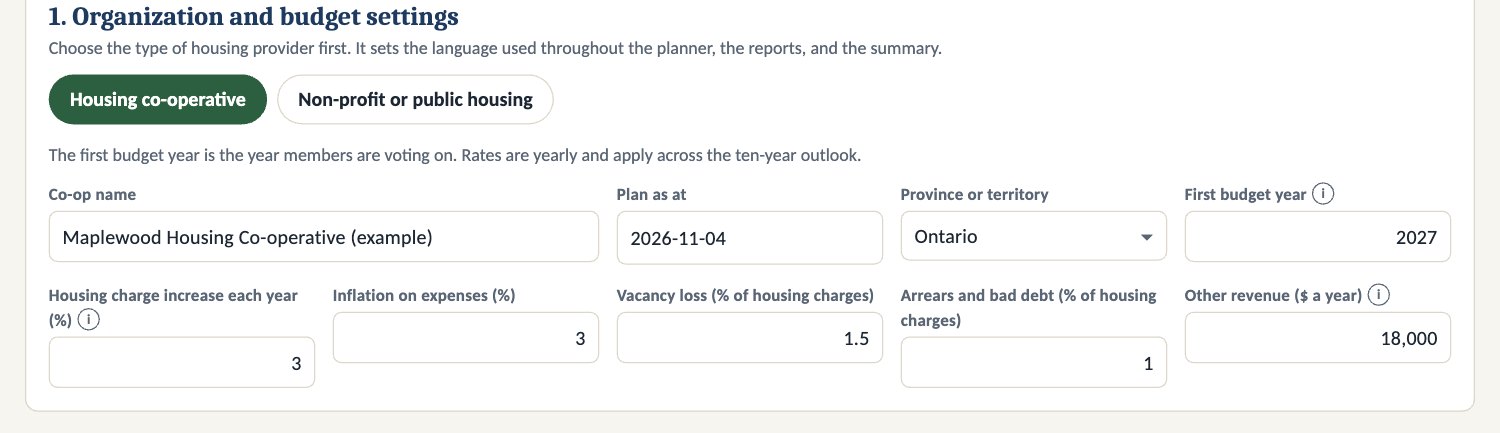
- Choose Housing co-operative or Non-profit or public housing. Co-ops work in housing charges and members; non-profits work in rents and tenants. Switching never changes your figures, only the language and outputs.
- Enter your organization name and the plan date.
- Set the first budget year and the yearly increase you are proposing. Every result updates as you type.
- Set inflation, vacancy, arrears, and other revenue from your recent results.
Step 2: Units and full charges or rents (section 2)
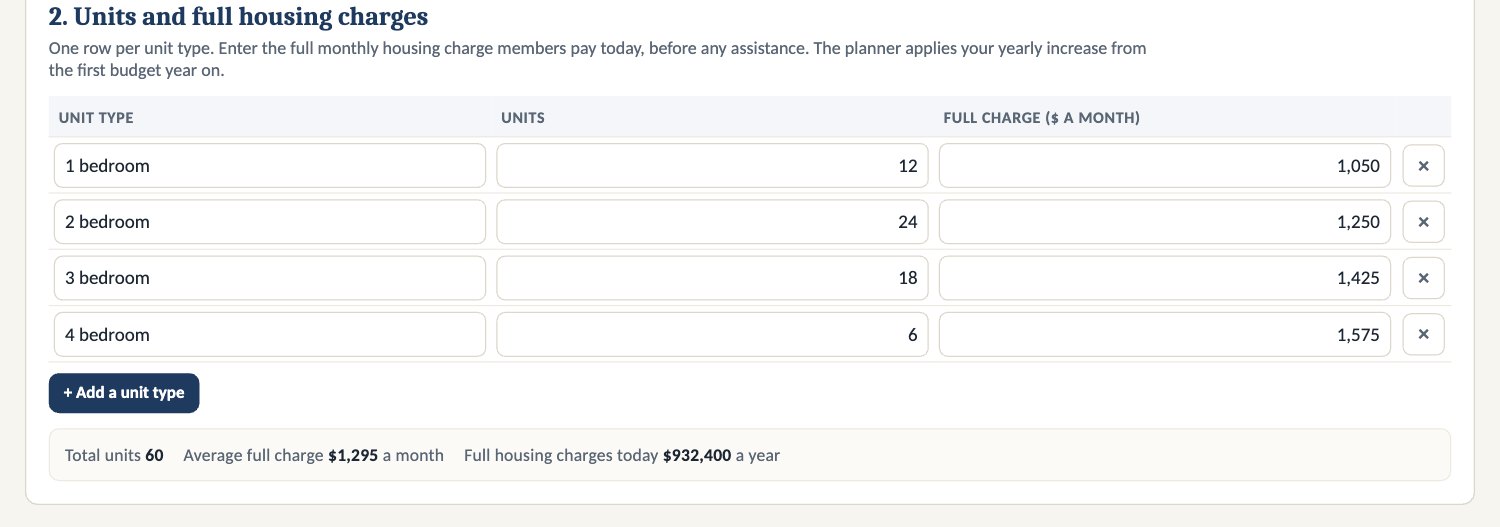
- Add one row for each unit type, with the number of units.
- Enter today's full monthly housing charge or rent before any assistance.
Tip: The summary uses the 2-bedroom row as its example, or your first unit type if there is none.
Step 3: Rent-geared-to-income assistance (section 3)

- Enter the number of assisted (RGI) households.
- Enter their average monthly payment today.
- Set how fast assisted payments grow. They follow incomes, which usually rise more slowly than rents.
- Co-ops only: add a surcharge on full-charge members if your co-op has one.
Step 4: Operating agreement, mortgage, and refinancing (section 4)

- Enter the yearly government subsidy and its last year, from your operating agreement.
- Enter yearly mortgage payments and the last mortgage year.
- To test borrowing against the mortgage-free property, tick the refinancing box and set the amount, rate, amortization, and year. Proceeds go into the capital reserve; payments become an operating cost.
Step 5: Operating expenses (section 5)
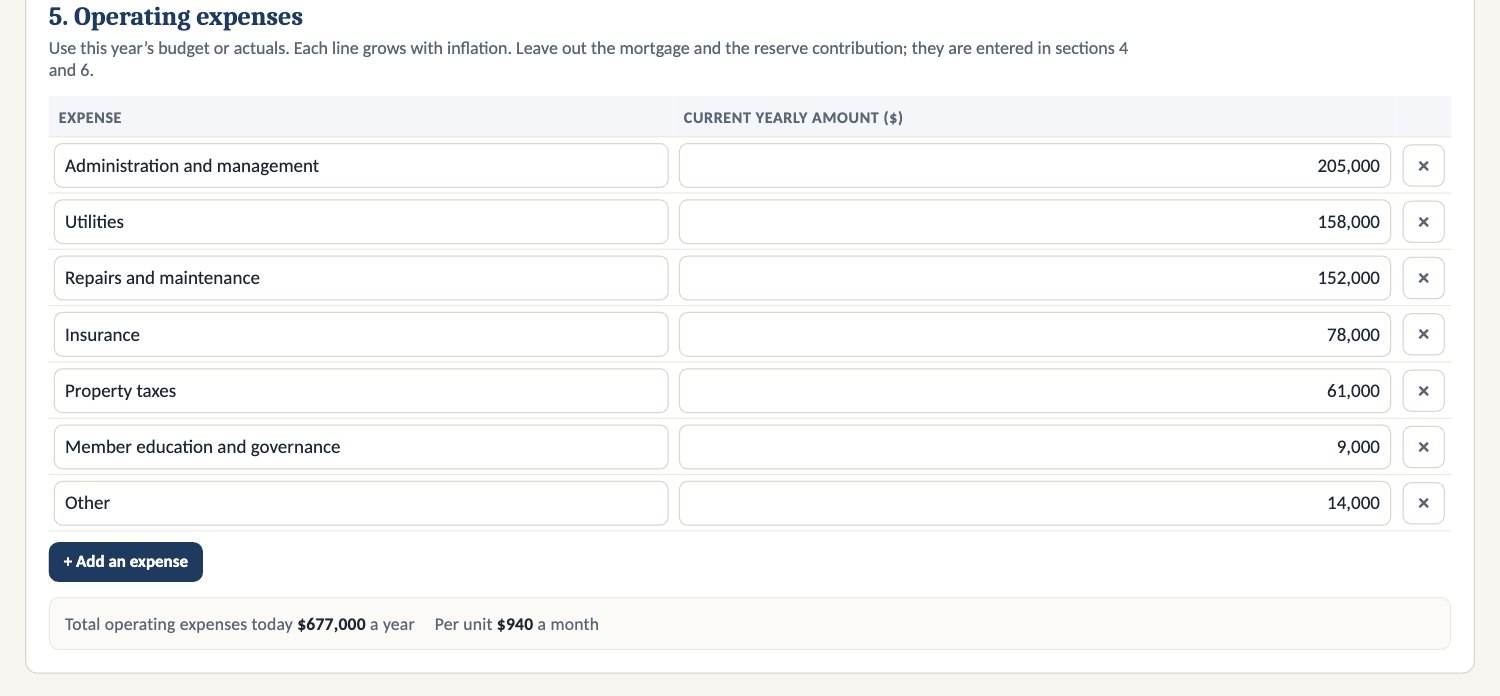
- Enter this year's budget or actuals, line by line. Each line grows with inflation.
- Leave out the mortgage and the reserve contribution. They are entered in sections 4 and 6.
Step 6: Capital reserve and capital plan (section 6)
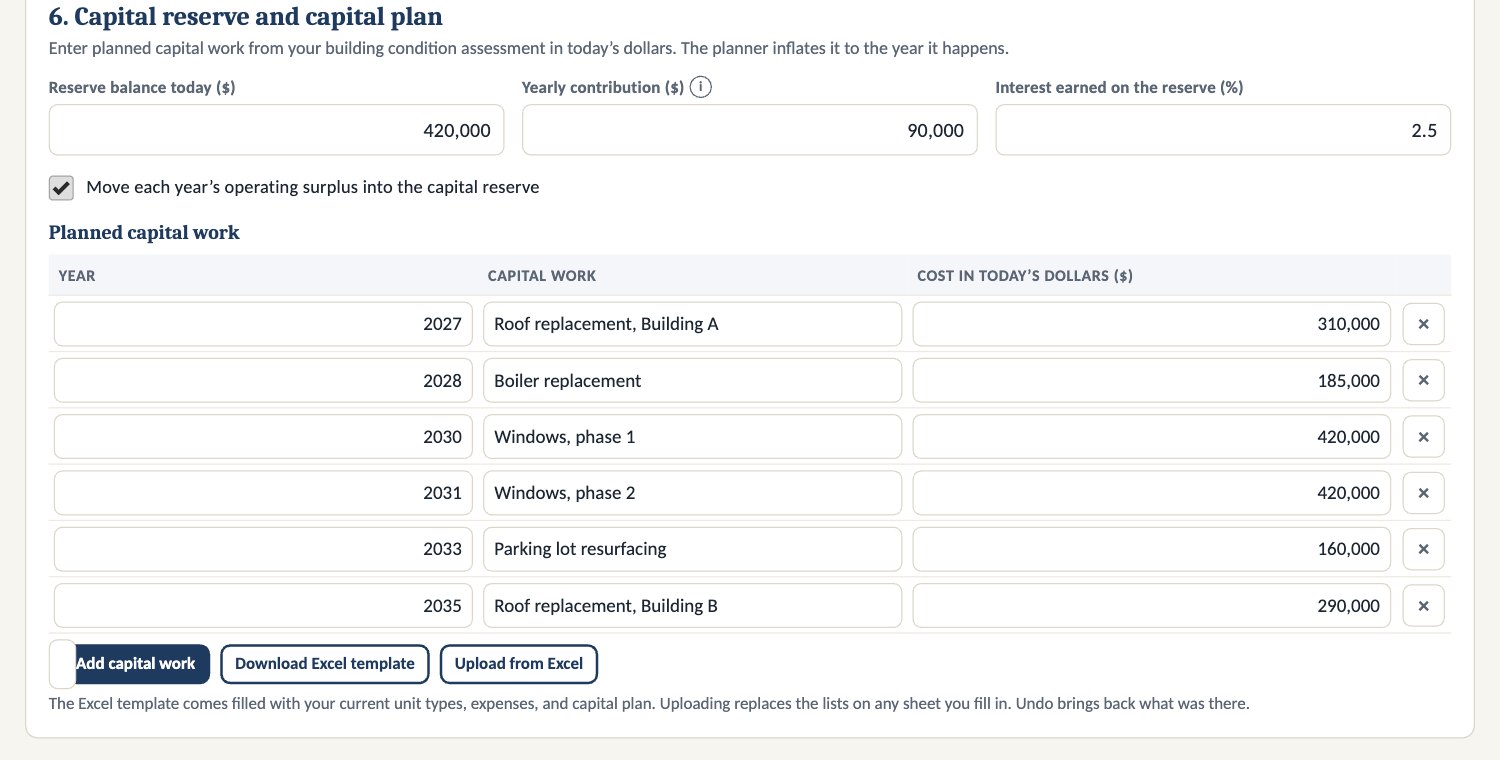
- Enter today's reserve balance, yearly contribution, and interest rate.
- Choose whether each year's surplus moves into the reserve.
- Add each piece of planned capital work with its year and cost in today's dollars. The planner inflates it.
Long capital plan? Select Download Excel template, fill in the sheets for unit types, expenses, and capital, and select Upload from Excel.
Step 7: Read the results (sections 7 to 11)
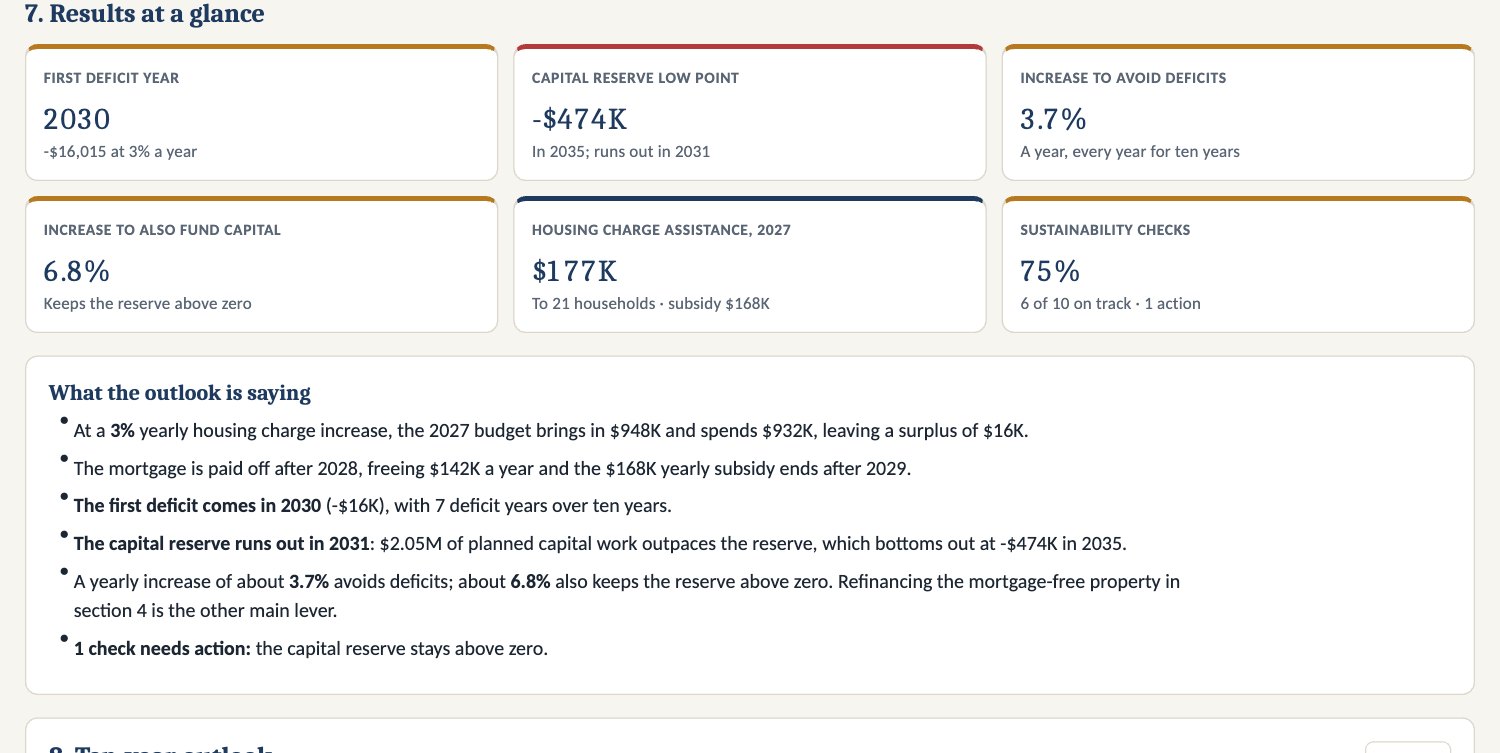
- Results at a glance (7): the first deficit year, the reserve low point, and the increases needed to avoid deficits and to fund capital.
- Ten-year outlook (8): look for the year the bars turn red and where the reserve line dips below zero. Mortgage and subsidy end dates are marked.
- Budget by year (9): read the surplus row and closing reserve balance. A diamond marks the first year without the mortgage or subsidy.
- Increase options (10): several yearly increases side by side, including the break-even ones, with the monthly change for a typical unit.
- Sustainability checks (11): deal with every Action before the budget is approved, and make a plan for each Watch item.
Step 8: Share with members or tenants (section 12)
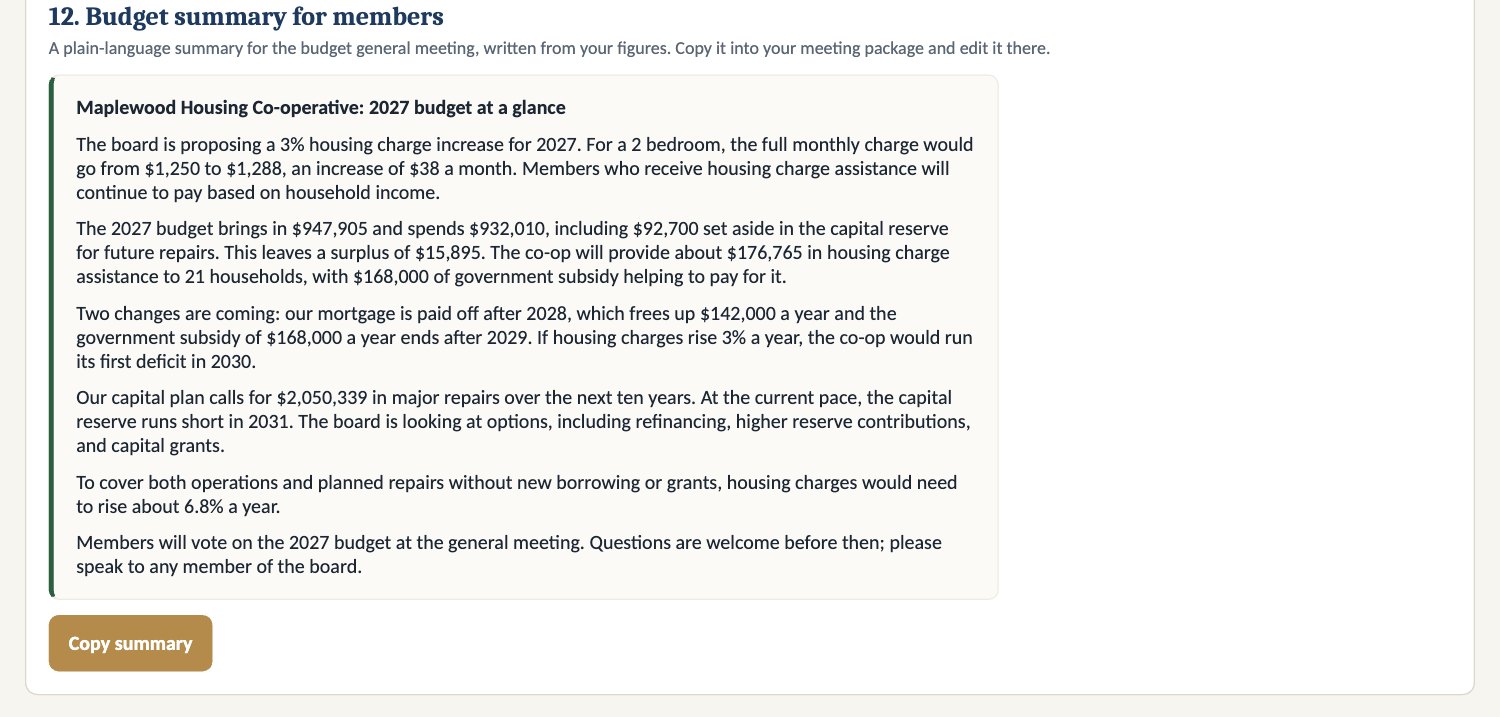
- Read the plain-language summary written from your figures.
- Select Copy summary and paste it into your general meeting package or tenant letter, then edit it there.
Non-profits: the summary does not replace the formal rent increase notice your province requires.
Step 9: Present, report, and save

- Select Present for a full-screen board briefing, or PDF report for the budget report, which includes the summary for members or tenants.
- Work saves to your account as you go. Save a named version before a board meeting and use Save planner file for a backup.
- Undo and redo with the curved arrows in the bottom-right corner.
Good to know
- Break-even increases assume the same increase every year for ten years.
- The planner does not apply provincial rent increase limits or notice periods. Check those before you set the increase.
- Lenders often look for debt service coverage of 1.10 to 1.20.
Works with: Budget & Forecast, Portfolio Asset Strategy.
Multifamily Feasibility Planner Pro: step-by-step guide
Test whether an affordable or mixed-income apartment project works before you apply for funding: the development budget, rent bands, capital stack, operations, financing, and program checks for your province and Build Canada Homes.
Time to set up: about an hour for a first pass.
Have on hand: the unit mix, a rental market study or comparable rents, CMHC Rental Market Survey median rents for your area, a cost estimate, and any funding commitments.
Before you start
- Sign in and select Multifamily Feasibility Planner Pro on your account page.
- The planner opens with a fictitious 120-unit, four-storey mixed-income example. Replace any number with your own.
- On a team plan, select Start editing before you make changes and Done editing when you finish.
- Select ? Help & tour at the top for a two-minute guided tour.
Step 1: Project (section 1)
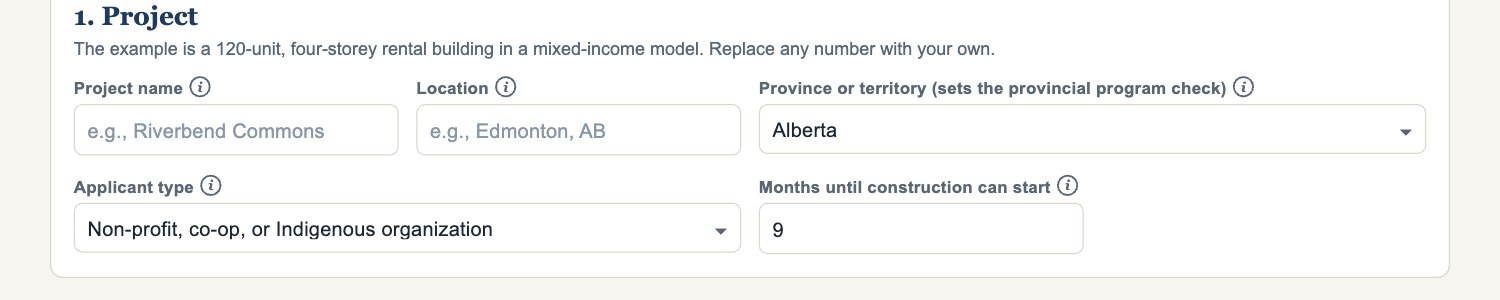
- Enter the project name and city.
- Choose the province or territory. Program checks, rent limits, and defaults throughout the planner cascade from this choice.
- Choose the applicant type: non-profit, municipality, partnership, or private developer.
- Set the months to construction start.
Step 2: Unit mix and market rents (section 2)
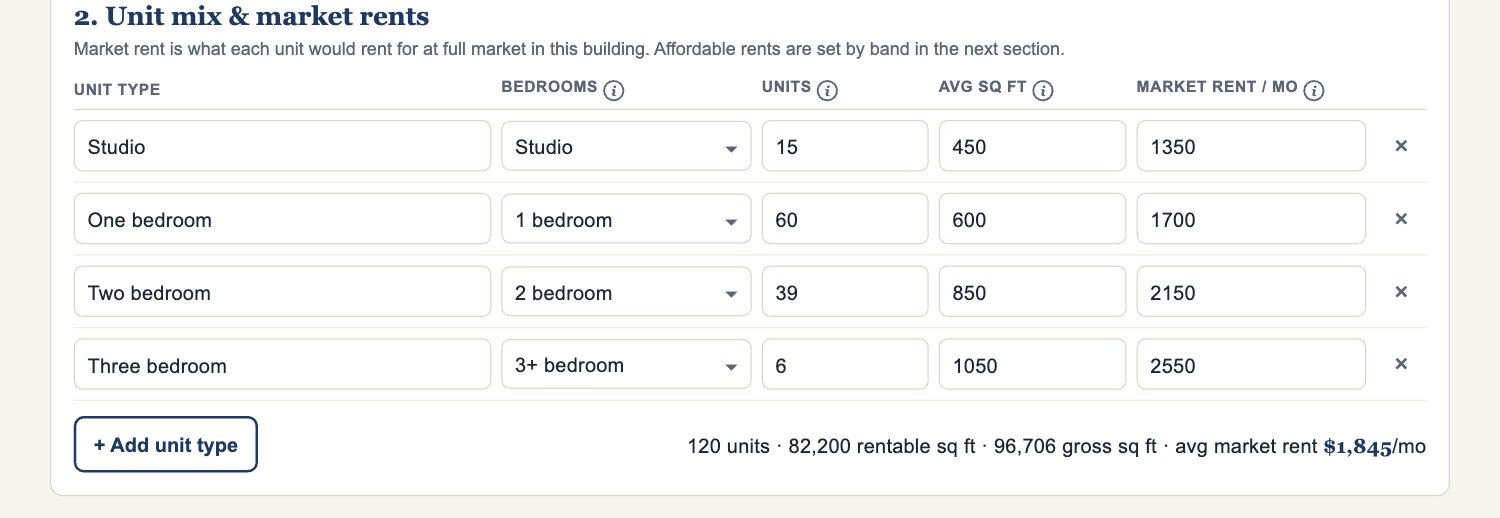
- Edit each row, or select + Add unit type.
- Enter the number of units, average size, and market rent per month.
- Check the summary line for total units and rentable area.
Tip: Market rent is your building's achievable rent. Affordable rents are set in section 3.
Step 3: Rent bands and affordability (section 3)
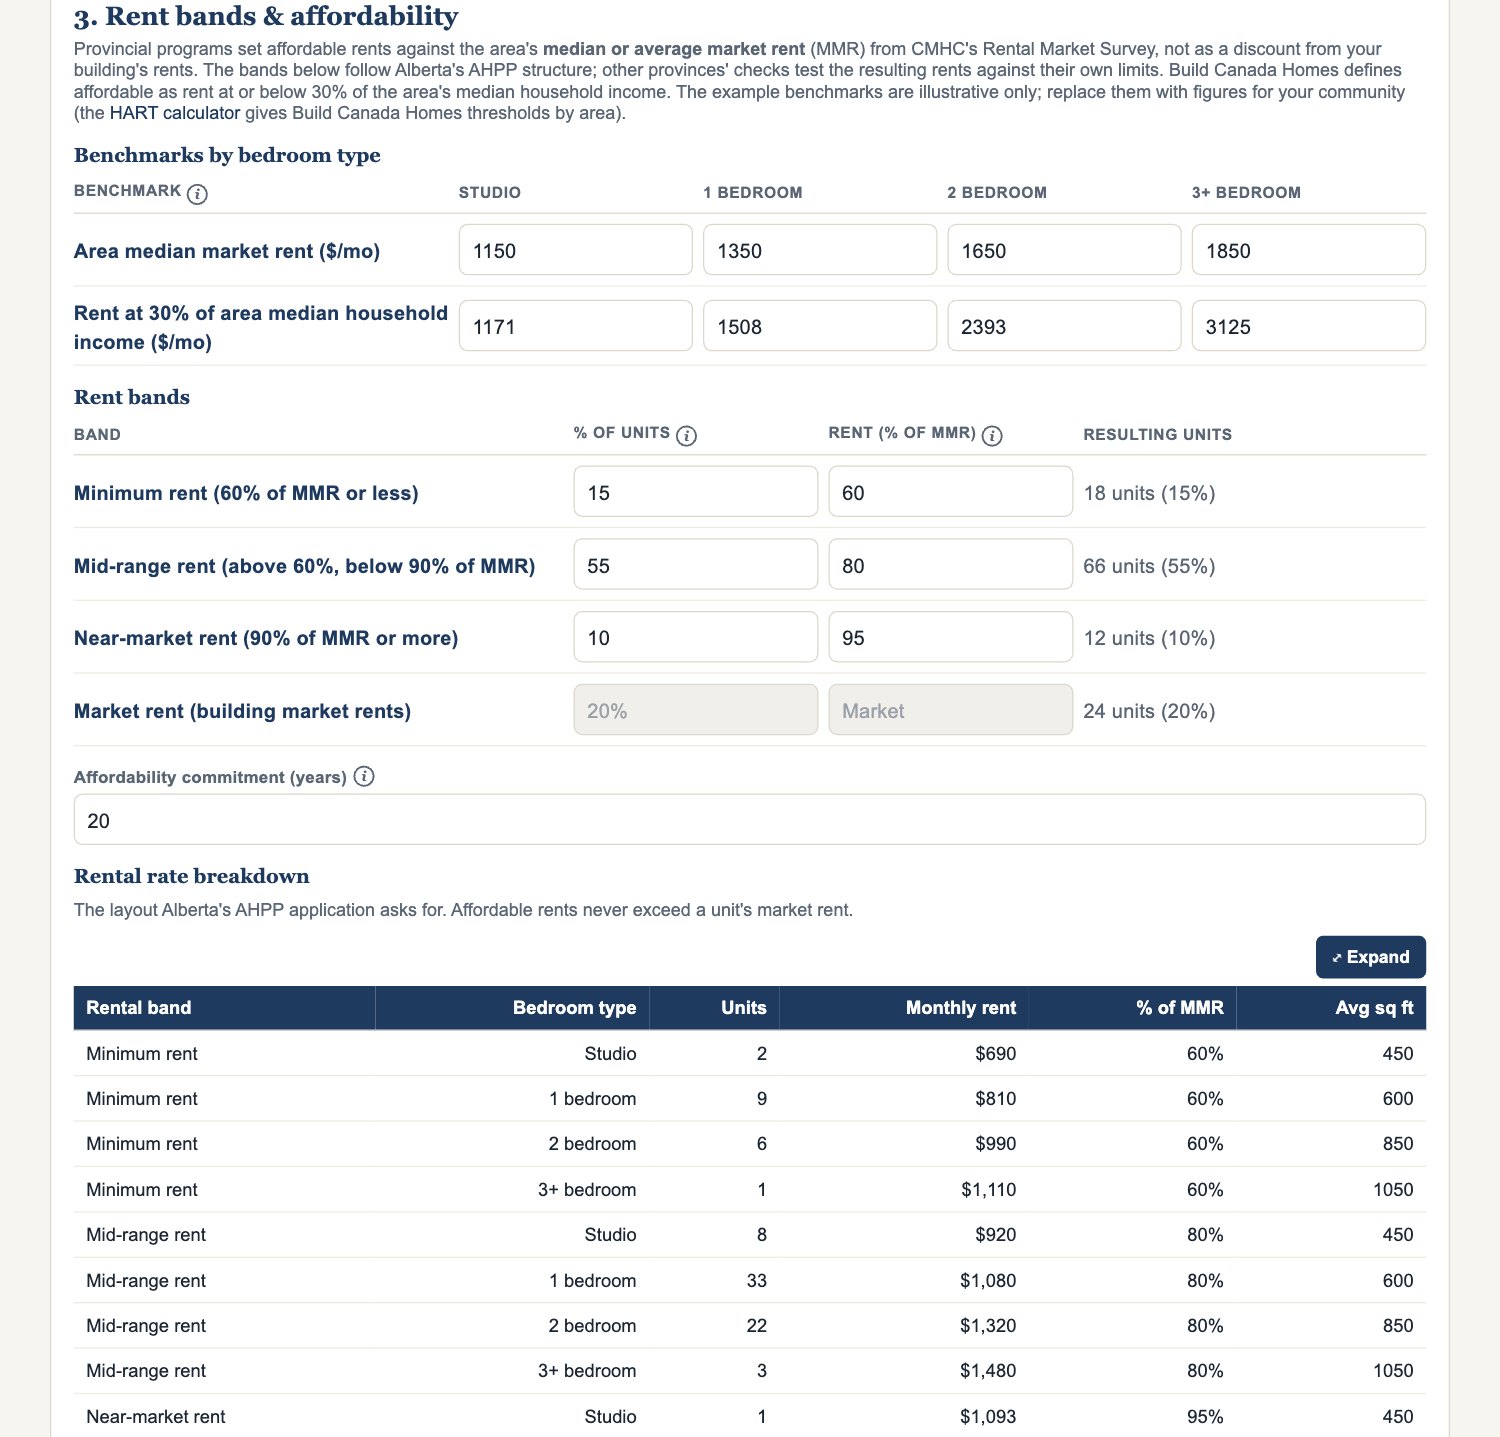
- Enter the area median market rents (MMR) by bedroom count from CMHC's latest Rental Market Survey.
- Assign units to each affordability band.
- Watch for band warnings. They flag rents above program limits.
Tip: Provincial programs measure affordability against area MMR. Build Canada Homes uses 30% of area median household income. The planner tests both.
Step 4: Development costs (section 4)
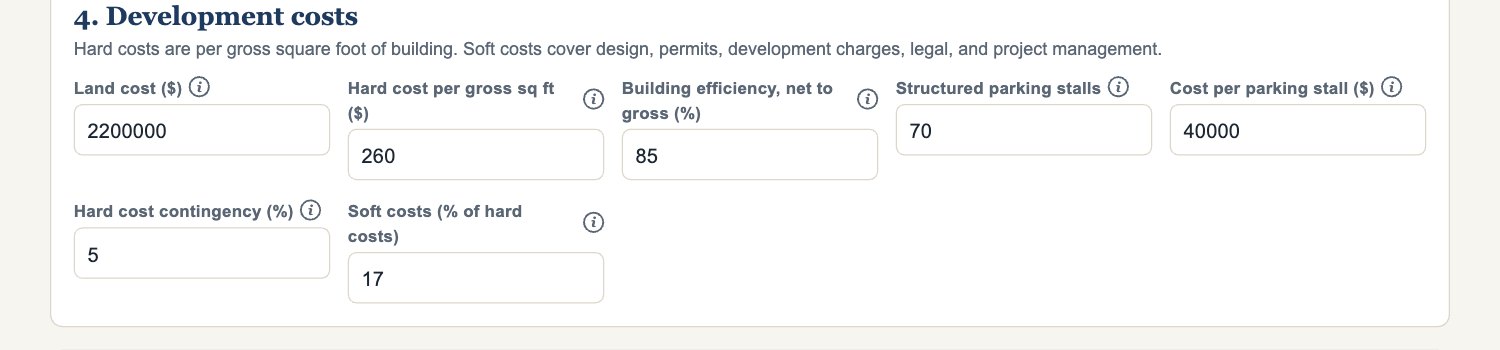
- Enter the land cost.
- Enter the hard cost per gross square foot and the building efficiency.
- Add structured parking stalls and cost per stall, if any.
- Set contingency and soft costs as a percentage. Soft costs are typically 15% to 25% of hard costs.
Step 5: Construction financing (section 5)
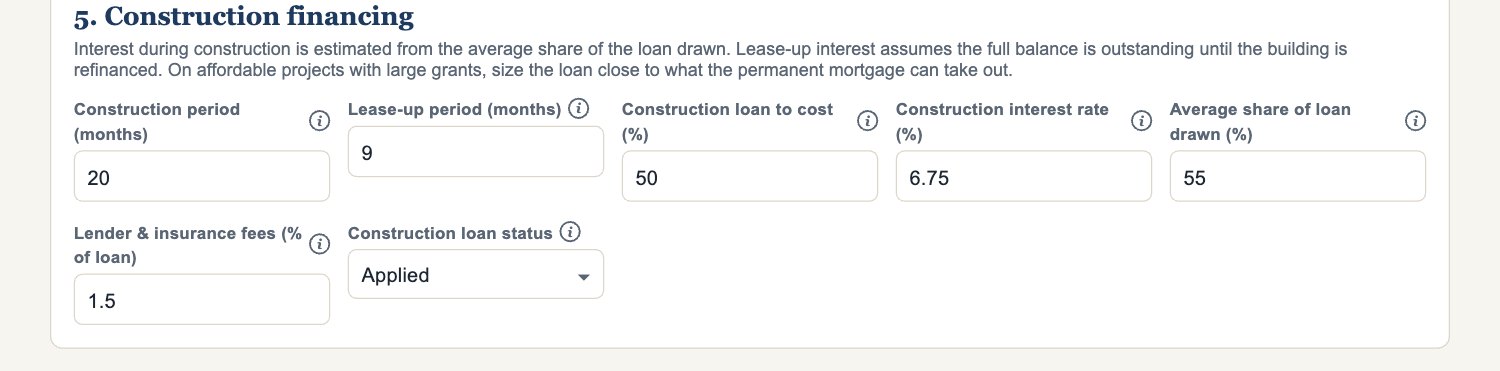
- Set loan-to-cost, construction rate, average draw, and lender fee.
- Record the loan's status: confirmed, applied, or planned.
Step 6: Capital stack (section 6)
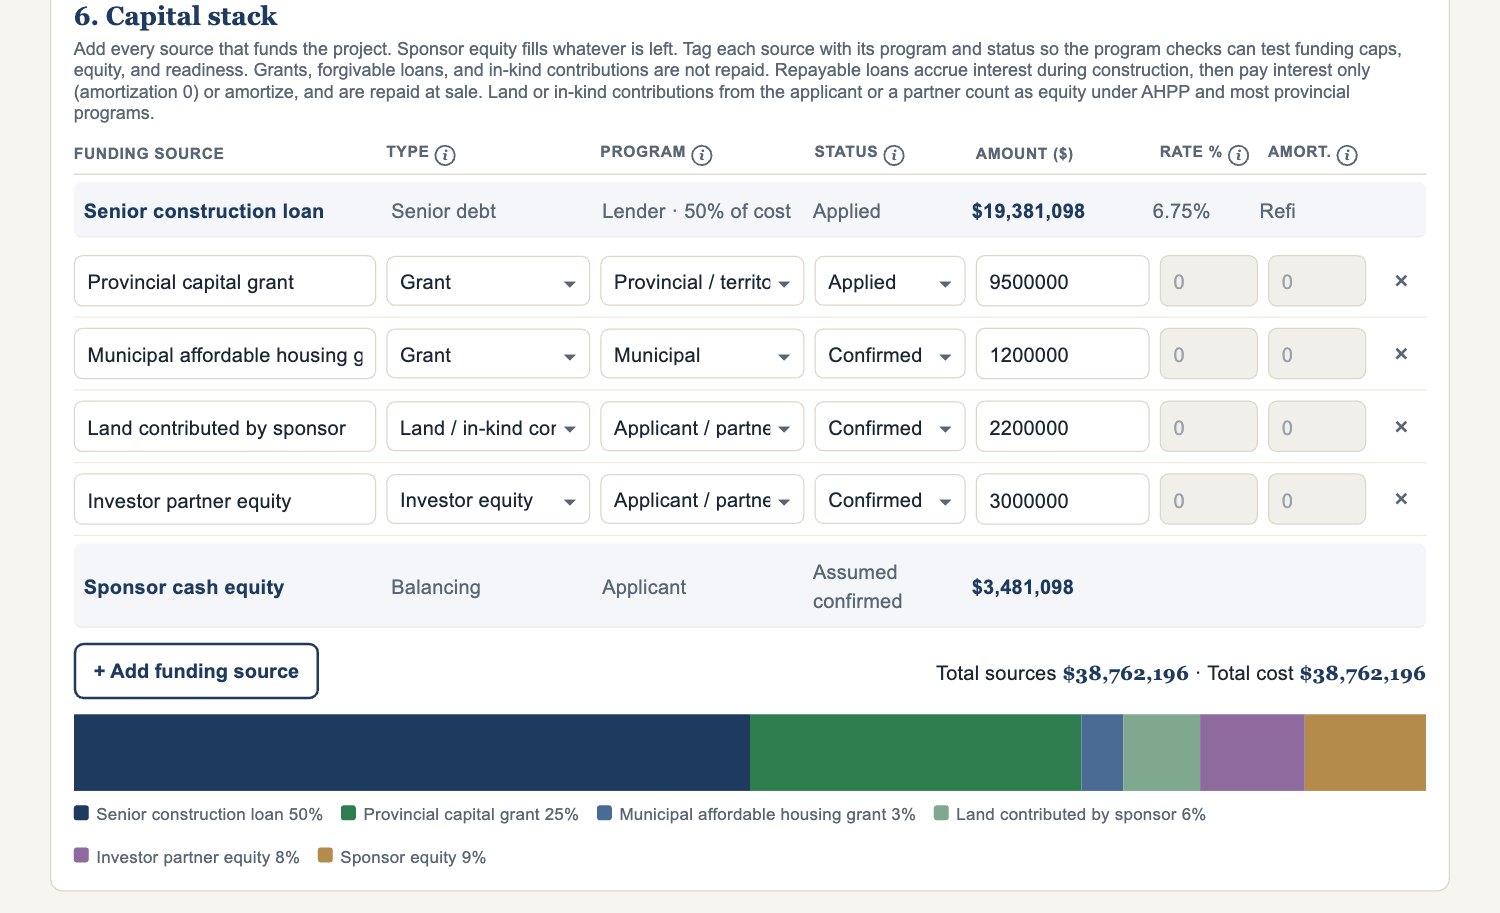
- Select + Add source for each grant, forgivable loan, repayable loan, in-kind contribution, or investor equity.
- Tag each with its program (provincial, Build Canada Homes, CMHC, municipal, applicant) and status. The program checks use these tags.
- Check the bar and legend. The sponsor equity line is the gap you still need to fill.
Step 7: Operations (section 7)
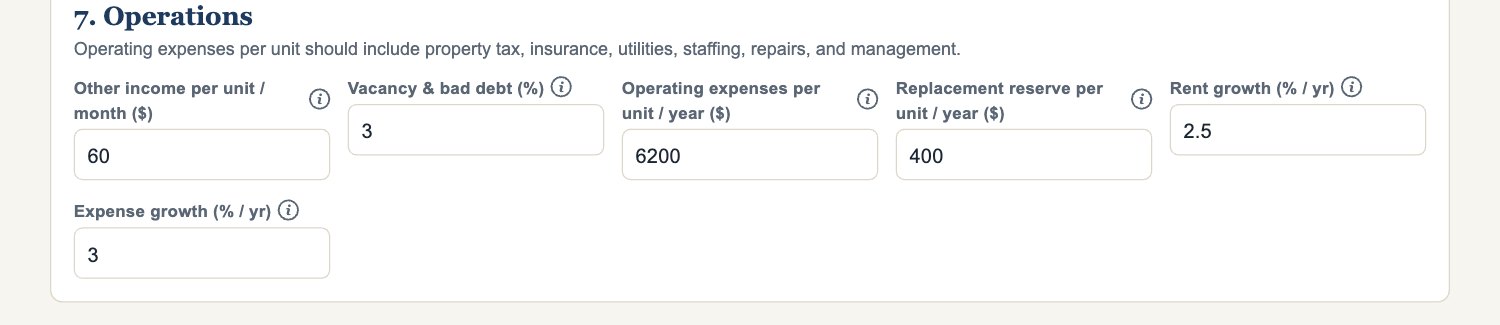
- Enter other income (parking, laundry, storage).
- Set vacancy and bad debt.
- Enter operating expenses per unit per year and the reserve contribution.
- Set rent and expense growth.
Step 8: Permanent financing and exit (section 8)
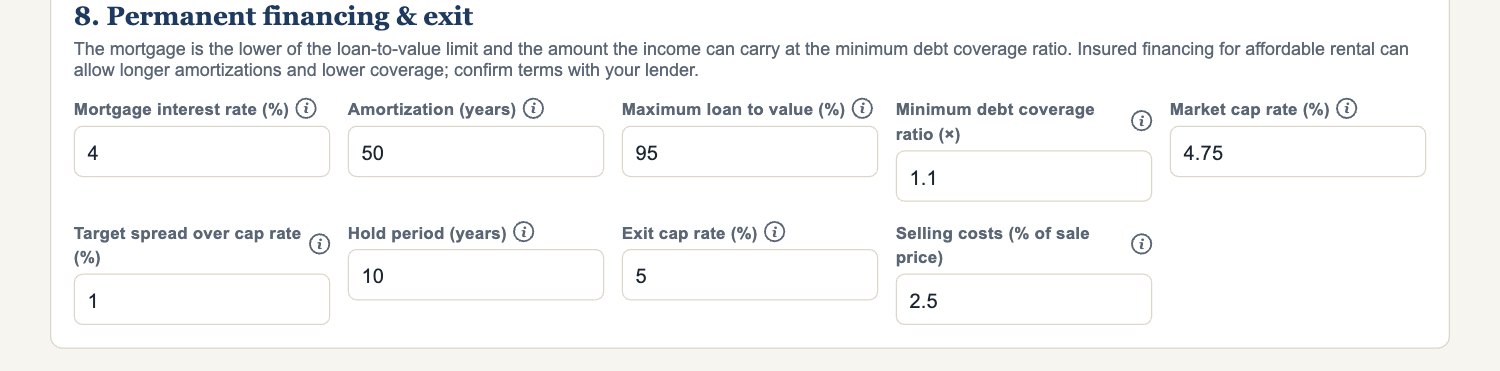
- Enter the mortgage rate, amortization, loan-to-value limit, and minimum debt coverage ratio.
- Enter the market cap rate and your target spread.
- Set the hold period, exit cap rate, and selling costs.
Tip: The mortgage is the lower of the loan-to-value limit and what the income can carry at the minimum coverage.
Step 9: Read the results (section 9)
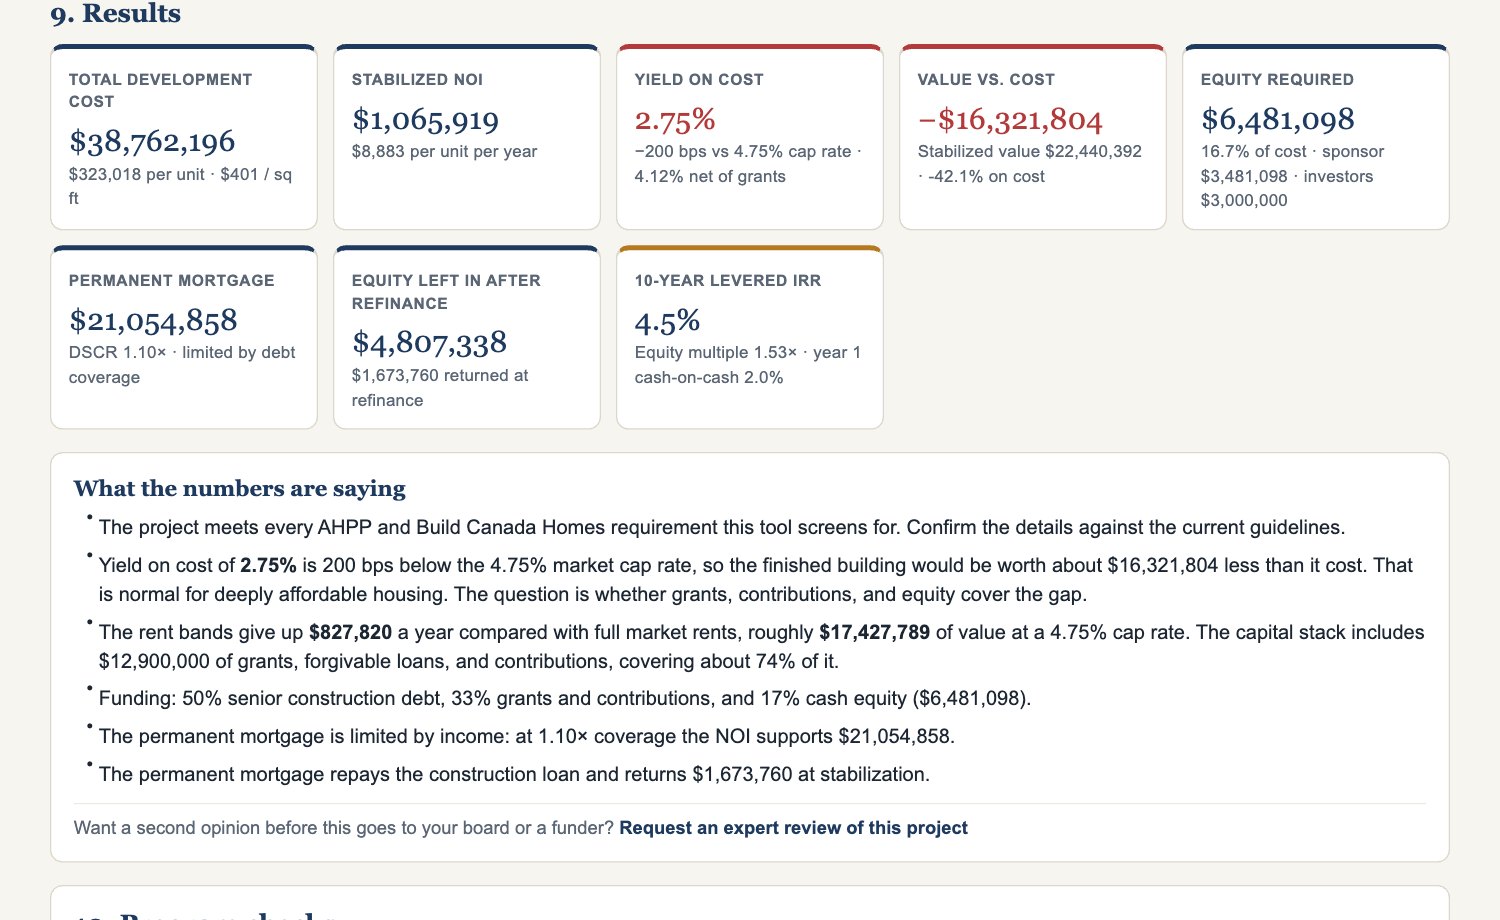
- Read the summary panel first. It names the issues a funder or lender will raise.
- Review total cost, cost per unit, the funding gap, yield on cost, debt coverage, and returns.
- Scroll on for the development budget, sources of funds, the yield-on-cost sensitivity table, and stabilized operations.
Large funding gap? Look first at the capital stack and rent bands, then at costs.
Step 10: Program checks (section 10)
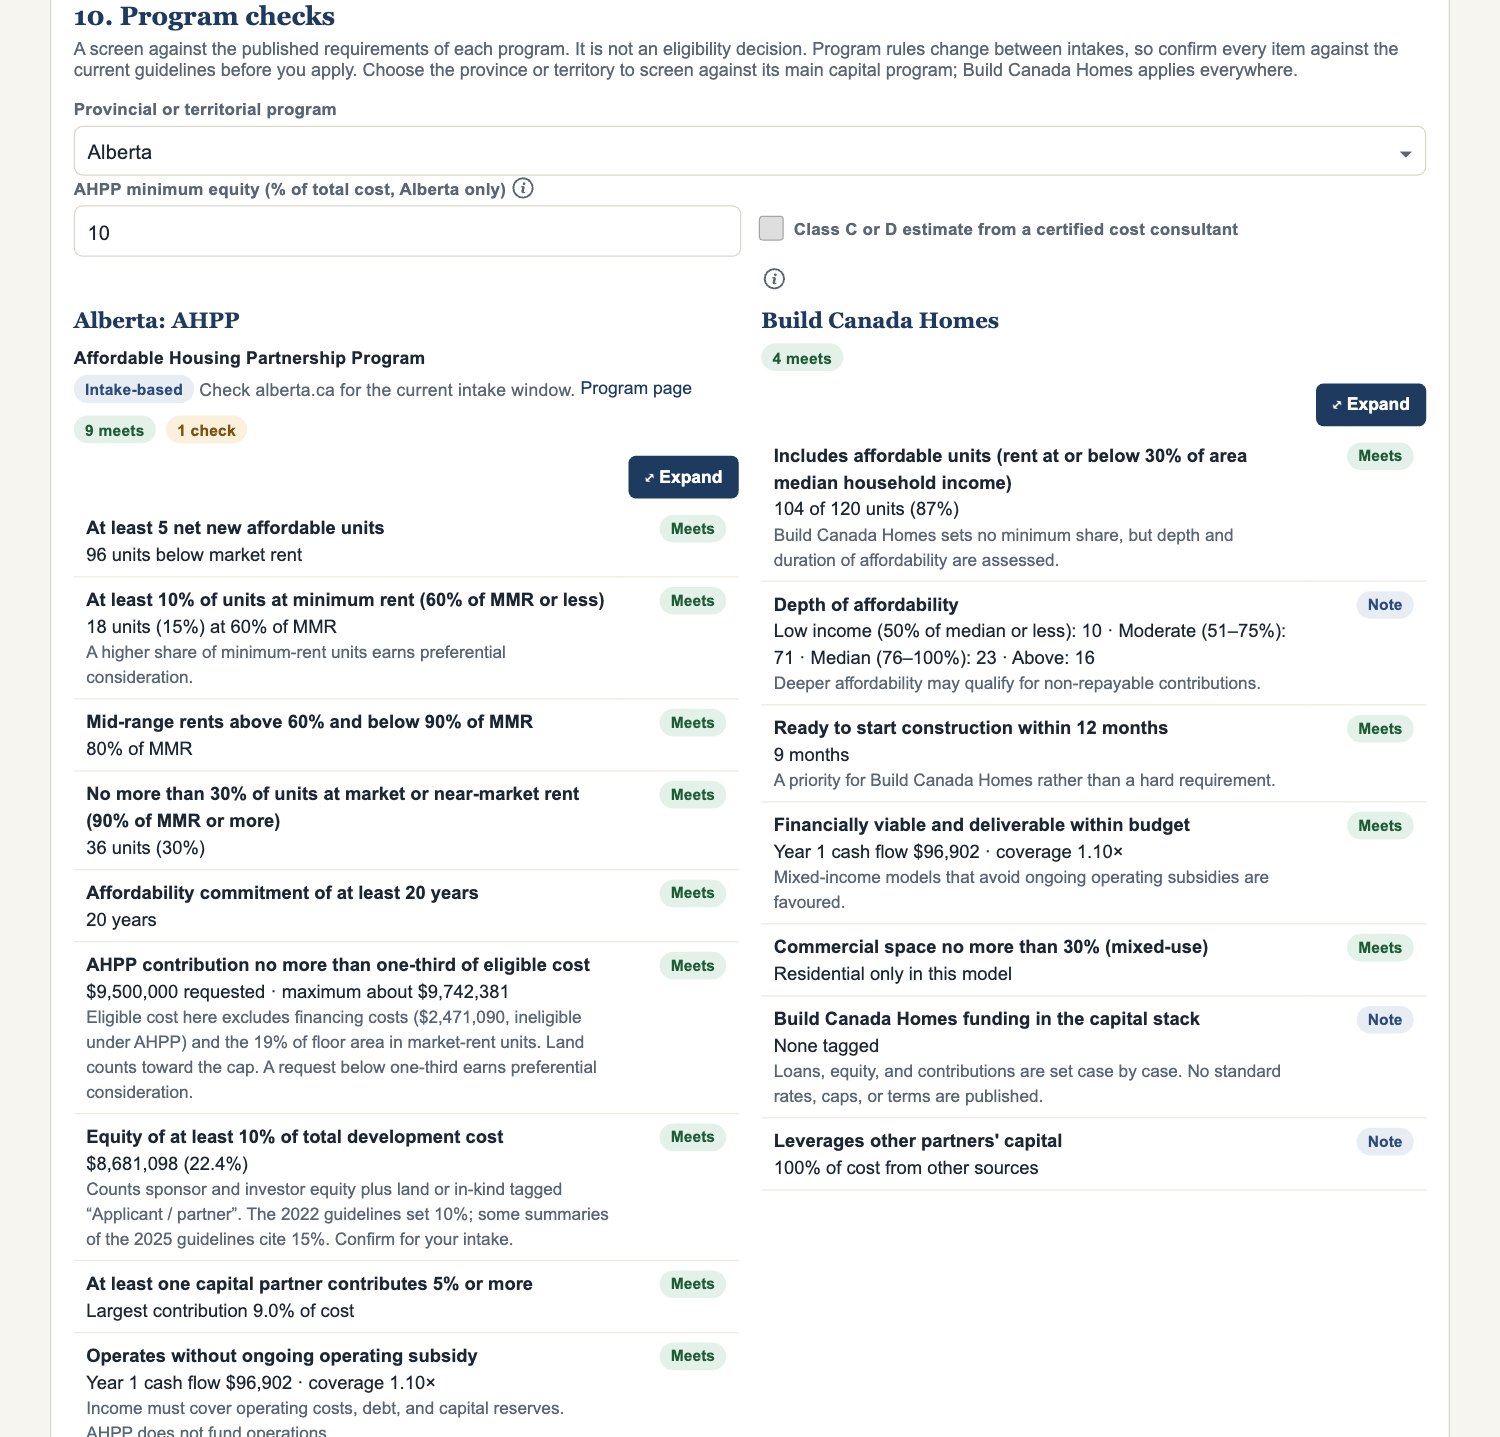
- Choose the province or territory to screen against. Build Canada Homes applies everywhere.
- Read each check (pass, fail, or unclear) and its reason.
- Fix fails by changing the relevant section, then recheck.
Tip: This is a screen, not an eligibility decision. Confirm each item against the current program guidelines.
Step 11: Board presentation (section 11)
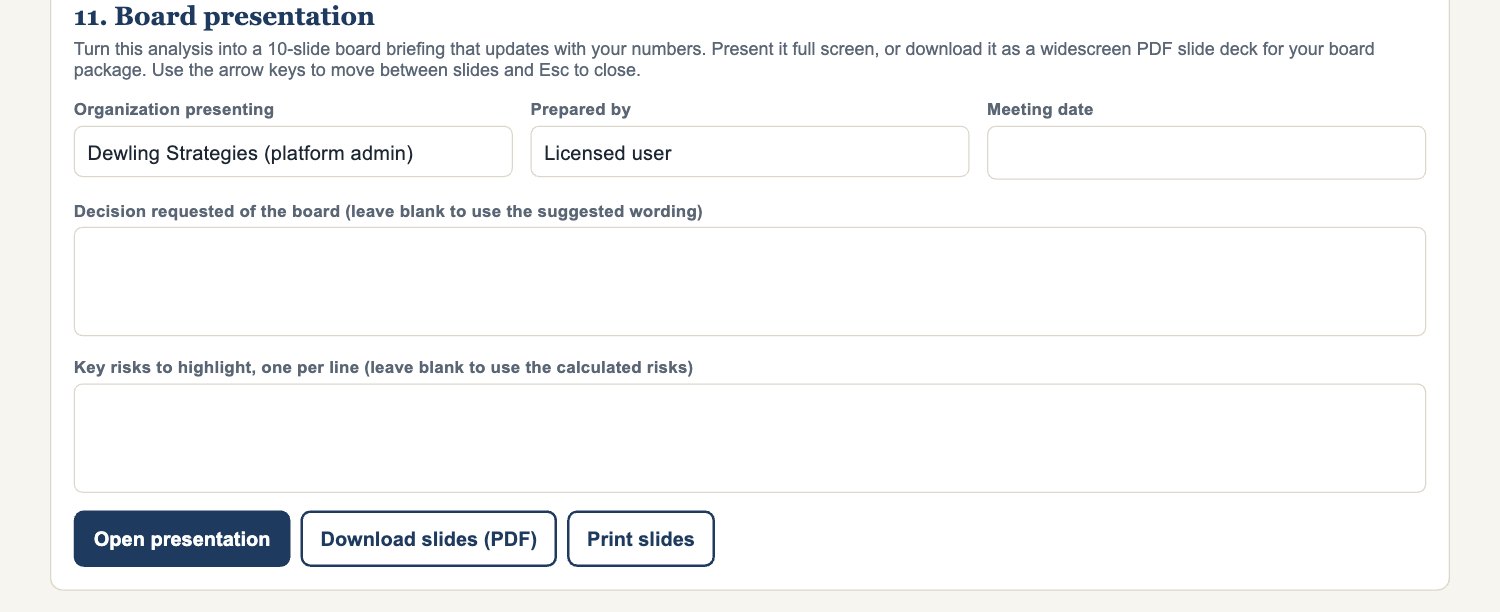
- Fill in the presenter details and the decision you are asking the board for.
- Add the key risks you want the board to weigh.
- Select Open presentation to present full screen, or Download slides (PDF) for the board package.
Step 12: Save and export

- Work saves to your account as you go. Use Save project file for a backup and Download CSV for your records.
- Undo and redo with the curved arrows in the bottom-right corner.
- Reset to example replaces your work with the example. Save a file first.
Works with: CRPF Acquisition, Portfolio Asset Strategy, Funding Stack & Capital.
CRPF Acquisition Planner Pro: step-by-step guide
Test a building against the Canada Rental Protection Fund (CRPF) before you apply to the Canadian Housing Acquisition Fund (CHAF): organization pre-qualification, property eligibility, the 40% affordability screen, the CRPF request, and the year-10 refinance. Available in English and French.
Time to set up: about an hour per building.
Have on hand: the broker's listing and rent roll, the seller's operating statements, your lender's terms, and the purchase agreement dates.
New to CRPF? Start with the free CRPF Eligibility Screen. It checks in a few minutes whether a building could qualify.
Before you start
- Sign in and select CRPF Acquisition Planner Pro on your account page.
- The planner opens with a fictitious example: Kestrel Valley Housing Society buying Larkspur Court in Red Deer, Alberta. Select Start a blank acquisition when you are ready for your own building.
- Use the language buttons at the top to switch between English and French at any time.
- On a team plan, select Start editing before you make changes and Done editing when you finish.
Step 1: Your organization and Stage 1 pre-qualification
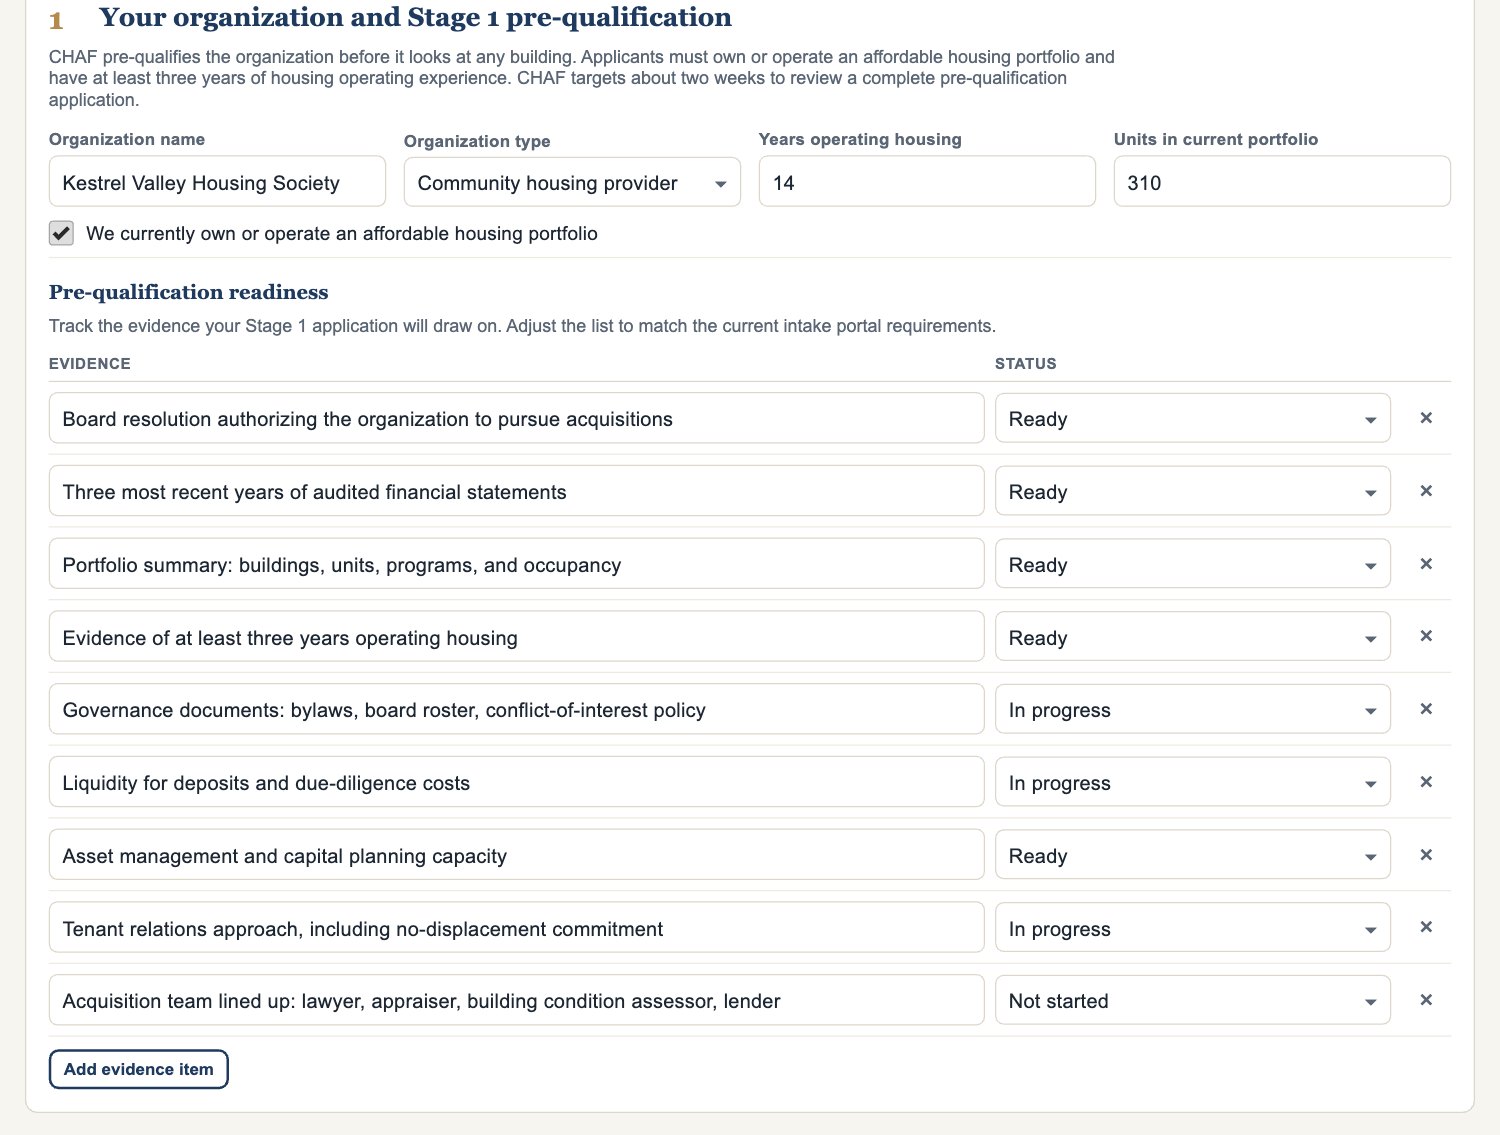
- Enter your organization type, portfolio size, and years of housing operating experience. CHAF requires an affordable housing portfolio and at least three years of operating experience.
- Track the evidence your Stage 1 application will draw on in the readiness list.
Tip: CHAF aims to review a complete pre-qualification in about two weeks. Pre-qualify before you need to move on a building.
Step 2: The property
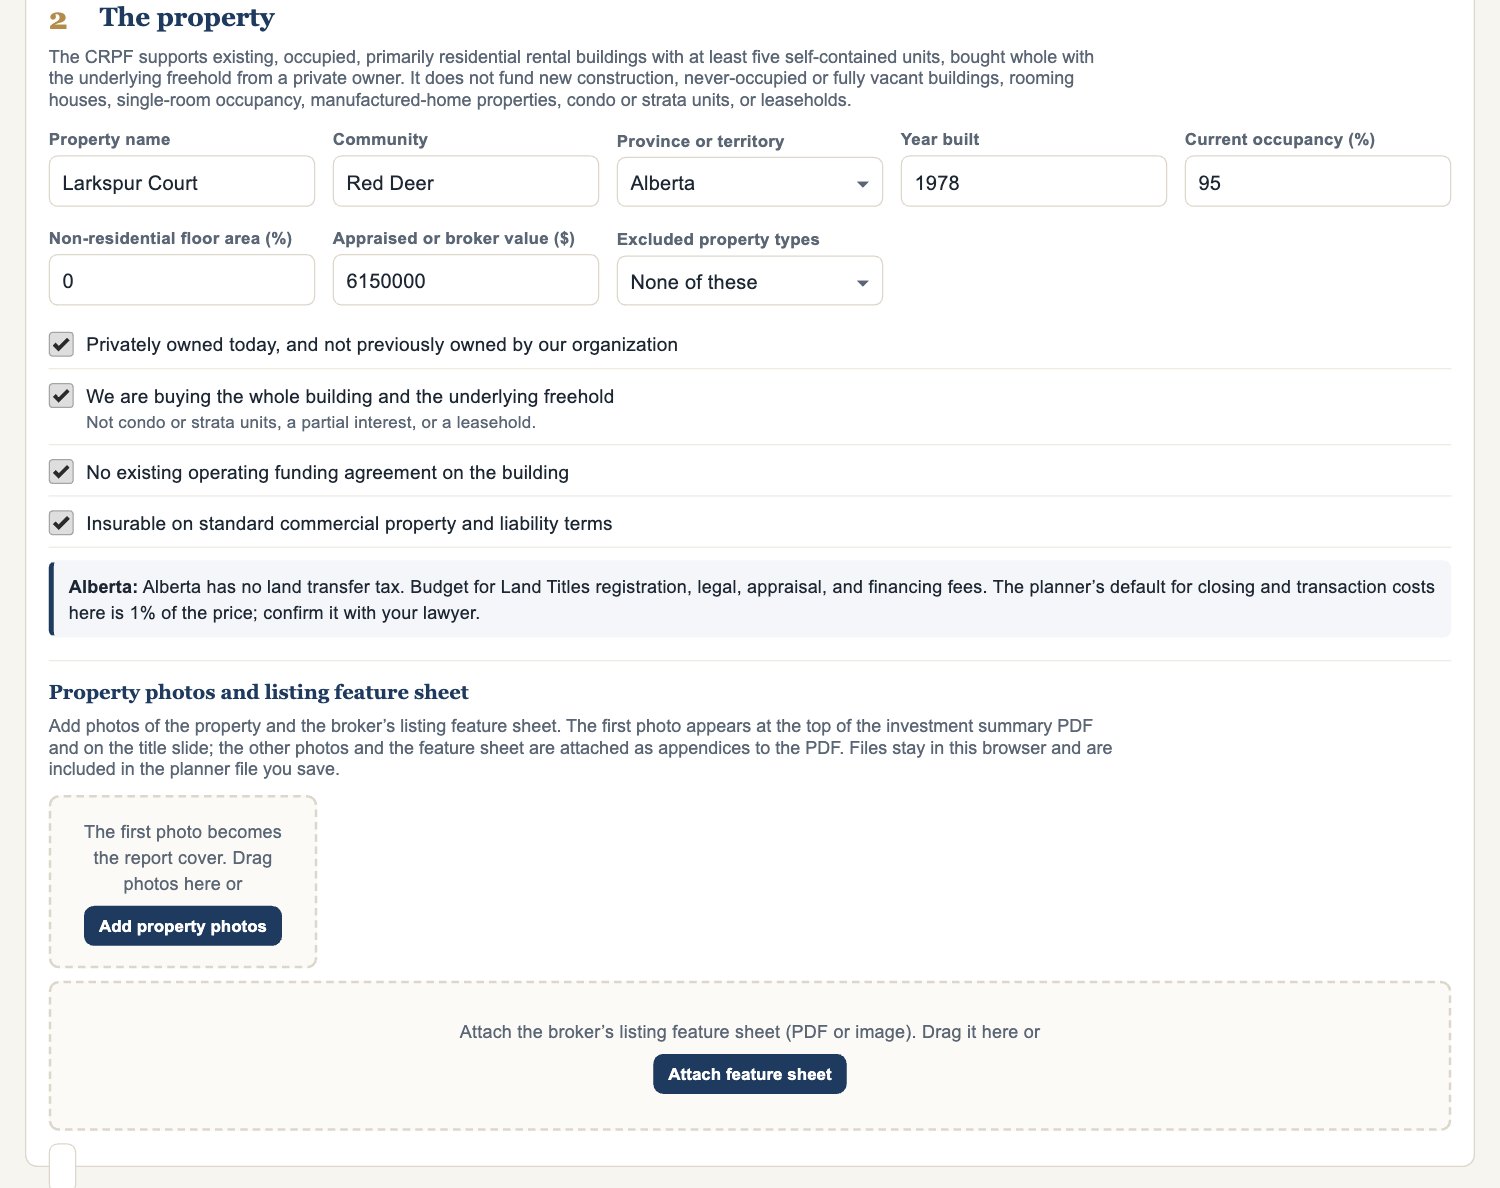
- Enter the address, province, number of units, and building details.
- Add up to six photos (the first is the cover) and the listing feature sheet. They appear in the PDF and the presentation.
Eligible: existing, occupied, primarily residential rental buildings with at least five self-contained units, bought whole with the freehold from a private owner. Not eligible: new construction, vacant buildings, rooming houses, condo units, or leaseholds.
Step 3: Rent roll and affordability
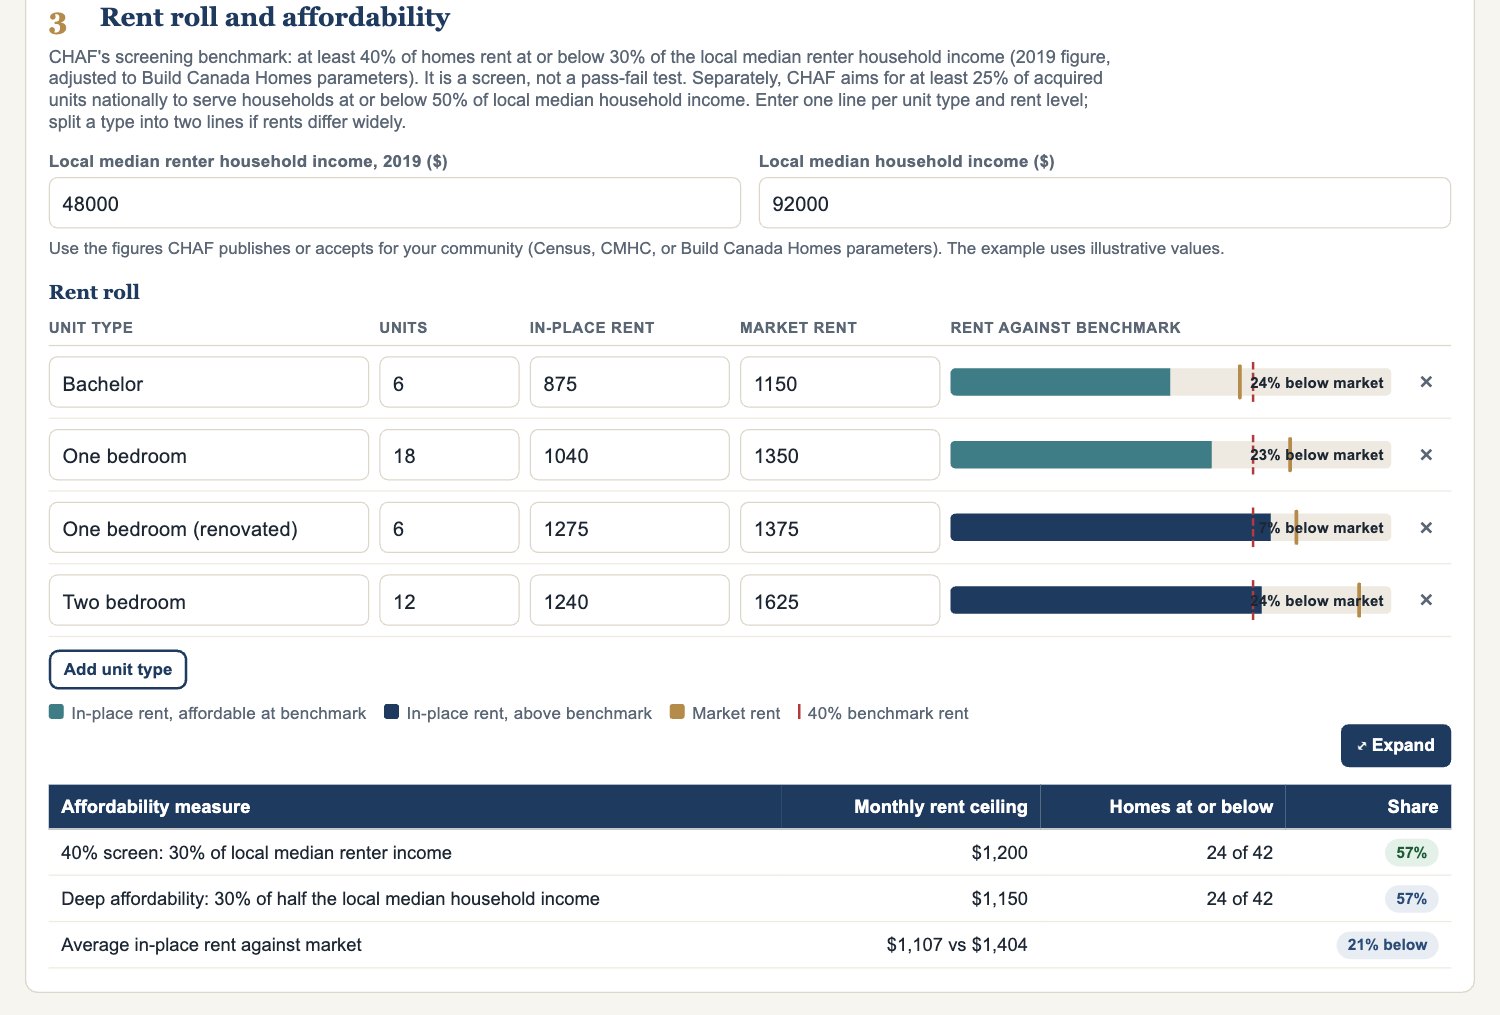
- Enter the local median renter household income.
- Enter one line per unit type and rent level: count, current rent, and any planned changes.
- Check the result below the table: at least 40% of homes should rent at or below 30% of the local median renter income.
Tip: The 40% figure is a screen, not a pass-fail test.
Step 4: Operating budget
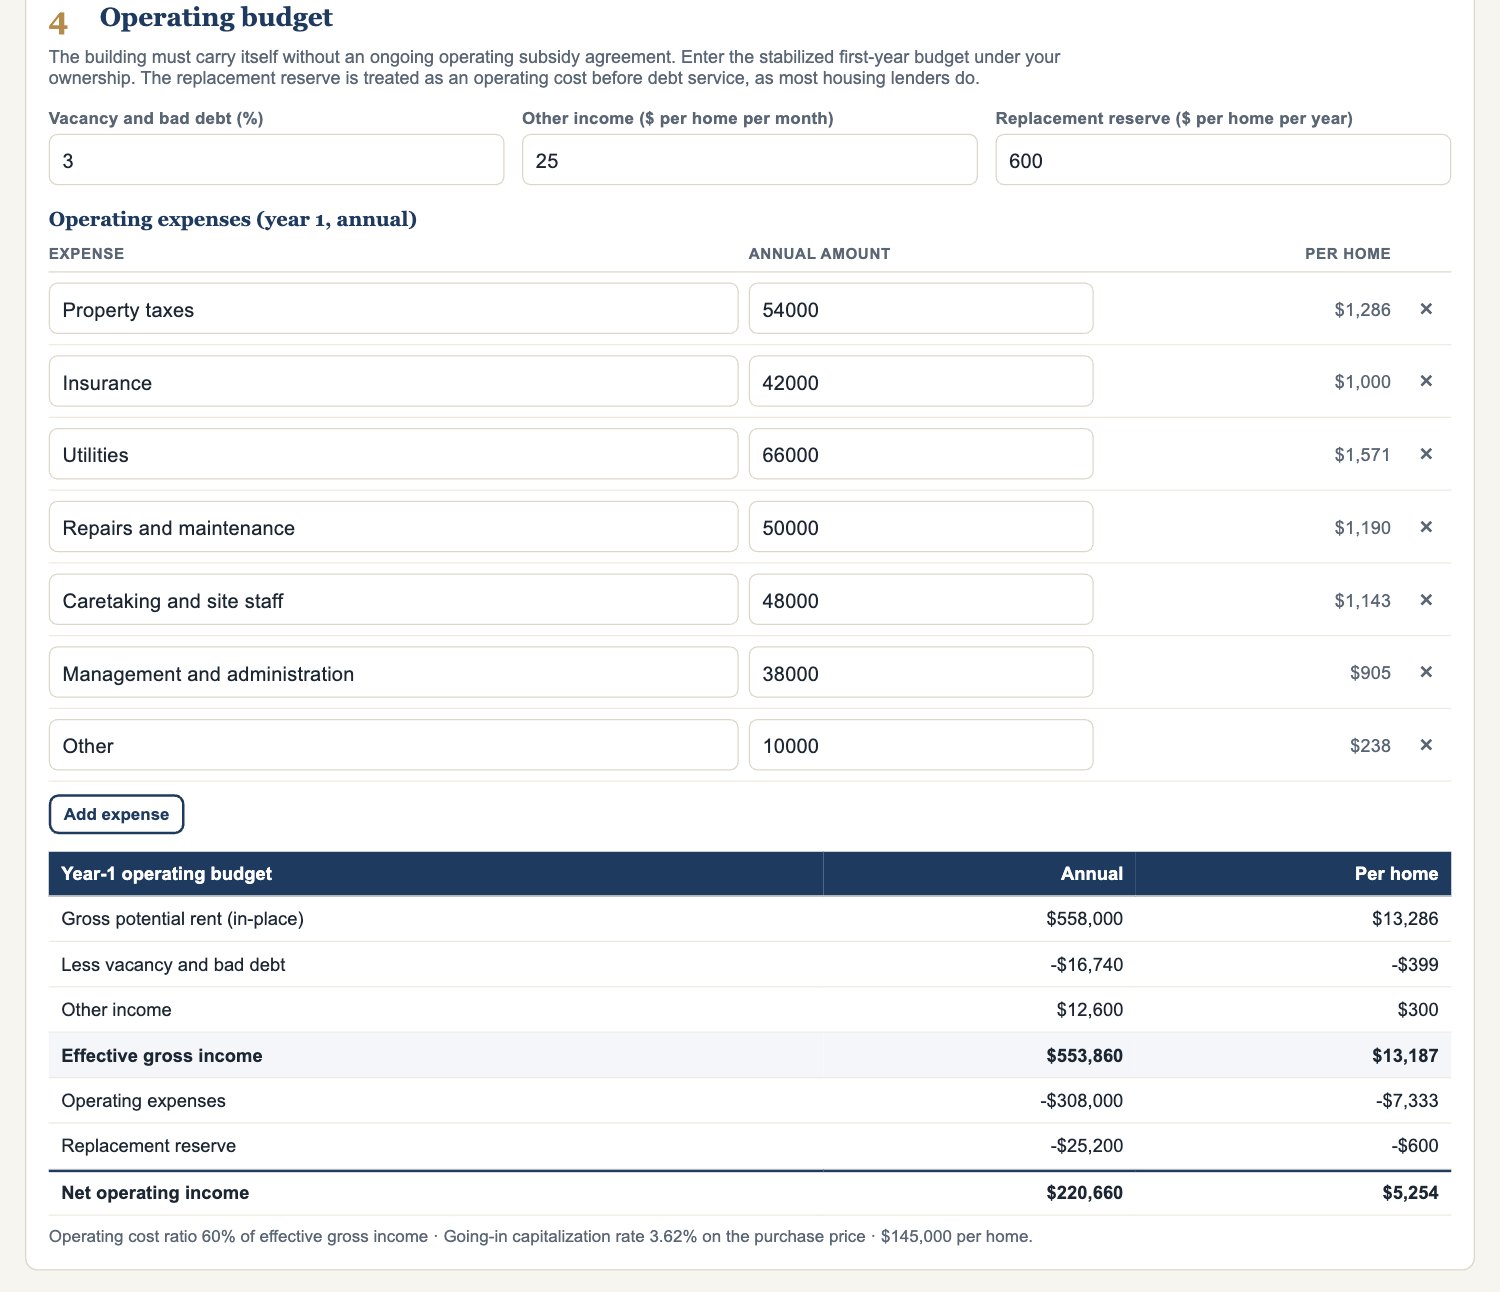
- Enter other income and vacancy.
- Enter annual operating expenses line by line, including the replacement reserve. The building must carry itself without an ongoing operating subsidy.
Step 5: Sources and uses, and the CRPF request
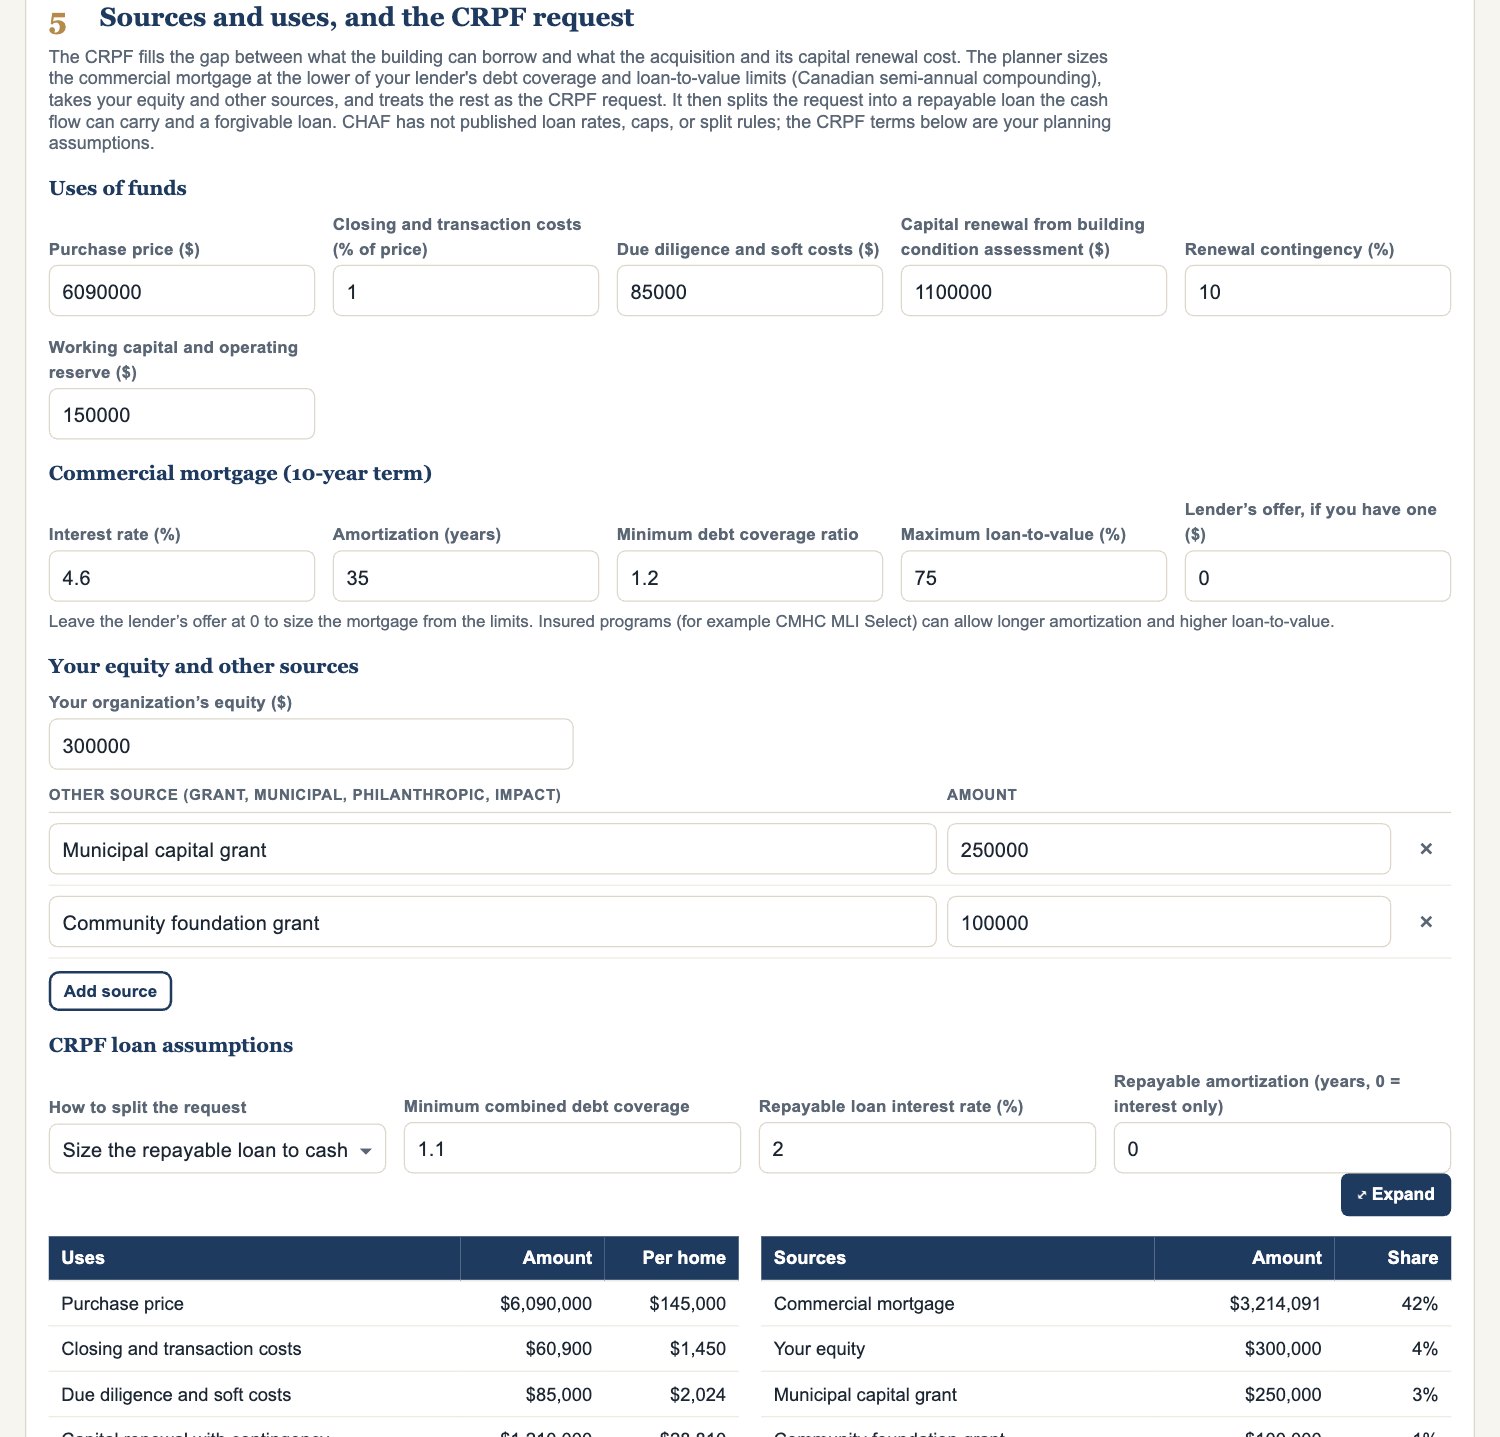
- Enter the purchase price, closing costs, and capital renewal.
- Enter your lender's rate, amortization, debt coverage, and loan-to-value limits.
- Add your equity and any other sources. The rest becomes the CRPF request, split into repayable and forgivable loans.
Step 6: Ten-year projection and the year-10 refinance
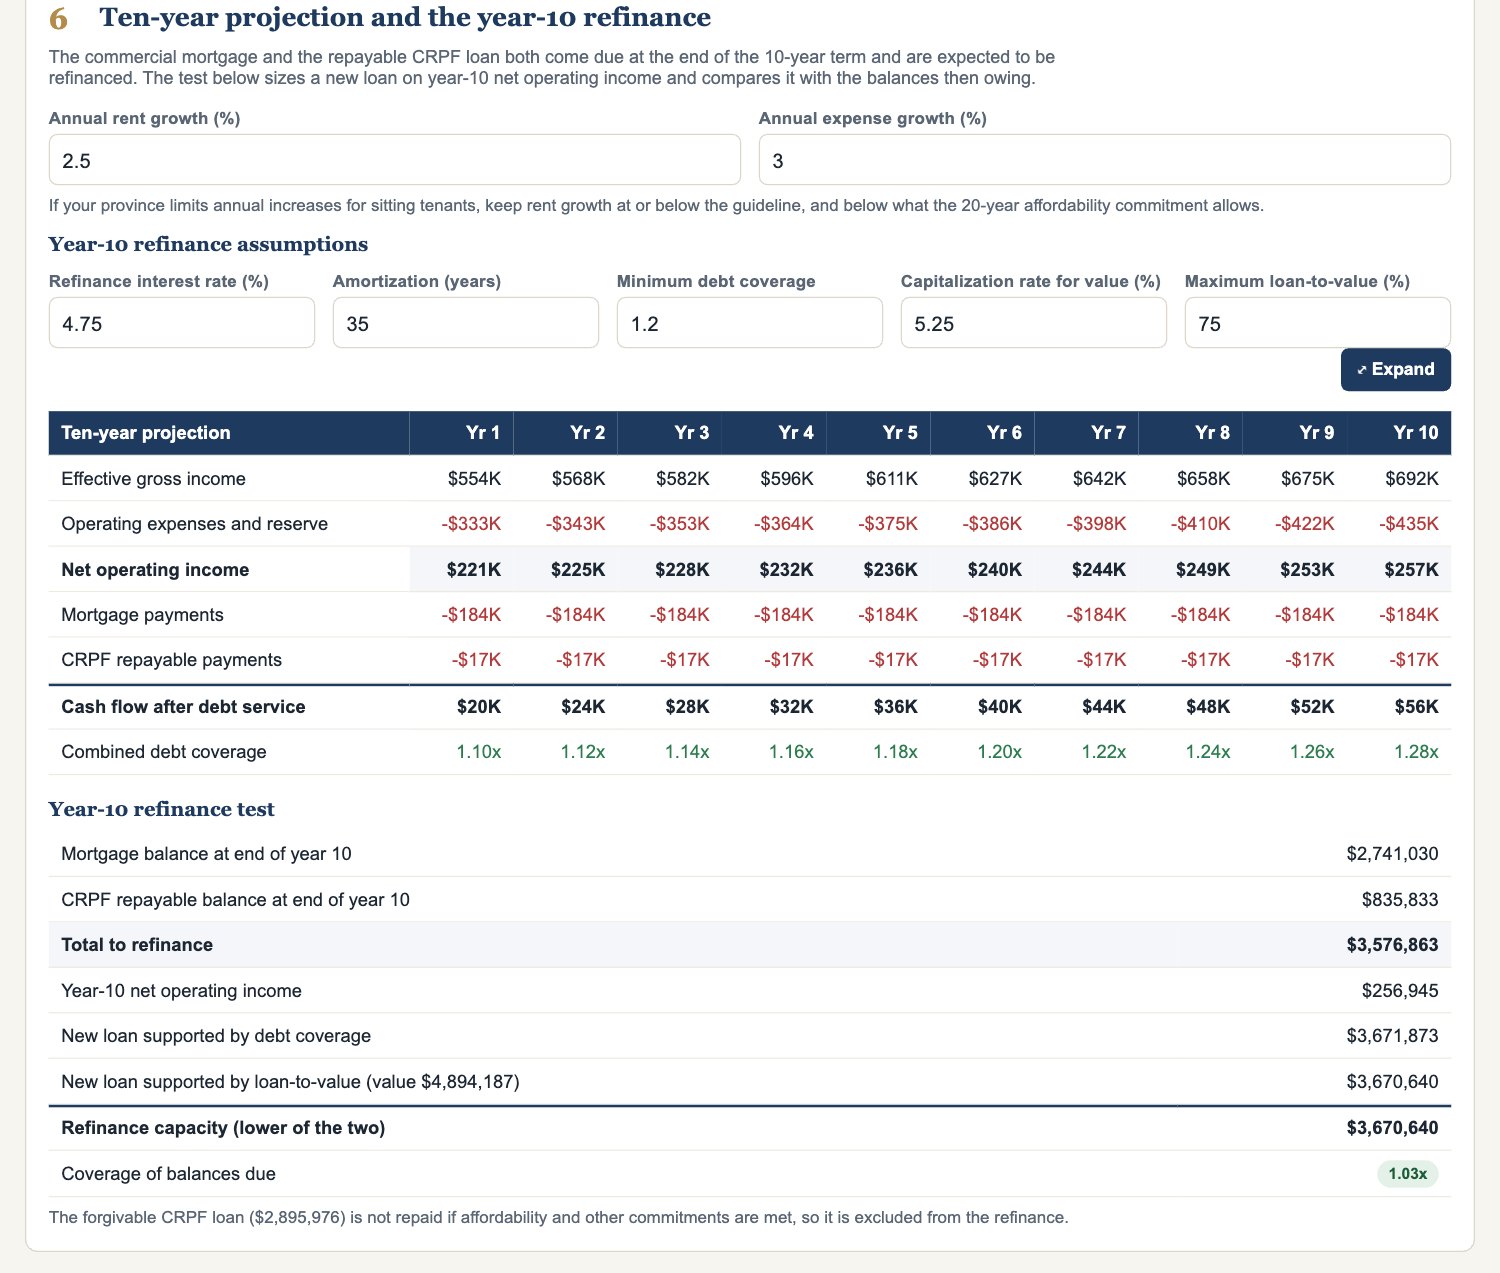
- Set rent and expense growth.
- Set the refinance rate, amortization, and coverage.
- Check whether a new loan sized on year-10 income covers what is owing on the mortgage and the repayable CRPF loan.
Tip: A refinance shortfall is the most common reason an acquisition that works today struggles later.
Step 7: Sensitivity
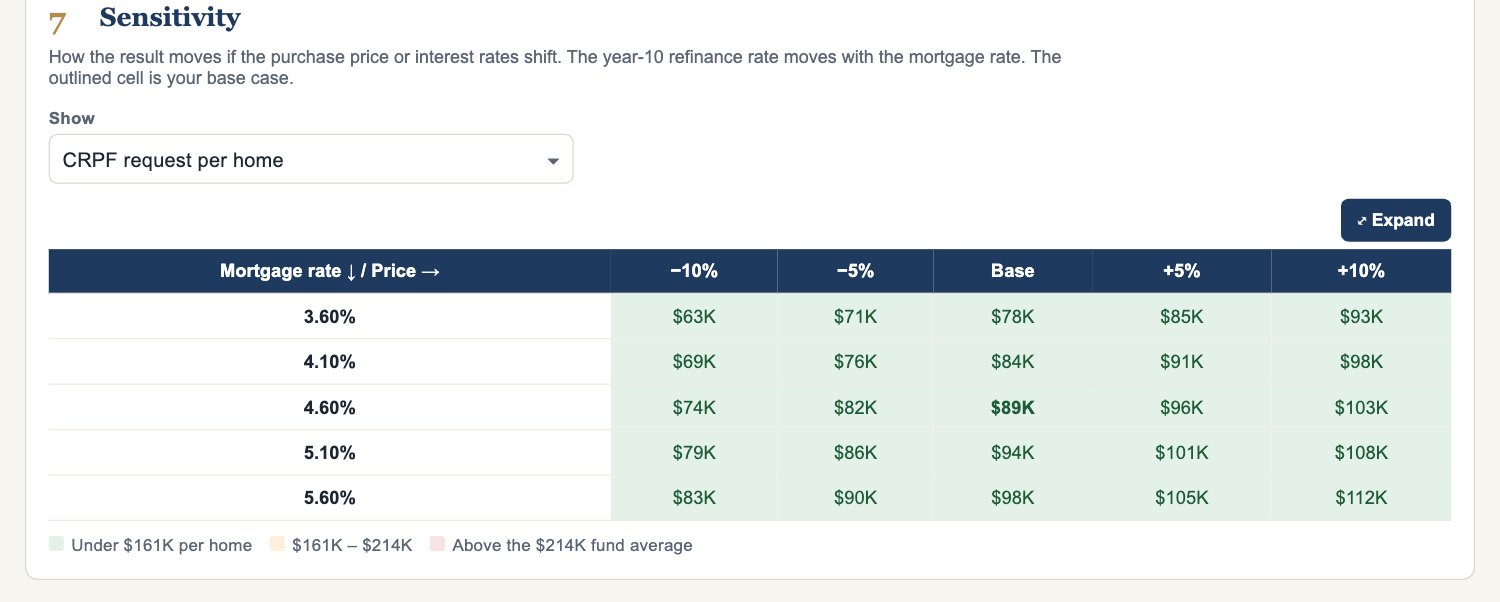
Choose what to show (CRPF request per home, year-10 refinance coverage, or year-1 combined debt coverage) and see how it moves if the price or rates shift. The outlined cell is your base case.
Step 8: CHAF evaluation factors
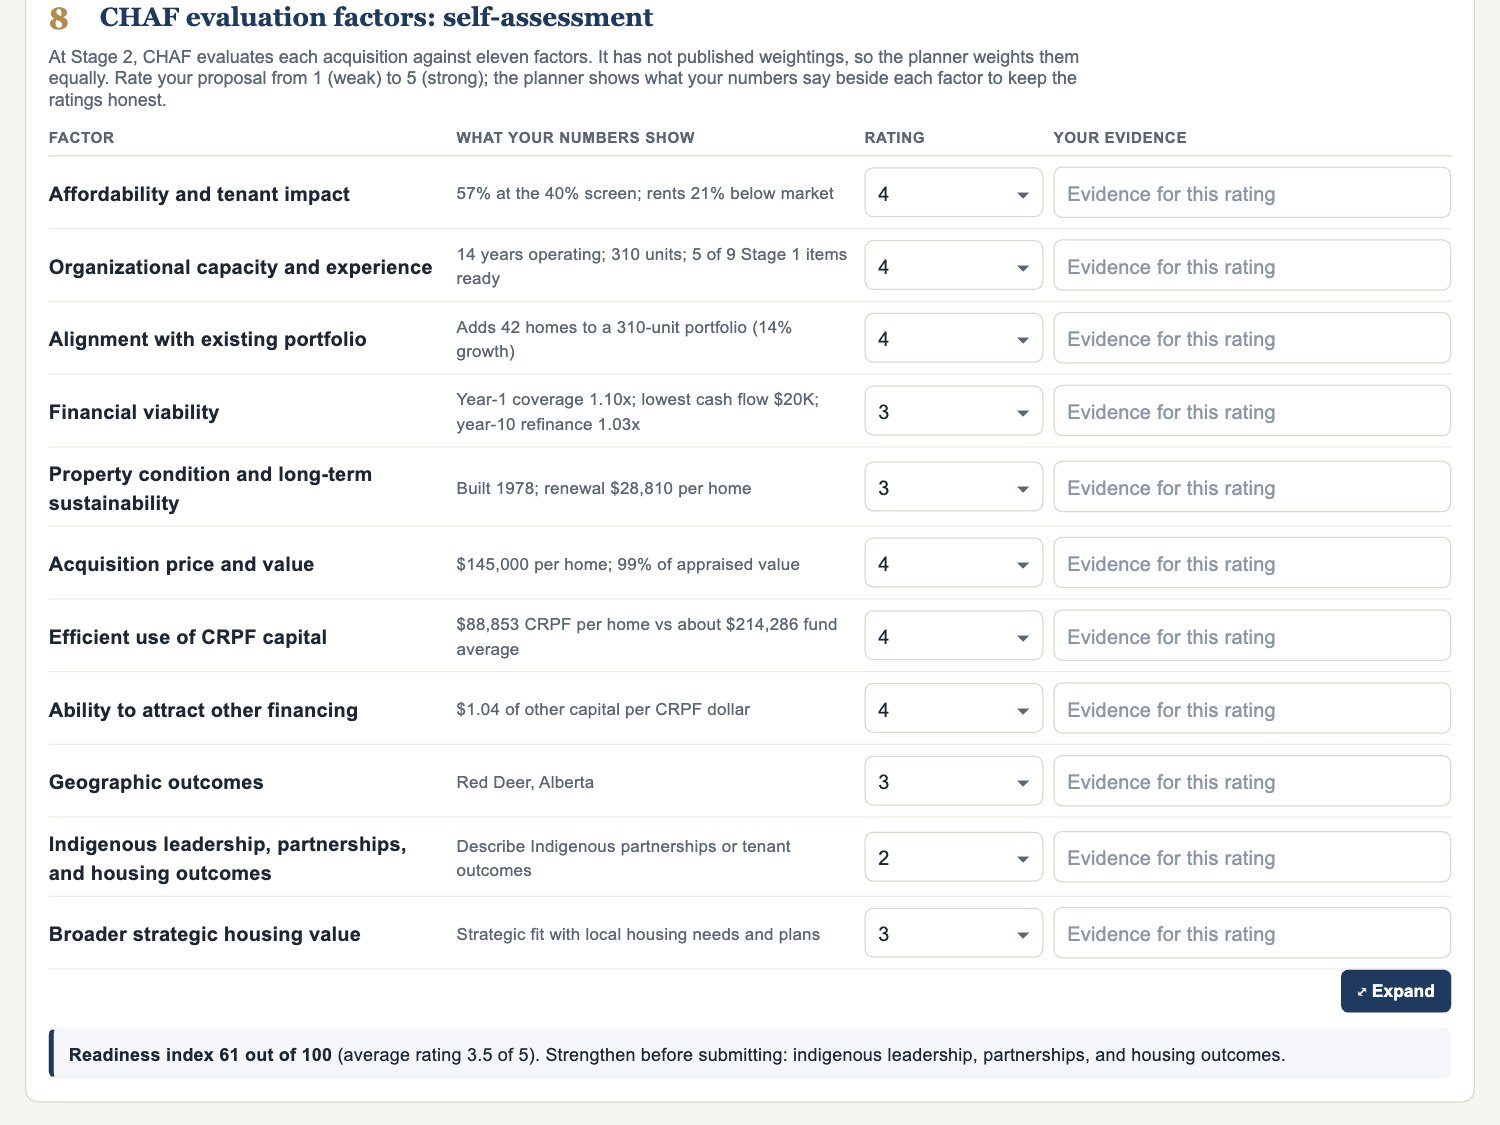
Rate your proposal from 1 (weak) to 5 (strong) on each of CHAF's eleven Stage 2 factors. The planner shows what your numbers say beside each. Let the numbers keep the ratings honest.
Step 9: Intake timeline
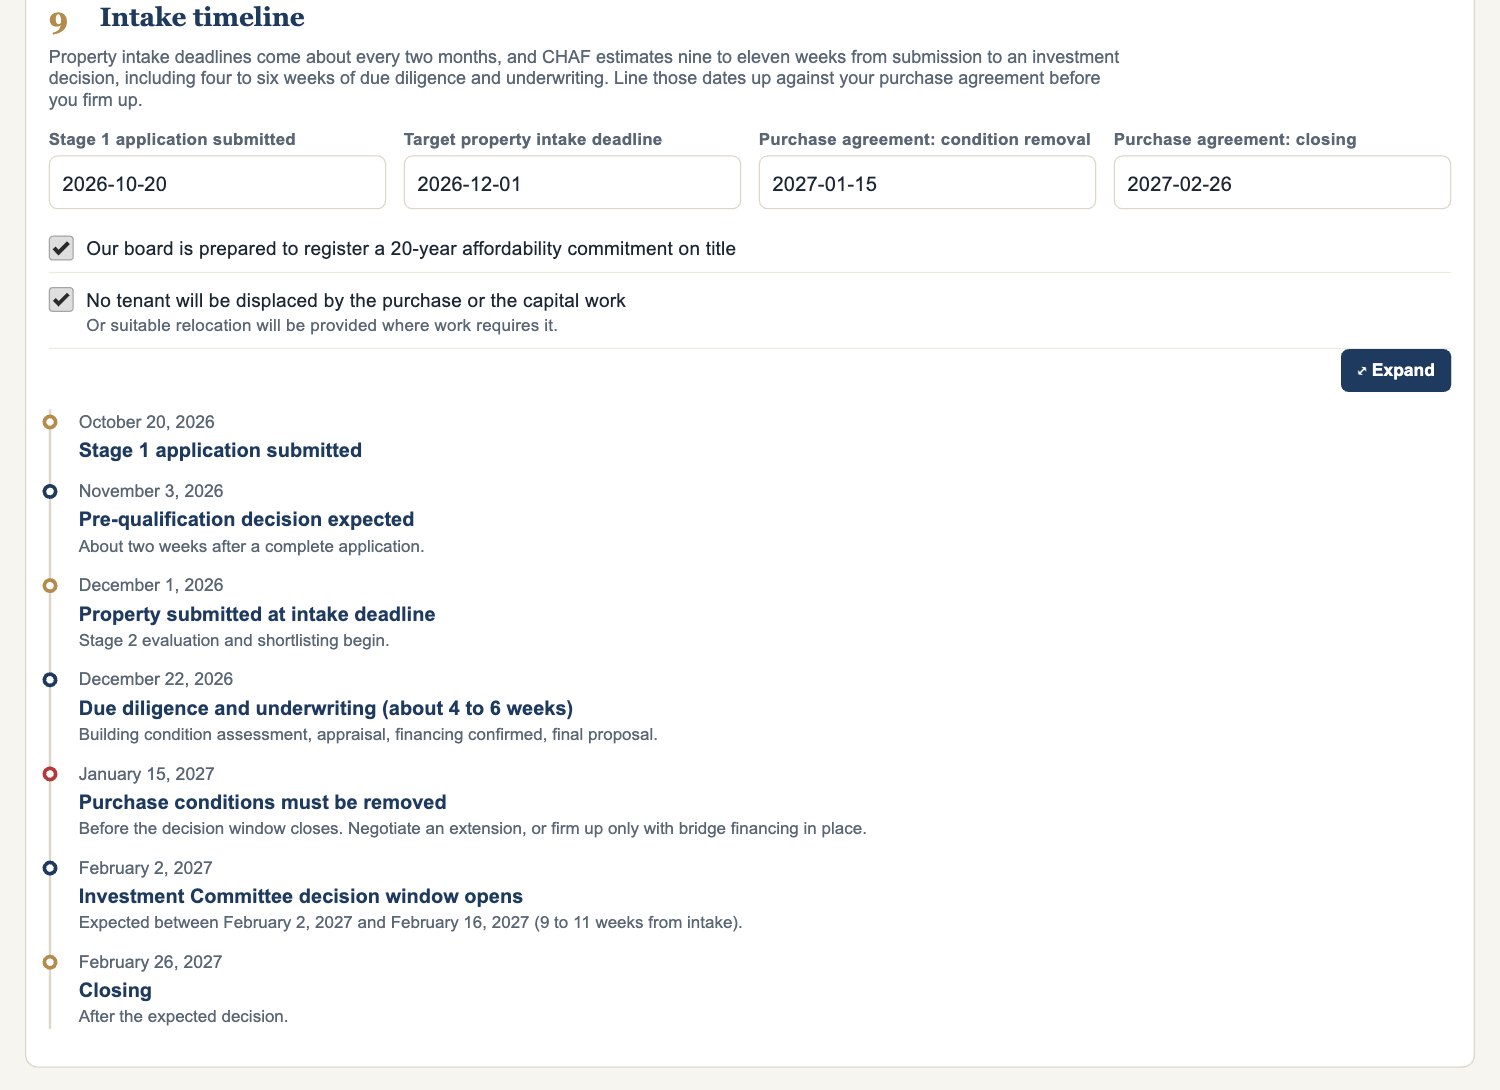
- Enter your offer date, conditions deadline, and closing date.
- Check whether CHAF's decision lands before your conditions expire. CHAF estimates nine to eleven weeks from submission to an investment decision.
Step 10: Read the verdict, present, and save
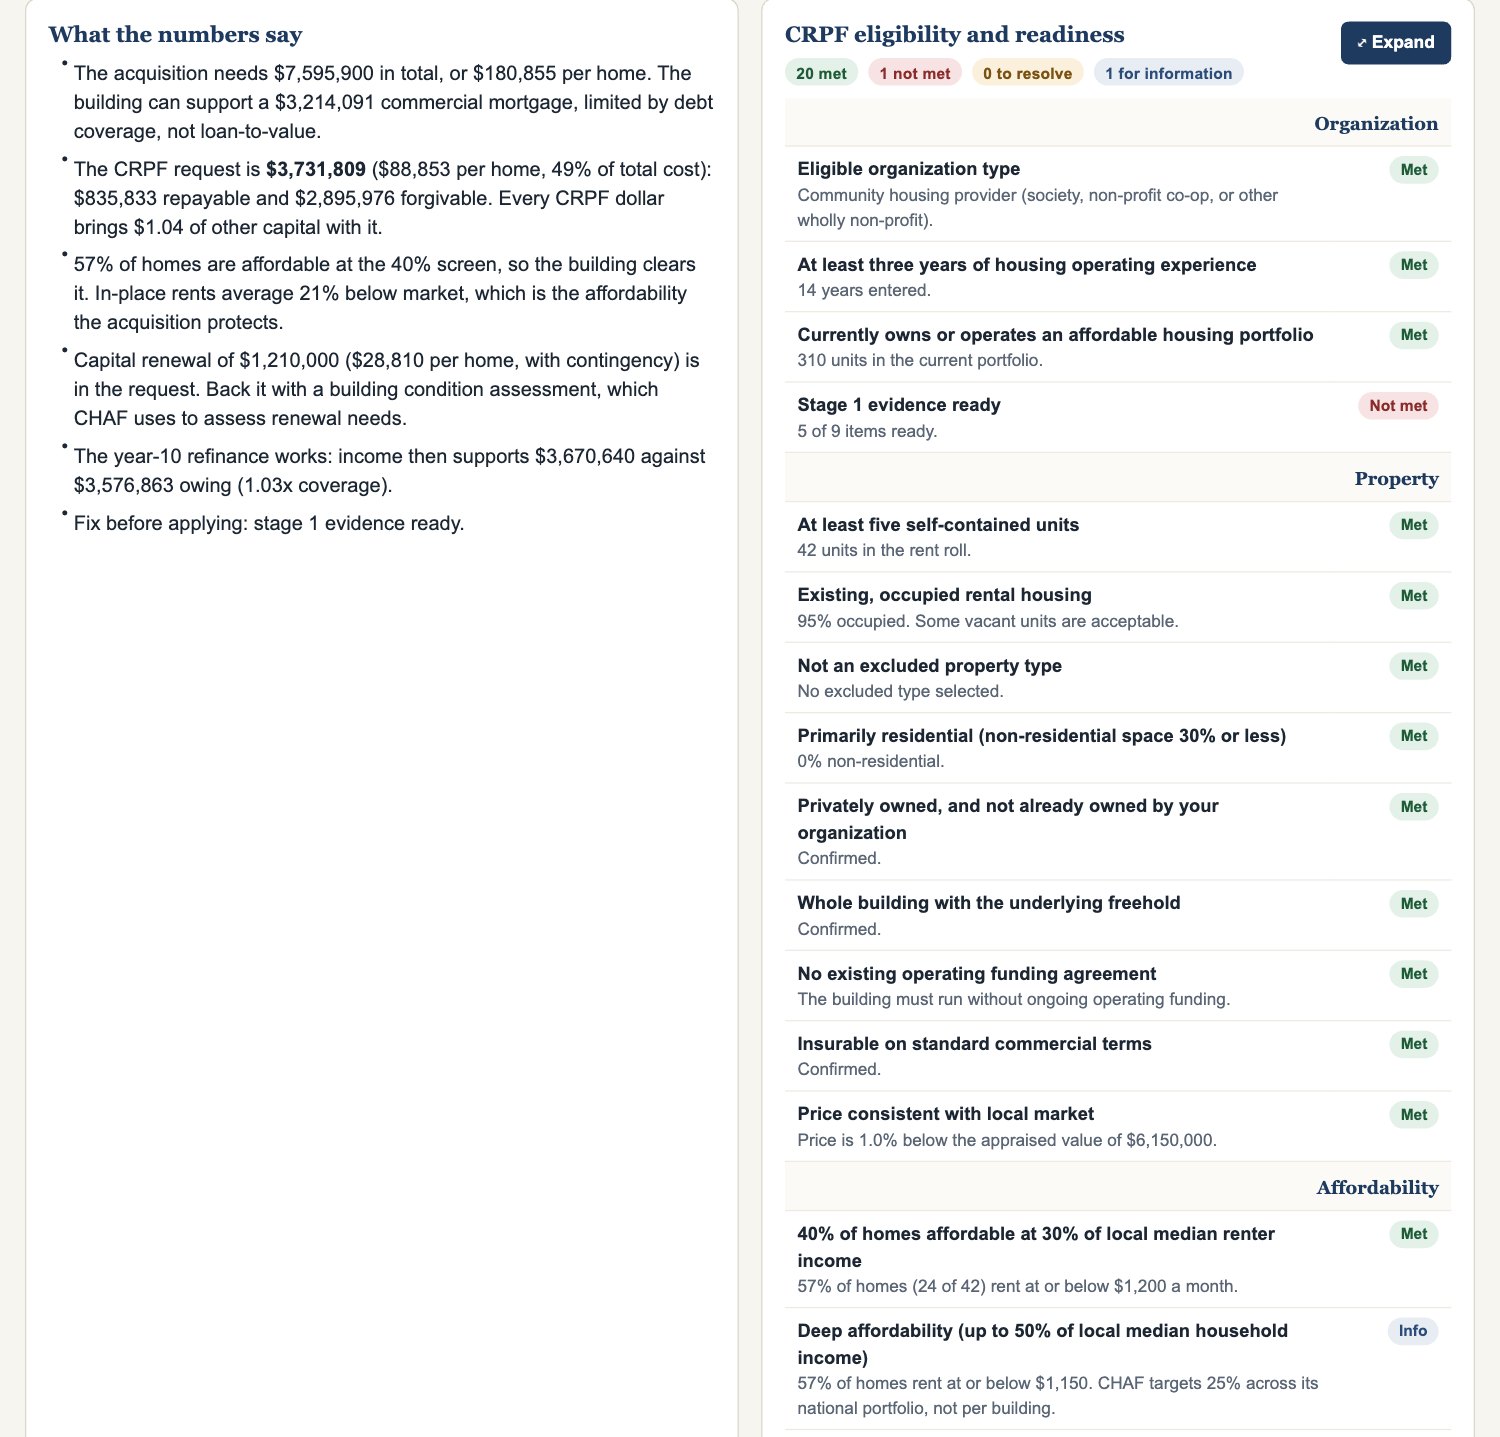
- The bar at the top shows the verdict, key figures, and the eligibility and readiness checklist. Work through any item not met, using the stage it points to.
- Select Present for a board briefing, or Download investment summary (PDF) for the board package or your lender.
- Work saves to your account as you go. Use Save planner file for a backup.
Good to know
- The checklist is a screen, not a CHAF decision. Confirm program rules for your intake.
- French-language advisory is available through Stephan Richard, Tailwind Growth Partners. Book from the Get help tab in the planner's Help panel.
Works with: Multifamily Feasibility, Budget & Forecast, Funding Stack & Capital.
Portfolio Asset Strategy Planner Pro: step-by-step guide
Decide what to do with every building in your portfolio. Score each building for condition, finances, mission fit, and redevelopment potential. The planner recommends hold, renew, reposition, redevelop, or dispose, builds the 10-year capital plan, and produces a report to the board.
Time to set up: about 30 minutes per building the first time.
Have on hand: building condition assessments, operating results by building, reserve balances, operating agreement and mortgage dates, and land and building values.
Before you start
- Sign in and select Portfolio Asset Strategy Planner Pro on your account page.
- The planner opens with a fictitious example, Kestrel Valley Housing Society. Select Start a blank portfolio in Save, share, and export when you are ready.
- On a team plan, select Start editing before you make changes and Done editing when you finish.
- Select ? Help & tour for a two-minute guided tour.
Step 1: Portfolio and settings (section 1)

- Enter your organization or portfolio name and the plan date. The plan date drives the five-year and three-year windows for agreements and mortgages.
- Choose your province or territory.
- Set the capital cost escalation rate. Three to four percent a year is a common planning range.
Step 2: Enter your buildings (section 2)
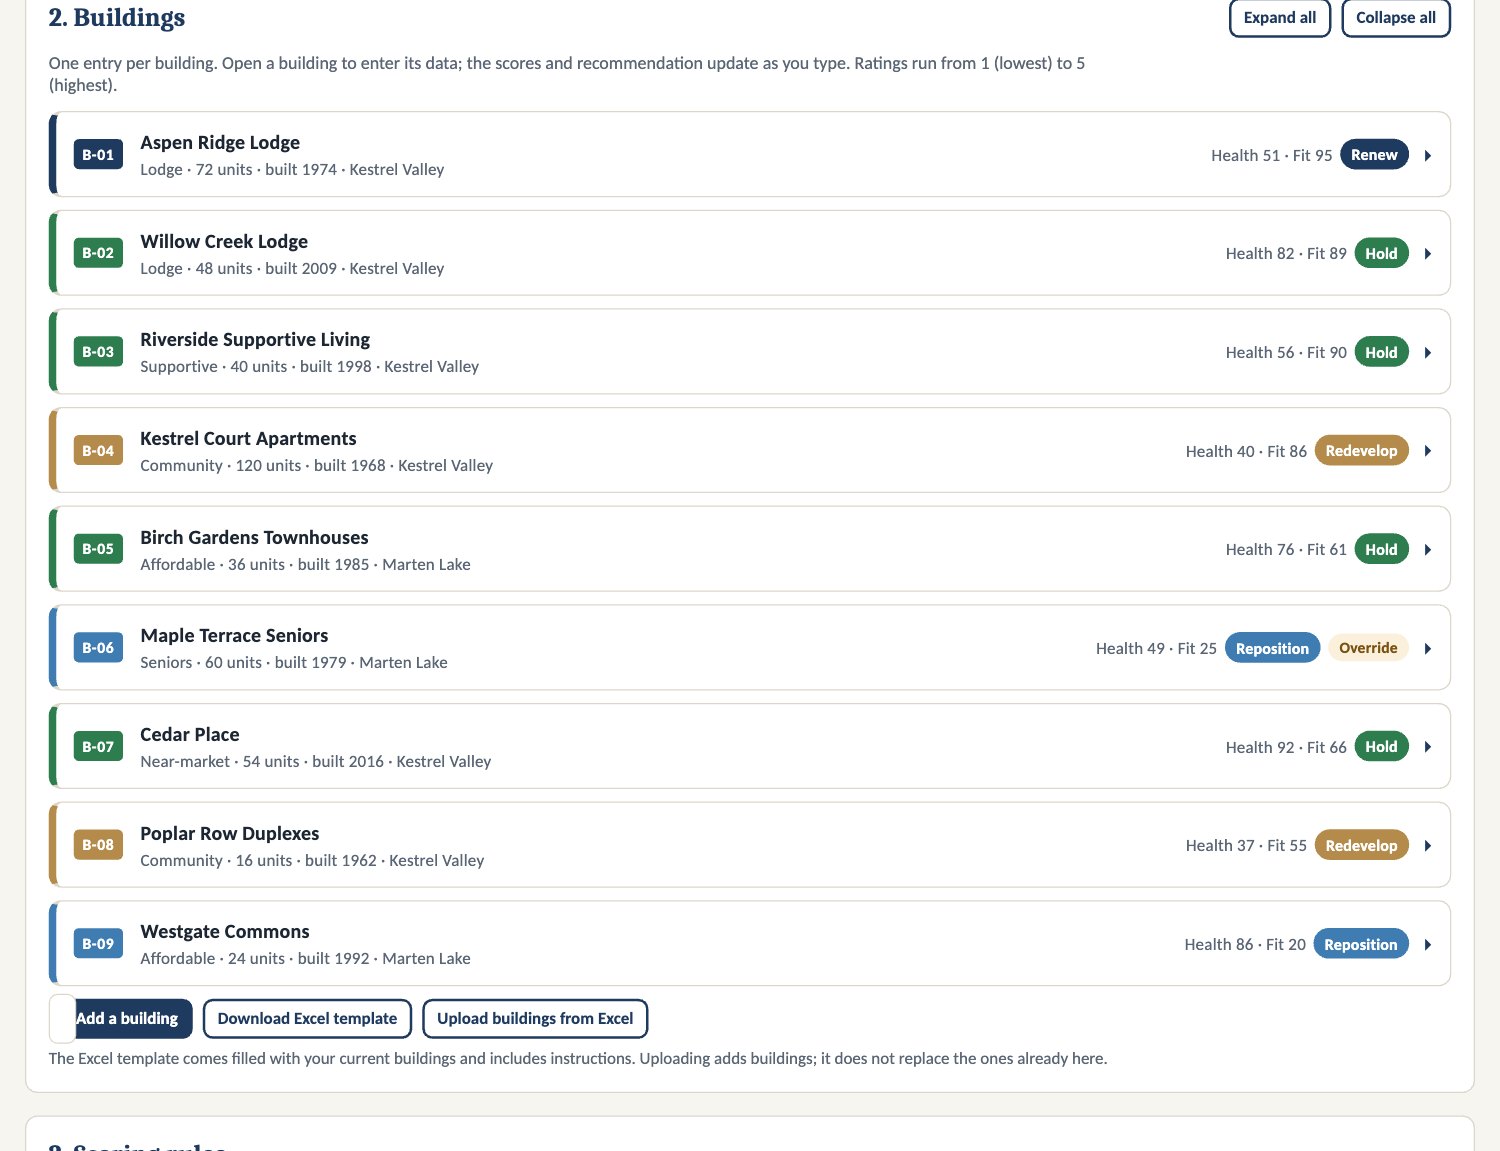
- Select a building to open it, or + Add a building.
- Enter the Facility Condition Index, remaining useful life, and 10-year capital need from your building condition assessment.
- Enter annual net operating income, occupancy, subsidy, reserves, and any mortgage.
- Rate need served, demand, location, and strategic alignment from 1 to 5. Rate these as a team, against your strategic plan.
- Enter land value, building value, and the units the zoning allows, to score redevelopment potential.
- If the board chooses a different strategy, set it under Board strategy and record the rationale.
Large portfolio? Select Download Excel template, fill in one row per building, and select Upload buildings from Excel. Uploading adds buildings; it does not replace them.
Step 3: Agree the scoring rules (section 3)
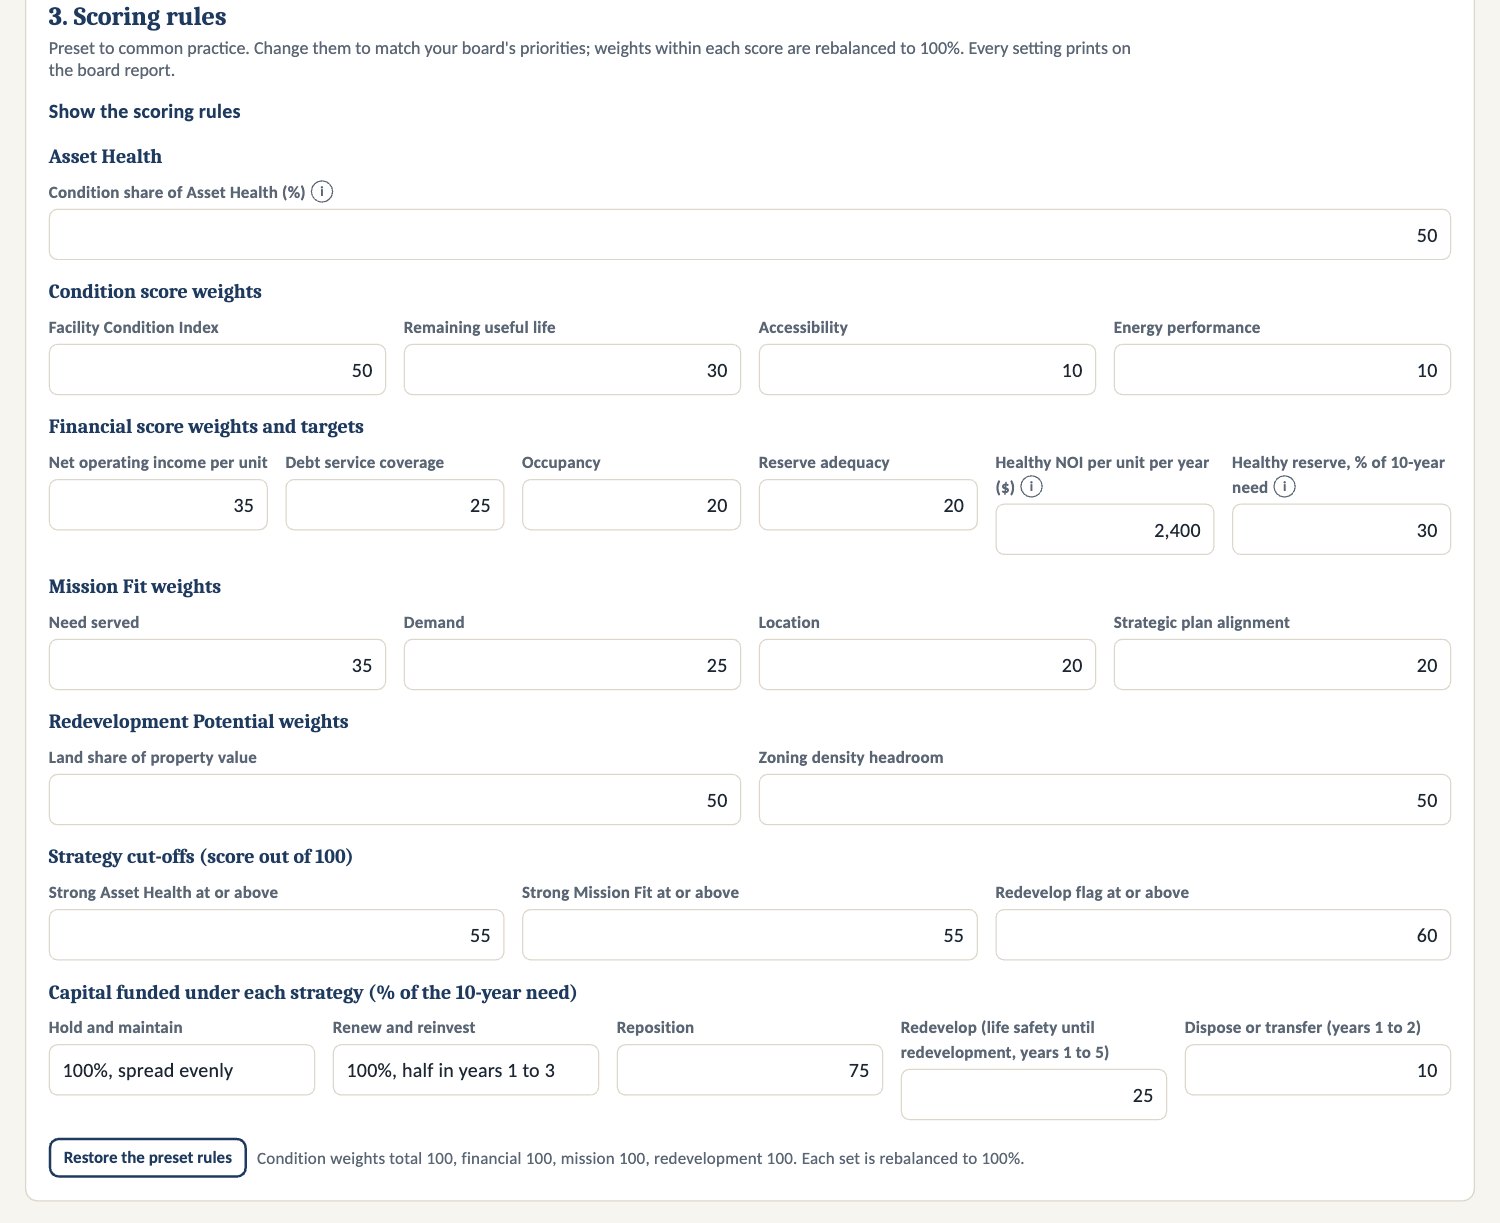
- Select Show the scoring rules.
- Adjust the weights within each score. Each set is rebalanced to 100%.
- Set the cut-offs for strong Asset Health, strong Mission Fit, and the redevelop flag.
- Set how much of the 10-year capital need is funded under reposition, redevelop, and dispose.
Tip: Agree the rules with your board or finance committee once, then leave them, so year-to-year comparisons stay meaningful. Restore the preset rules brings back the defaults.
Step 4: Read the results (sections 4 to 9)
- Portfolio at a glance (4): read the summary first. A red reserve funding ratio means reserves run out within 10 years.
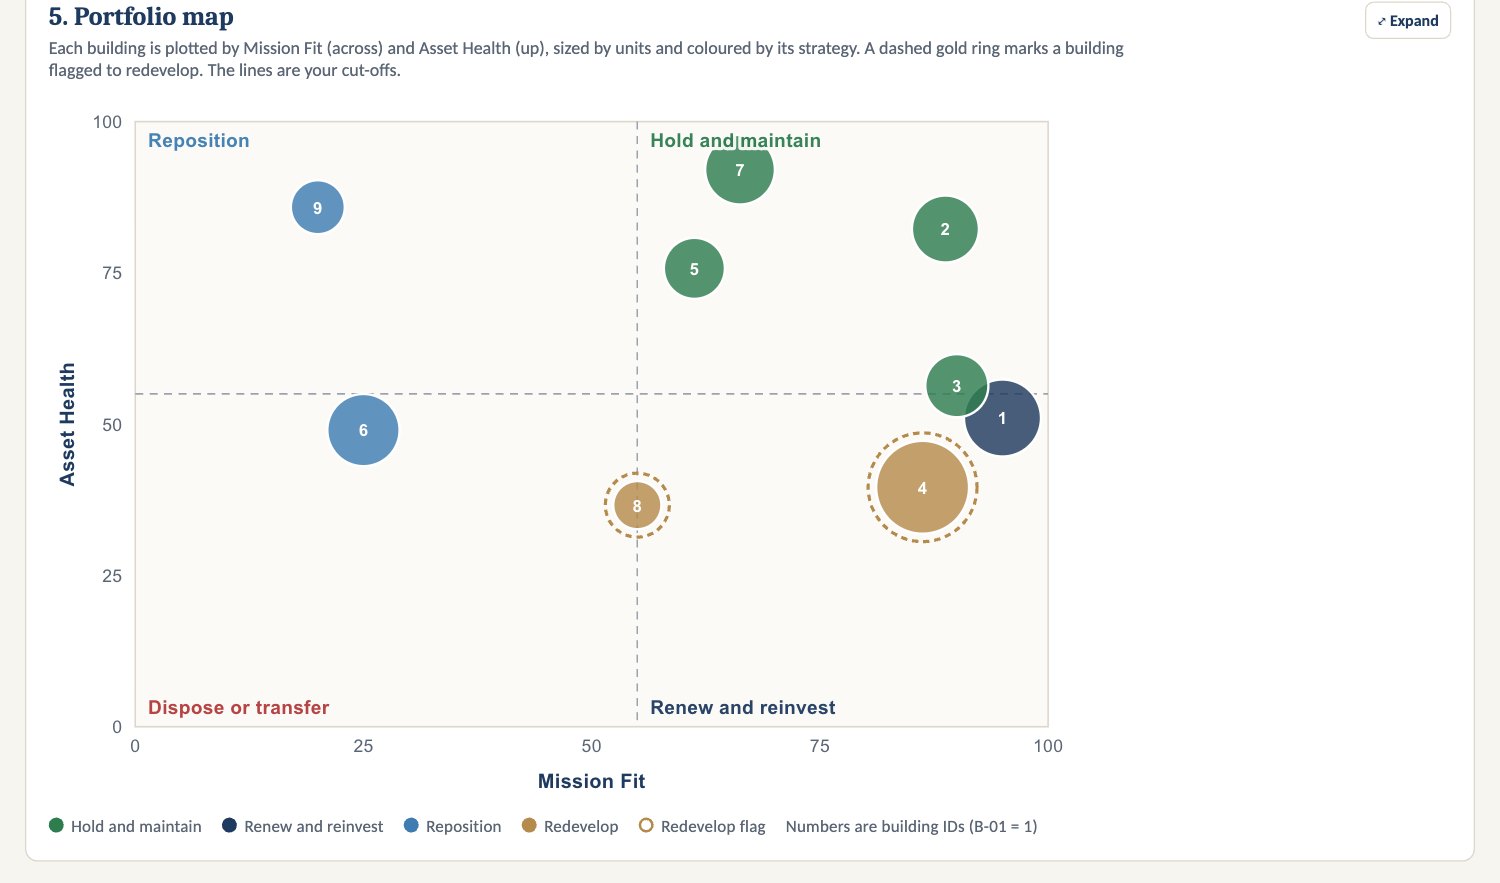
- Portfolio map (5): every building by Mission Fit (across) and Asset Health (up), sized by units, coloured by strategy. Buildings close to a cut-off line deserve a second look.
- Strategy register (6): each building's scores, the recommended strategy, and the board's strategy. This is the page the board approves.
- 10-year capital plan (7): a red reserve figure shows the year reserves run out.
- Agreements and debt maturities (8): anything in the shaded five-year band needs a plan now. Model buildings without their subsidy before confirming a hold.
- Scenario comparison (9): the recommendations, your plan with overrides, and holding everything as it is.
Step 5: Work the checks (section 10)
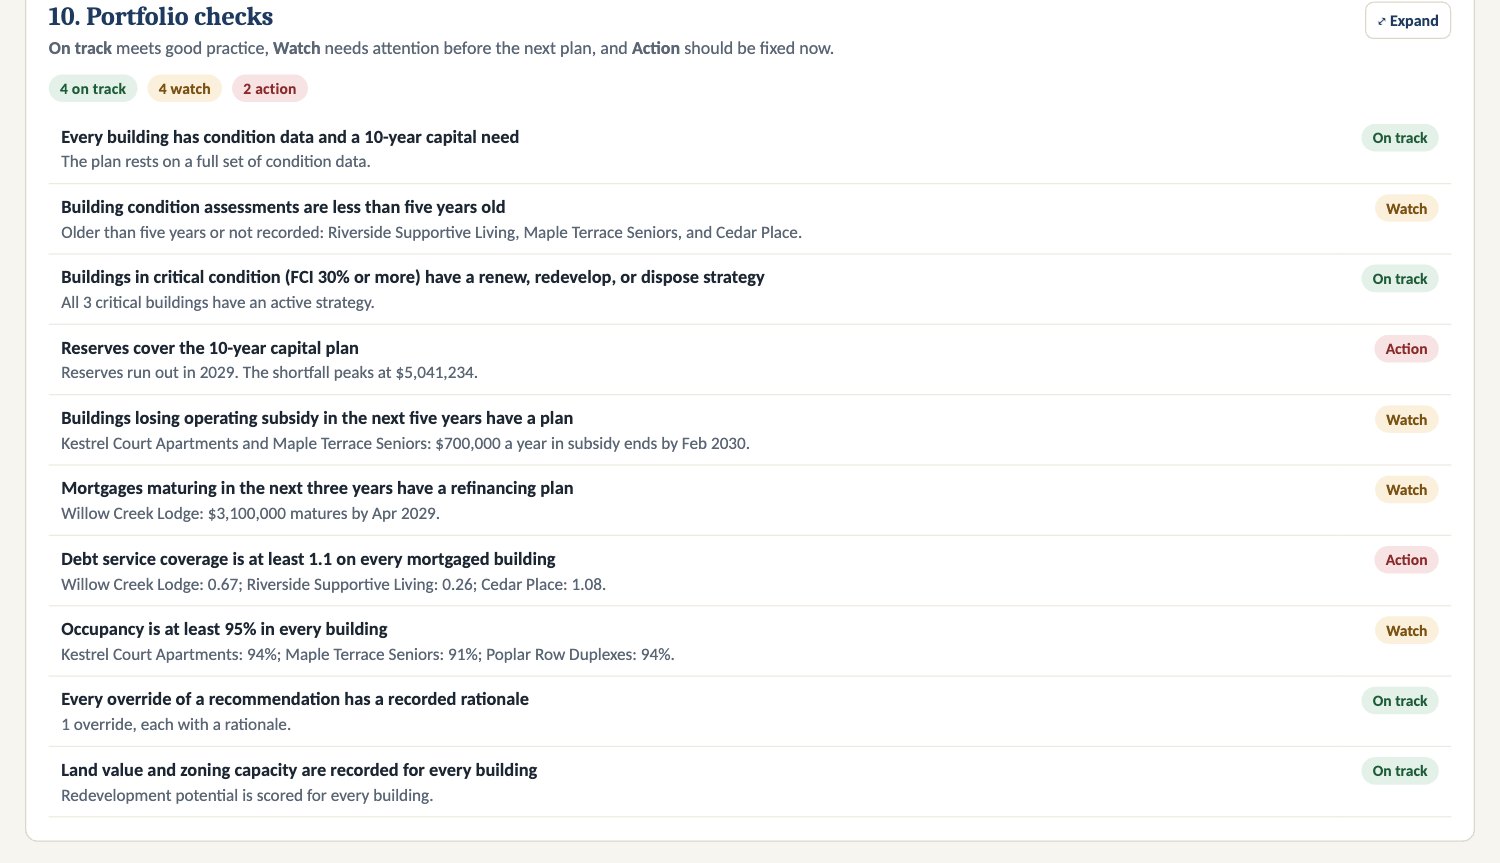
- Work through every Action first, then the Watch items. Each check names the buildings to fix.
- An override without a rationale is flagged.
Step 6: Present, report, and save

- Select Present for a full-screen board briefing, or PDF report for the portfolio asset strategy report.
- Work saves to your account as you go. Save a named version before a board meeting and use Save planner file for a backup.
- Undo and redo with the curved arrows in the bottom-right corner. Select Expand on the map or any table to show it full size.
How the planner chooses a strategy
- Weak Asset Health with strong Redevelopment Potential: redevelop.
- Strong health, strong fit: hold and maintain.
- Weak health, strong fit: renew and reinvest.
- Strong health, weak fit: reposition.
- Weak health, weak fit: dispose or transfer.
The recommendation is a starting point for the board's judgment, not a decision. Confirm values, condition, and zoning with qualified professionals.
Works with: Risk Management, Operating Agreement Expiry.
Funding Stack & Capital Planner Pro: step-by-step guide
Build the funding stack for a housing project and test it before you apply: sources and uses, the funding gap, debt coverage, stress tests, an Alberta AHPP application check, and a ten-year capital plan with the reserve fund.
Time to set up: about an hour.
Have on hand: the latest cost estimate (Class B or better if you have one), funding letters and applications, lender terms, the stabilized operating budget, and your capital plan for existing buildings.
Before you start
- Sign in and select Funding Stack & Capital Planner Pro on your account page.
- The planner opens with a fictitious example, Kestrel Valley Housing Society. Select Start a blank funding stack in Save, share, and export when you are ready.
- On a team plan, select Start editing before you make changes and Done editing when you finish.
- Select ? Help & tour for a two-minute guided tour.
Step 1: Organization and project (section 1)
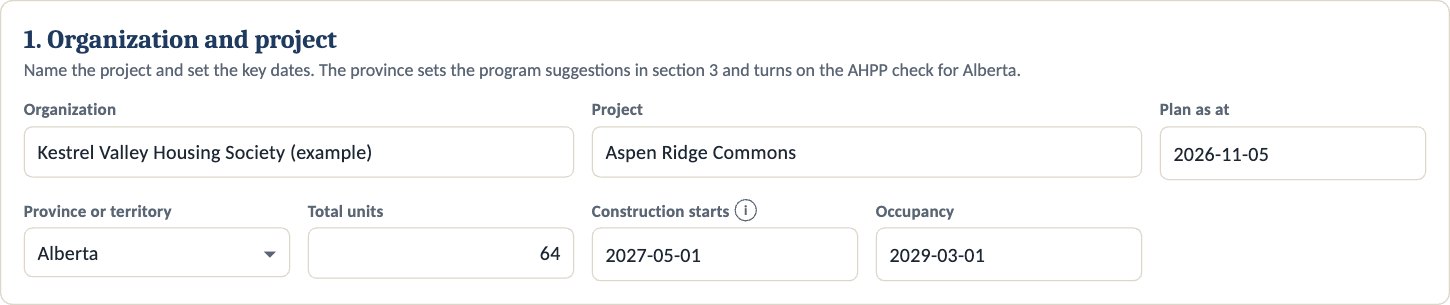
- Enter your organization and the project name.
- Choose your province. Alberta turns on the AHPP check and loads Alberta program suggestions.
- Enter total units, the construction start, and occupancy. The construction start is used to flag money expected too late.
Step 2: Uses of funds (section 2)
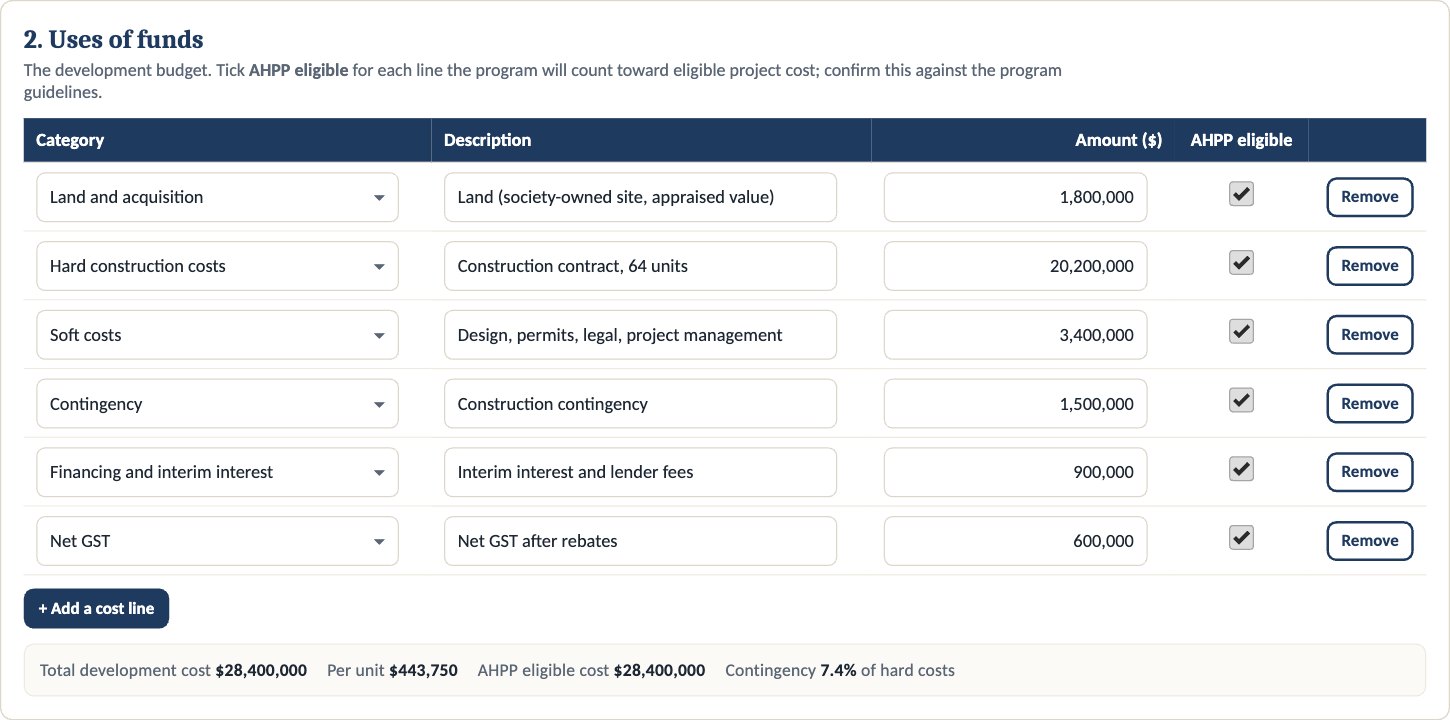
- Enter each cost line in the development budget, from land to net GST.
- Untick AHPP eligible for any line the program will not count.
Tip: Keep contingency at 5% or more of hard costs. The checks flag anything lower.
Step 3: Sources of funds (section 3)
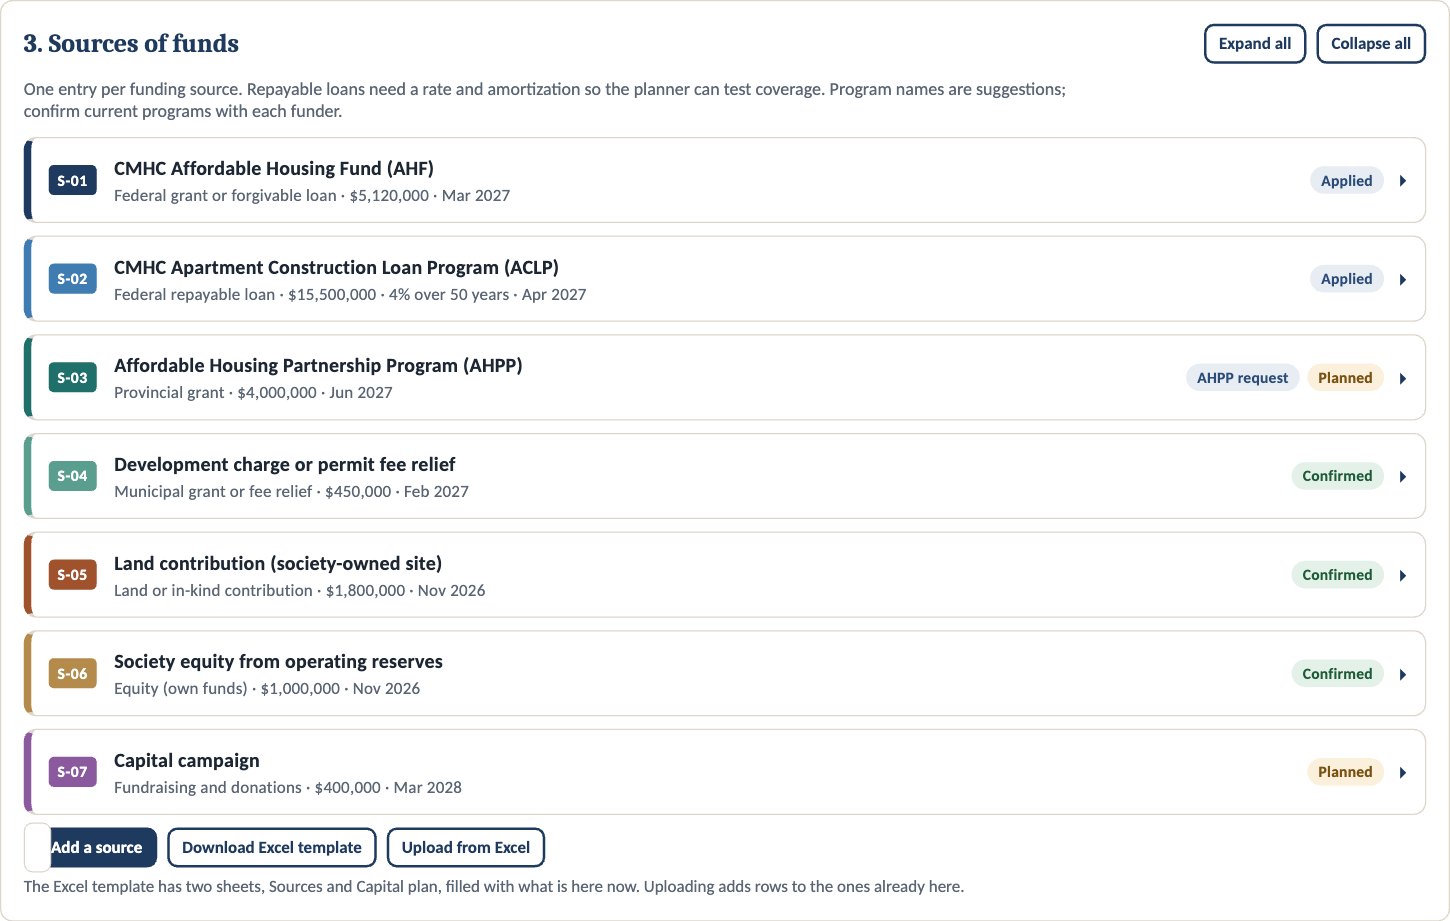
- Select + Add a source and choose a program from the suggestions, or type your own.
- Set the type and status: Confirmed, Applied, or Planned.
- For loans, enter the rate and amortization.
- Tick Counts as equity where it applies, and mark the AHPP request.
Many sources? Select Download Excel template, fill in the Sources sheet, and upload it.
Step 4: Operations and stress tests (section 4)

- Enter effective gross income and operating expenses once the building is full.
- Set the lender's minimum debt coverage, usually 1.10x.
- Set the cost overrun and interest rate rise to test.
Step 5: AHPP application (section 5, Alberta)
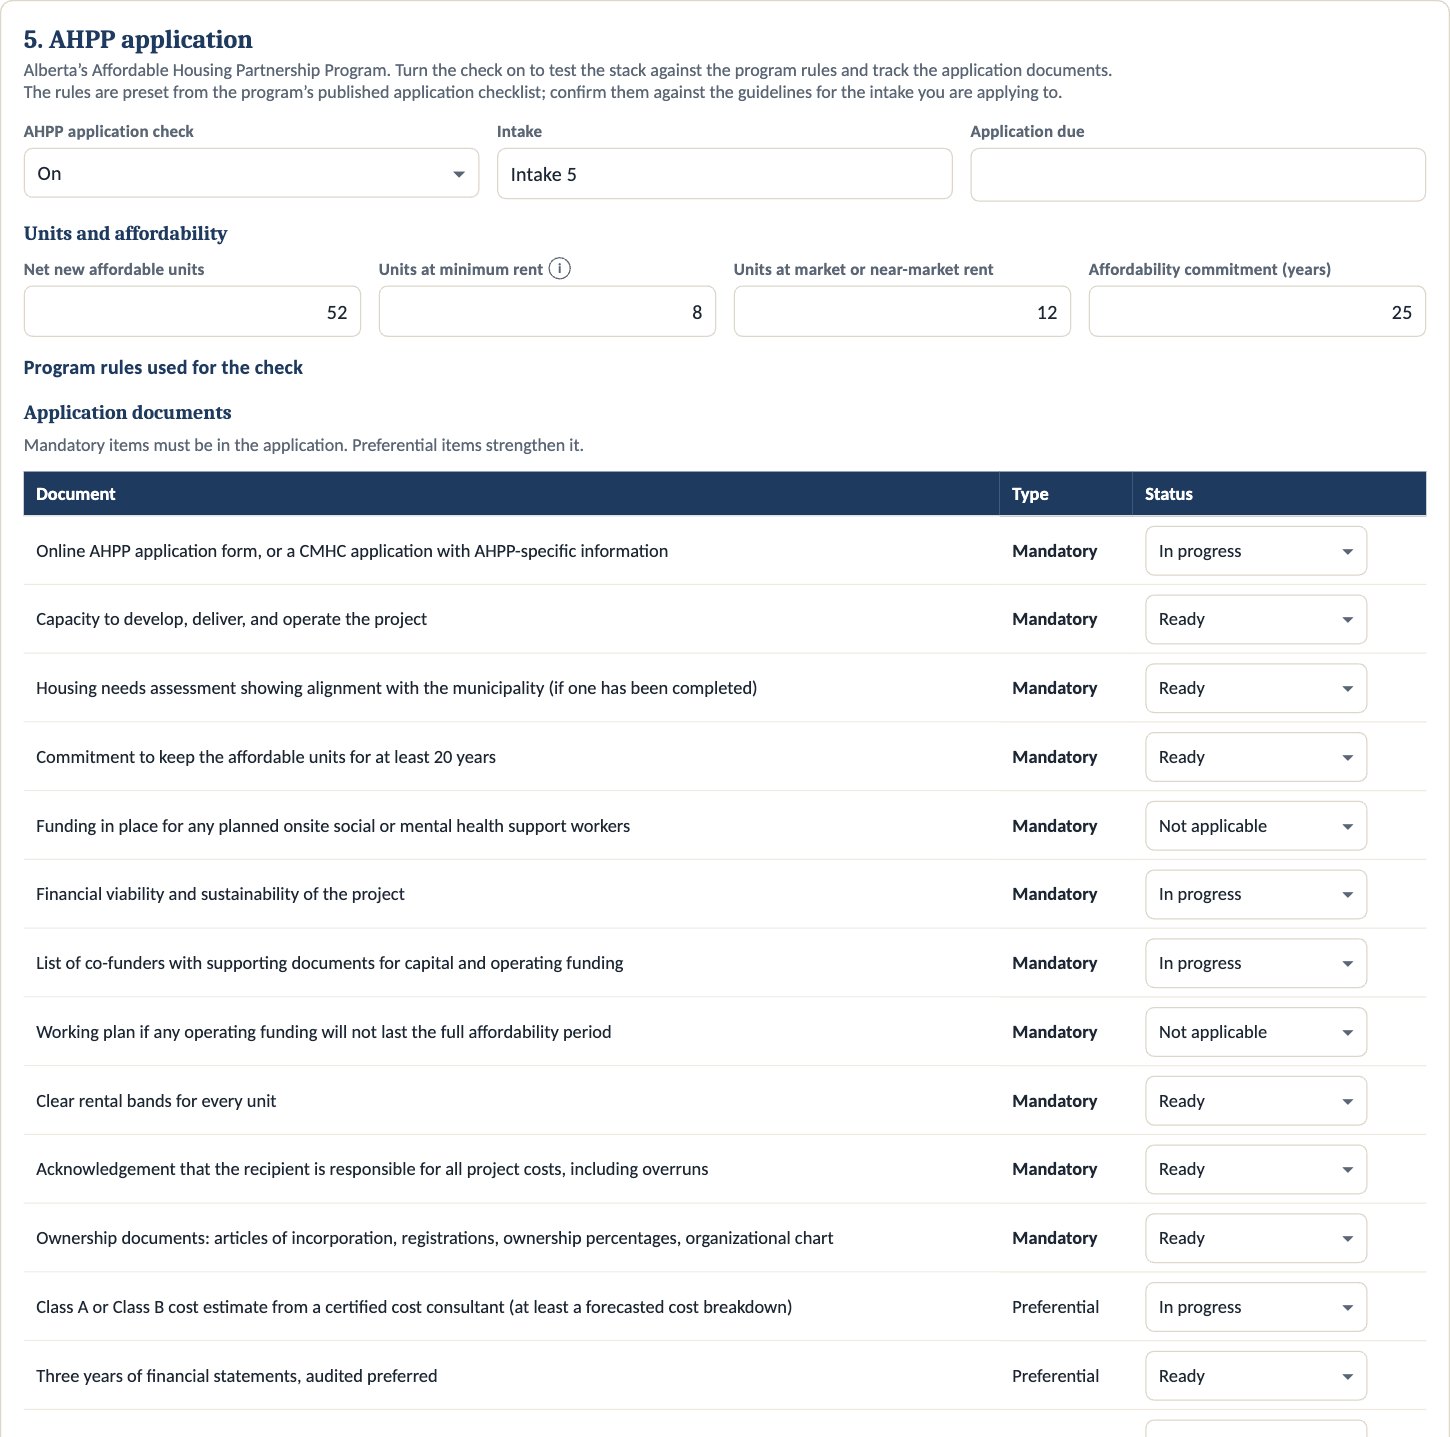
- Turn the check on and enter the intake and due date.
- Enter net new affordable units, units at minimum rent, units at market or near-market rent, and the affordability term.
- Set the status of each application document.
Tip: The rules are preset from the program's published checklist. Confirm them against the guidelines for your intake.
Step 6: Ten-year capital plan (section 6)
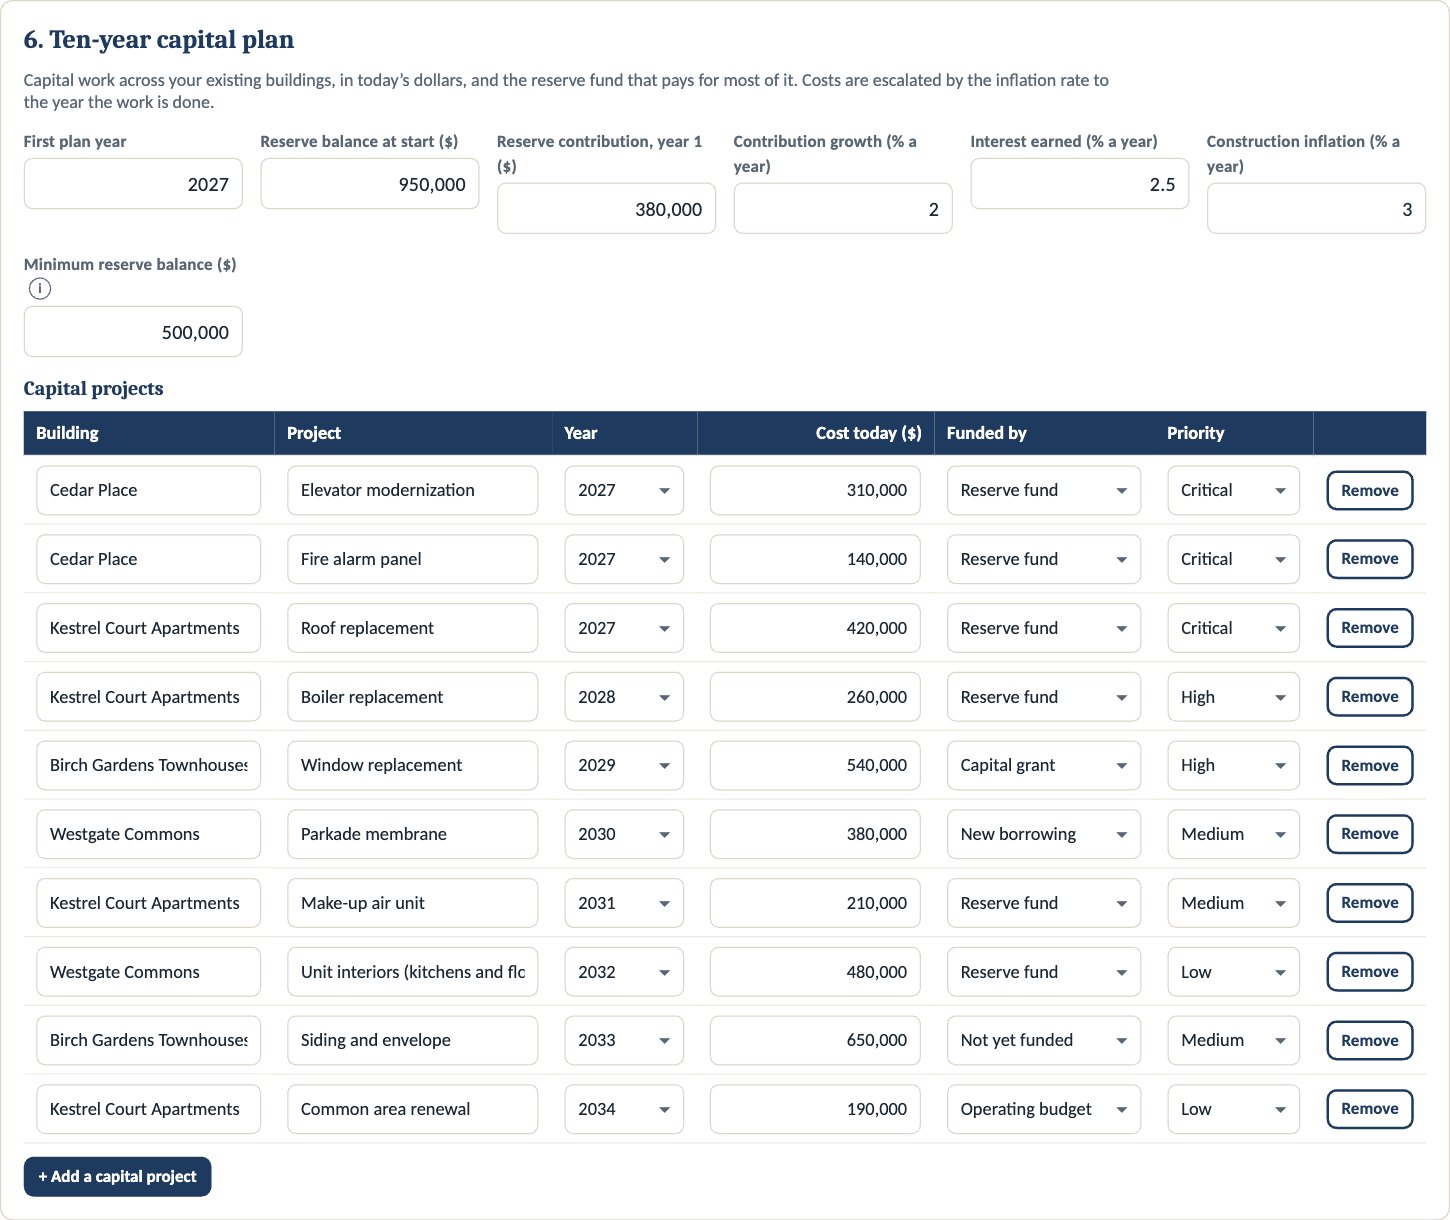
- Enter the reserve balance, yearly contribution, interest, and inflation.
- Add each capital project with its year, cost in today's dollars, and funding source. Mark it Not yet funded when no source is lined up.
Step 7: Read the results (sections 7 to 12)
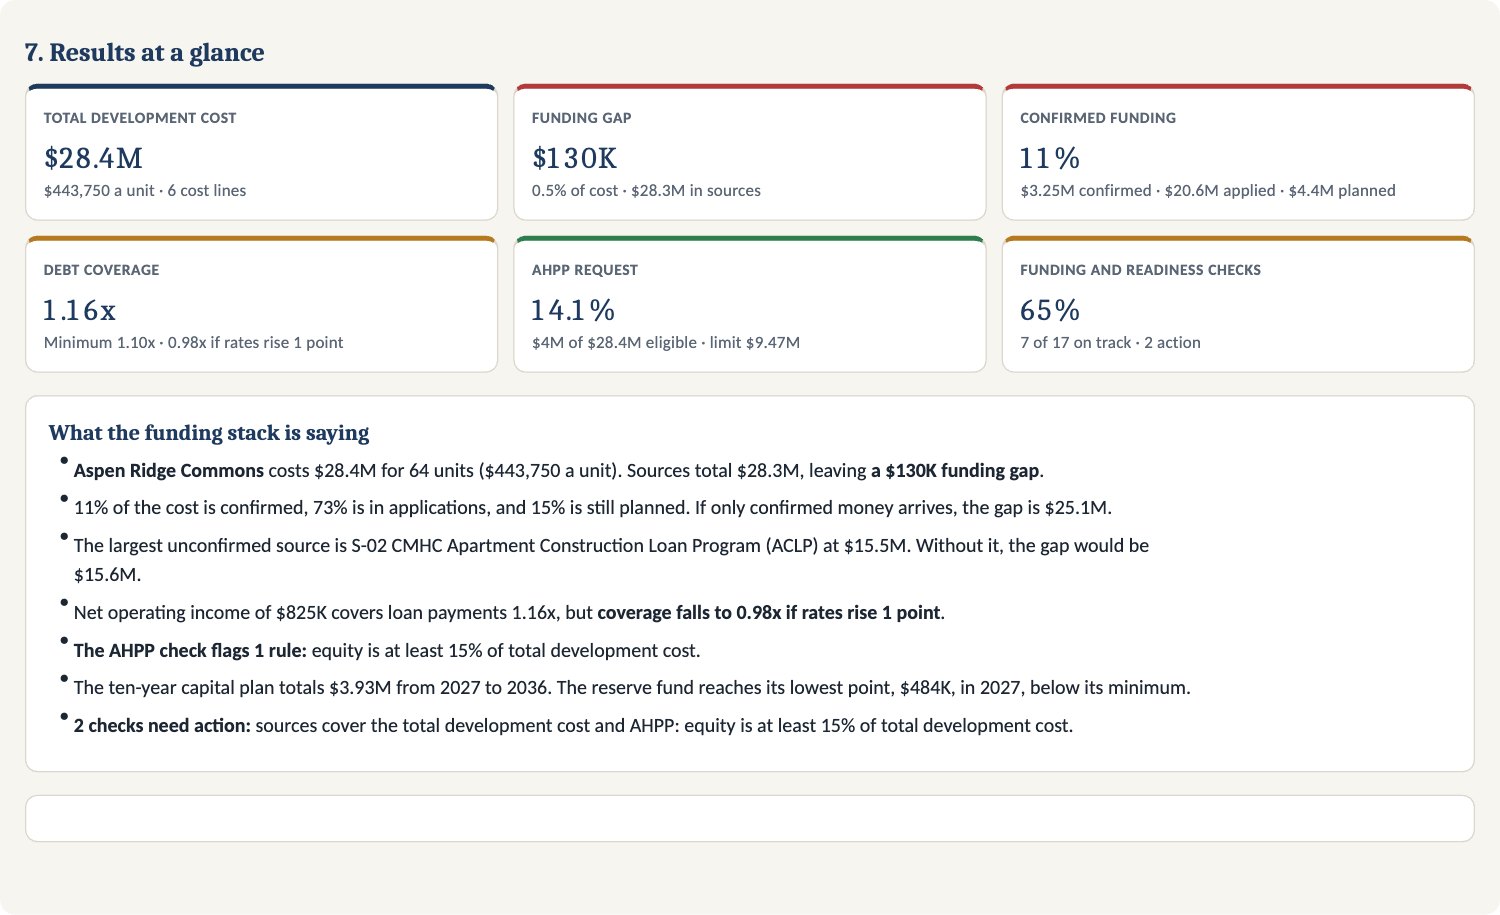
- Results at a glance (7): read the summary, then the funding gap, confirmed share, and debt coverage.
- Sources and uses (8): bars are drawn to the same scale, so a sources bar shorter than the uses bar is the funding gap.
- Stress tests (9): find the tests that break, and which single unconfirmed source would hurt most if it fell through.
- Debt and coverage (10): compare the debt the income can support with the debt in the stack.
- AHPP application check (11): fix every Action before you apply and move each mandatory document to Ready.
- Capital plan and reserve fund (12): find years the reserve dips below its minimum, and move or refund projects to smooth the plan.
Step 8: Clear the checks (section 13)
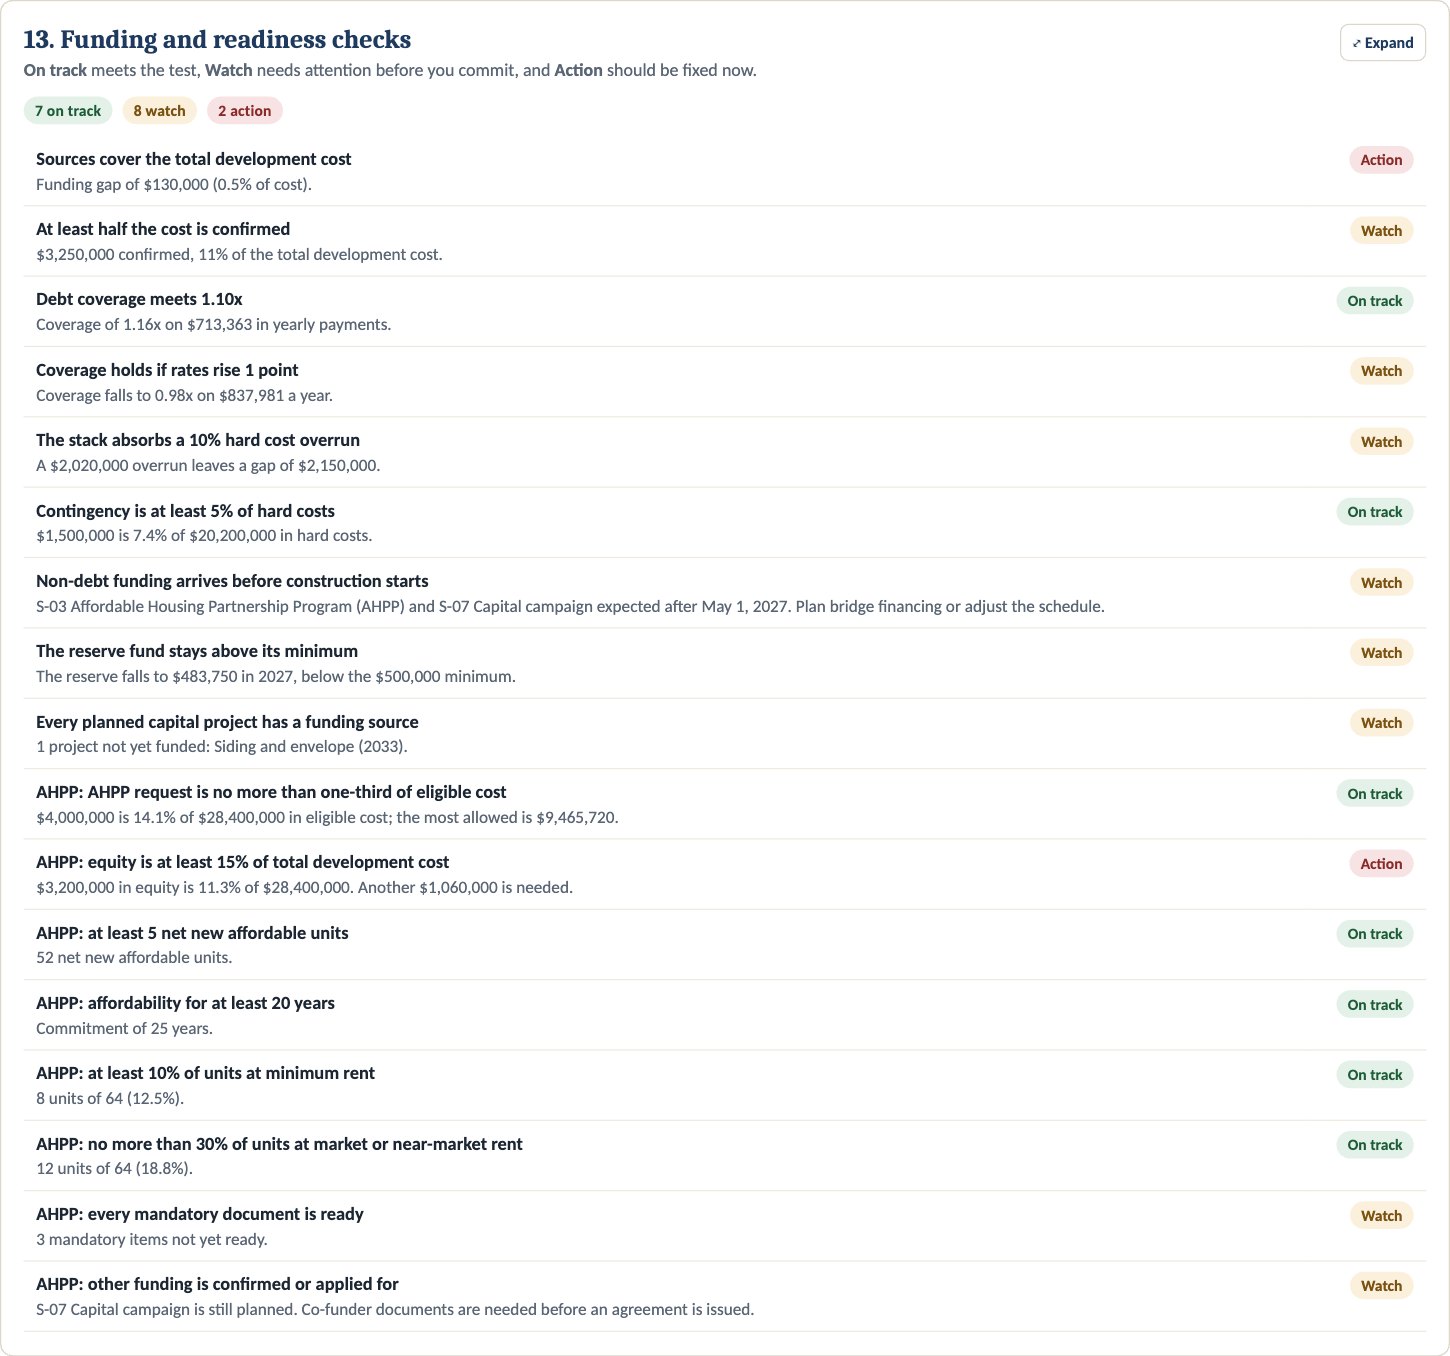
- Clear every Action.
- Review the Watch items with your team before you commit.
Step 9: Present, report, and save
- Select Present for a full-screen board briefing, or PDF report for the board report.
- Work saves to your account as you go. Save a named version before a board meeting and use Save planner file for a backup.
- Undo and redo with the curved arrows in the bottom-right corner.
Good to know
- Loan payments assume monthly payments with semi-annual compounding, the Canadian standard.
- Program rules change between intakes. The checks are a screen, not an eligibility decision.
Works with: Multifamily Feasibility, CRPF Acquisition.
Project Management Planner Pro: step-by-step guide
Run a renewal, development, merger, or your whole strategic plan from one place, and report on it to your board. Keep workstreams, tasks, milestones, budget, risks, and strategic KPIs together, check them against the status date, and produce a red-amber-green status report.
Time to set up: one to two hours for a typical project.
Have on hand: the approved budget and dates, a task list or work plan, key milestones and board decision points, and, for a strategic plan, your priorities and KPIs.
Before you start
- Sign in and select Project Management Planner Pro on your account page.
- The planner opens with a fictitious example, the Willow Court renewal for Kestrel Valley Housing Society. Select Start a blank project in Save, share, and export when you are ready.
- On a team plan, select Start editing before you make changes and Done editing when you finish.
- Select ? Help & tour for a two-minute guided tour.
Step 1: Project setup (section 1)
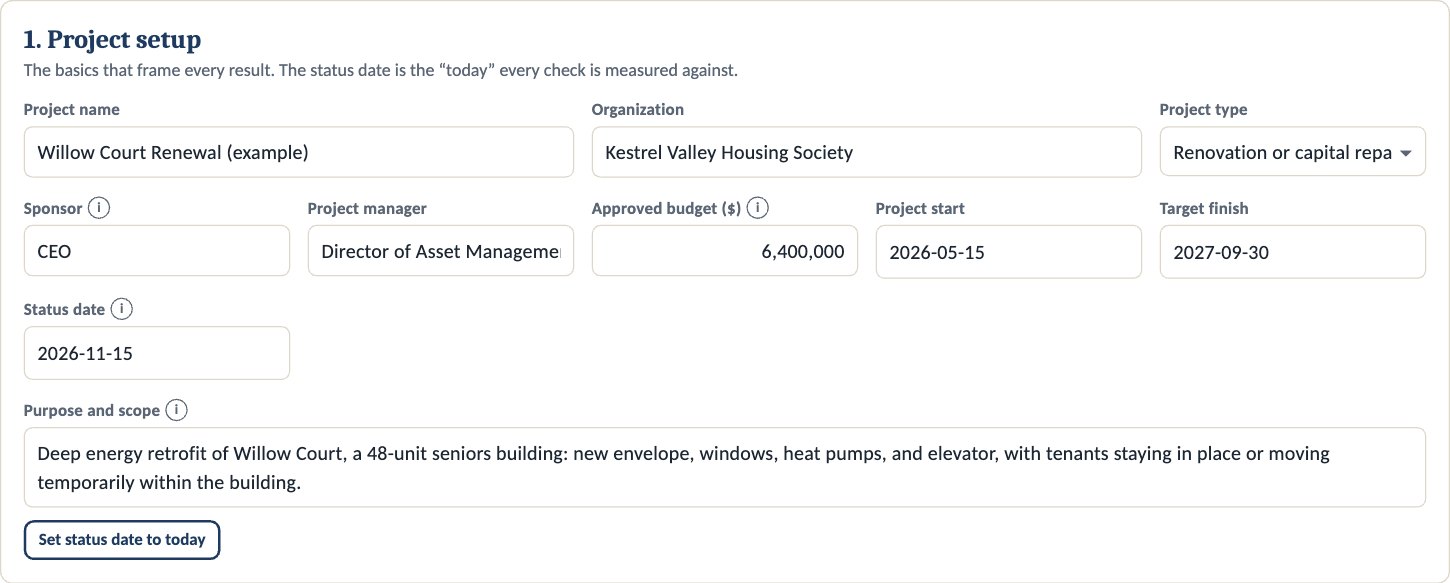
- Enter the project name, organization, and type (including Strategic plan).
- Enter the sponsor and project manager. Roles are fine.
- Enter the budget the board approved, including contingency.
- Set the project start and target finish.
- Set the status date, usually today. Select Set status date to today before each report.
- Write one or two sentences on purpose and scope. They open the board report.
Tip: Change the status date to see the project as it stood on another day, such as the last board meeting.
Step 2: Workstreams (section 2)
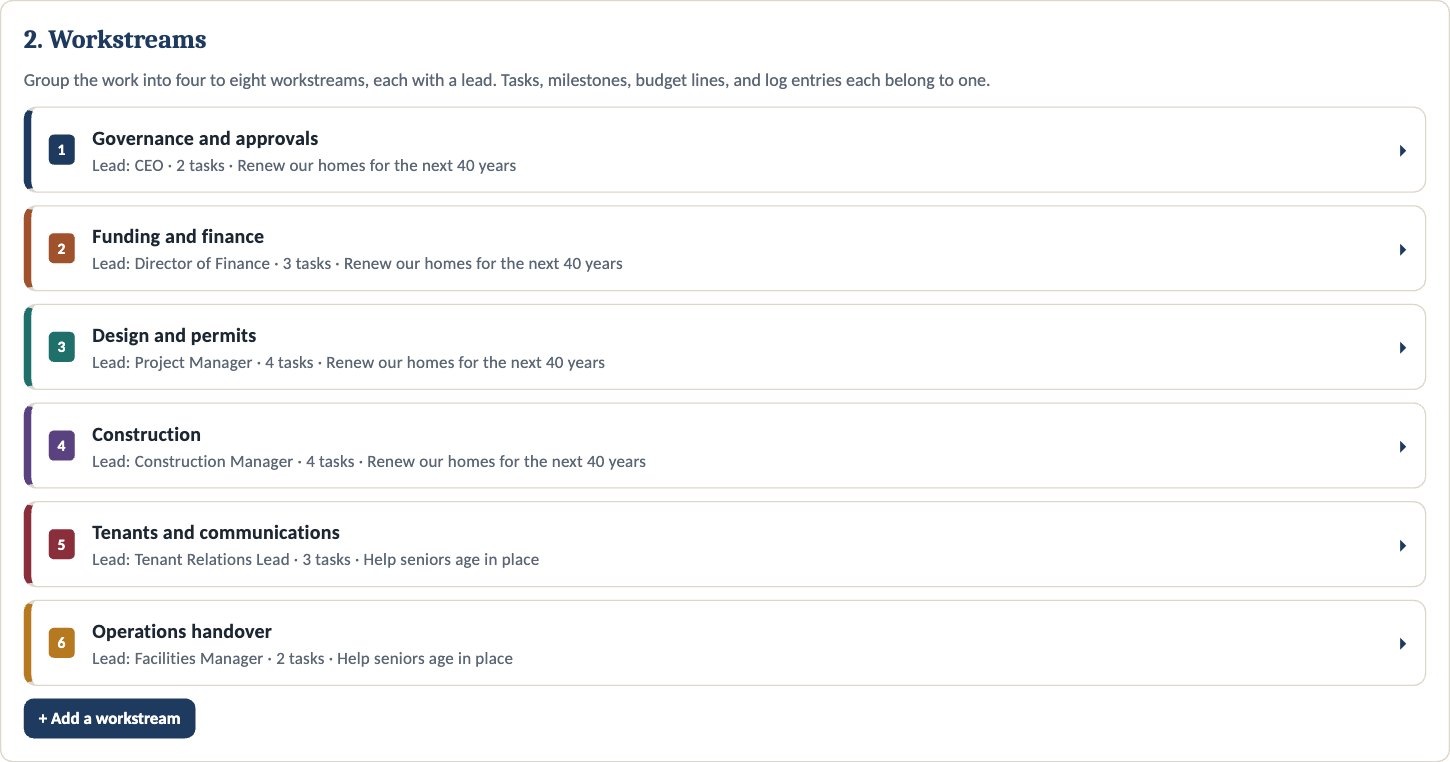
- Rename the starter workstreams or select + Add a workstream. Four to eight is usually right.
- Name a lead for each, and link each to a strategic priority if you use section 7.
Step 3: Tasks (section 3)
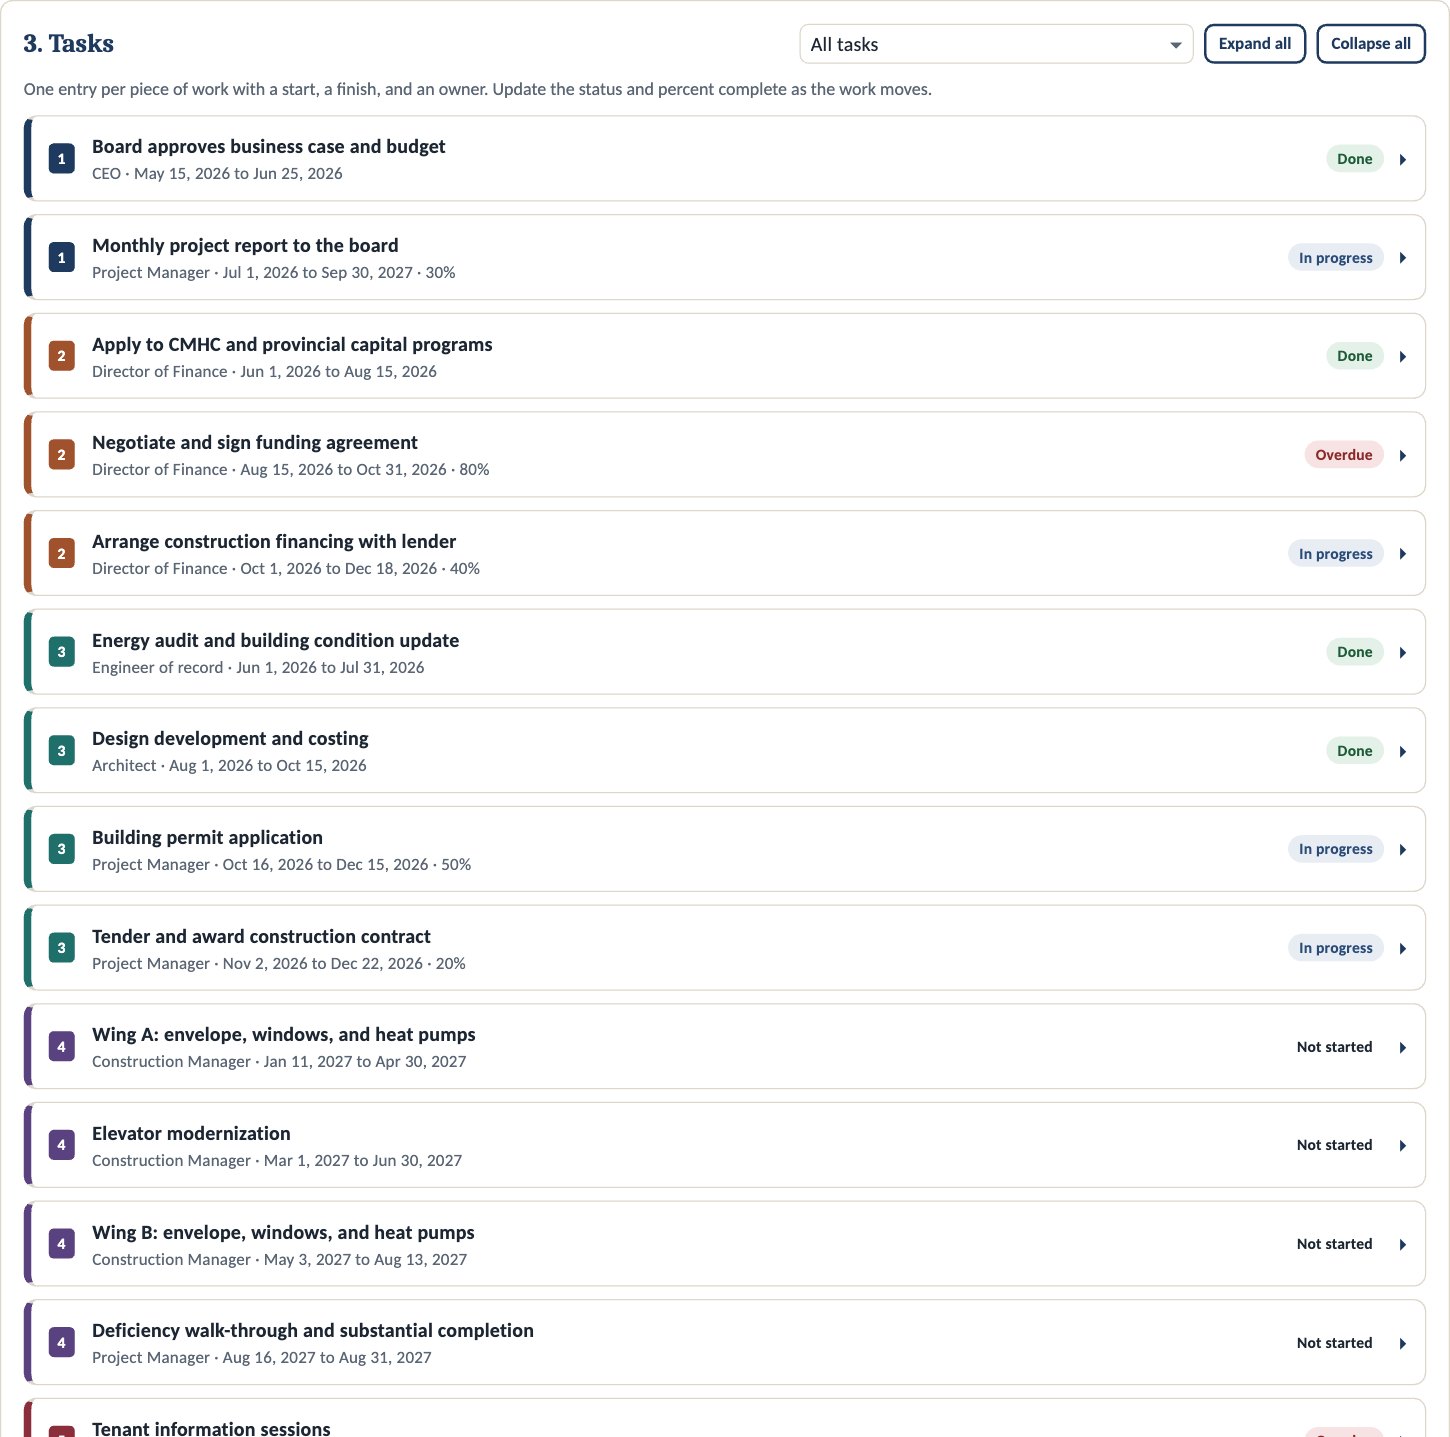
- Select a task to open it, or + Add a task.
- Choose the workstream and enter the owner, start, and finish.
- Update the status and percent complete as the work moves. 100% marks it done.
- Use the list at the top to show open or overdue tasks, or one workstream.
Long task list? Select Download Excel template (sheets for tasks, milestones, budget lines, and the log), fill it in, and select Upload from Excel.
Step 4: Milestones and decision points (section 4)
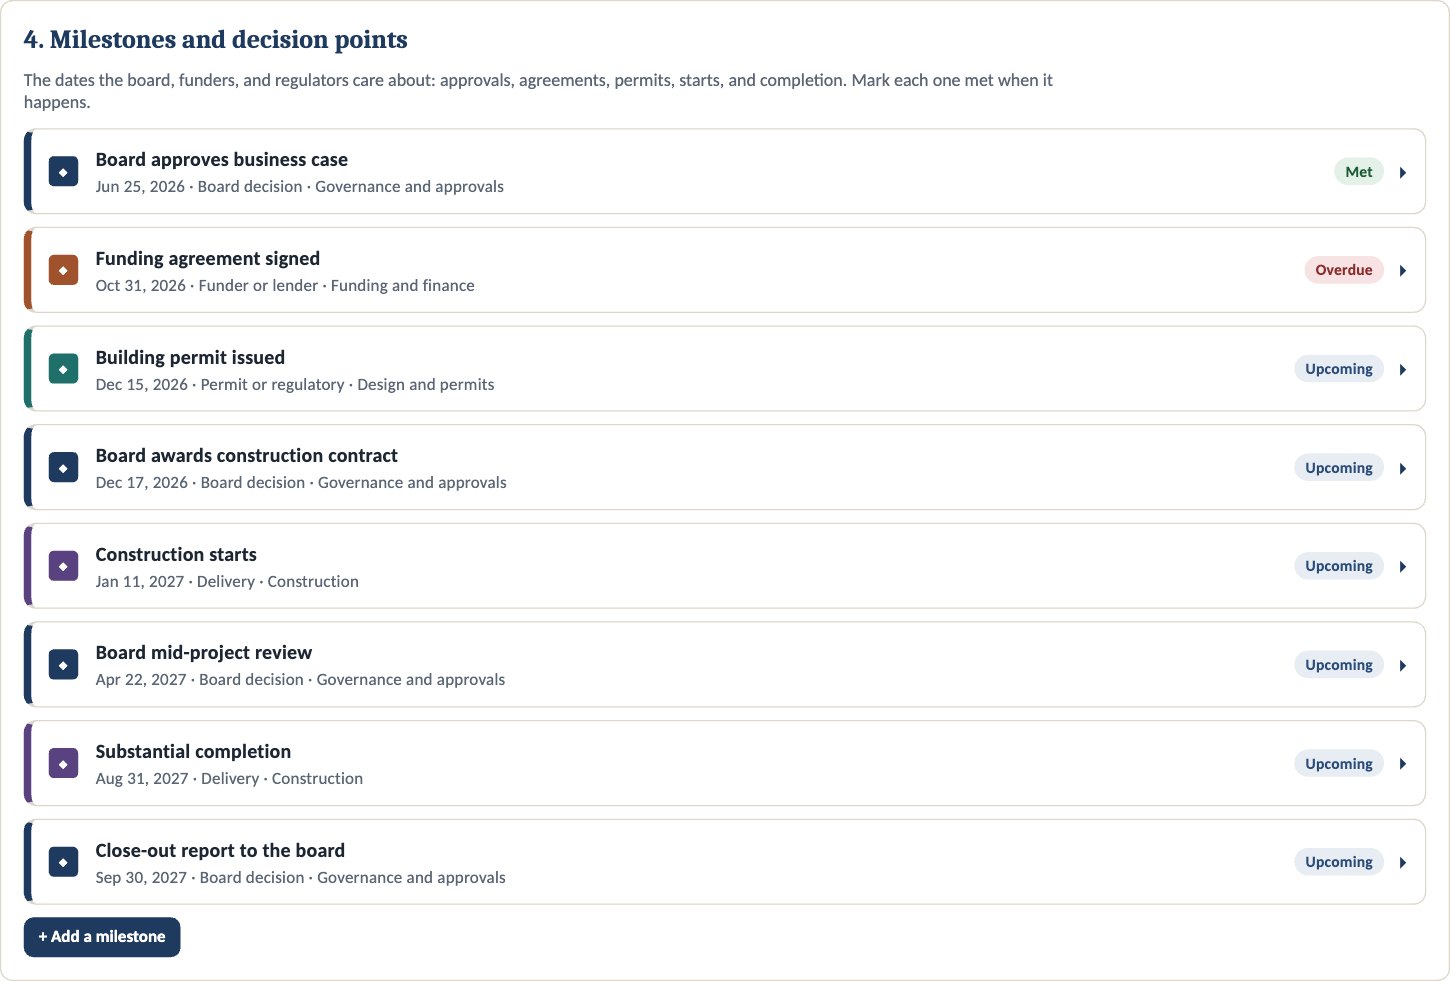
- Add each milestone (board decisions, funder agreements, permits, starts, completion) with its date and type.
- Mark it Met when it happens. A milestone not met after its date turns the status red.
Step 5: Budget (section 5)
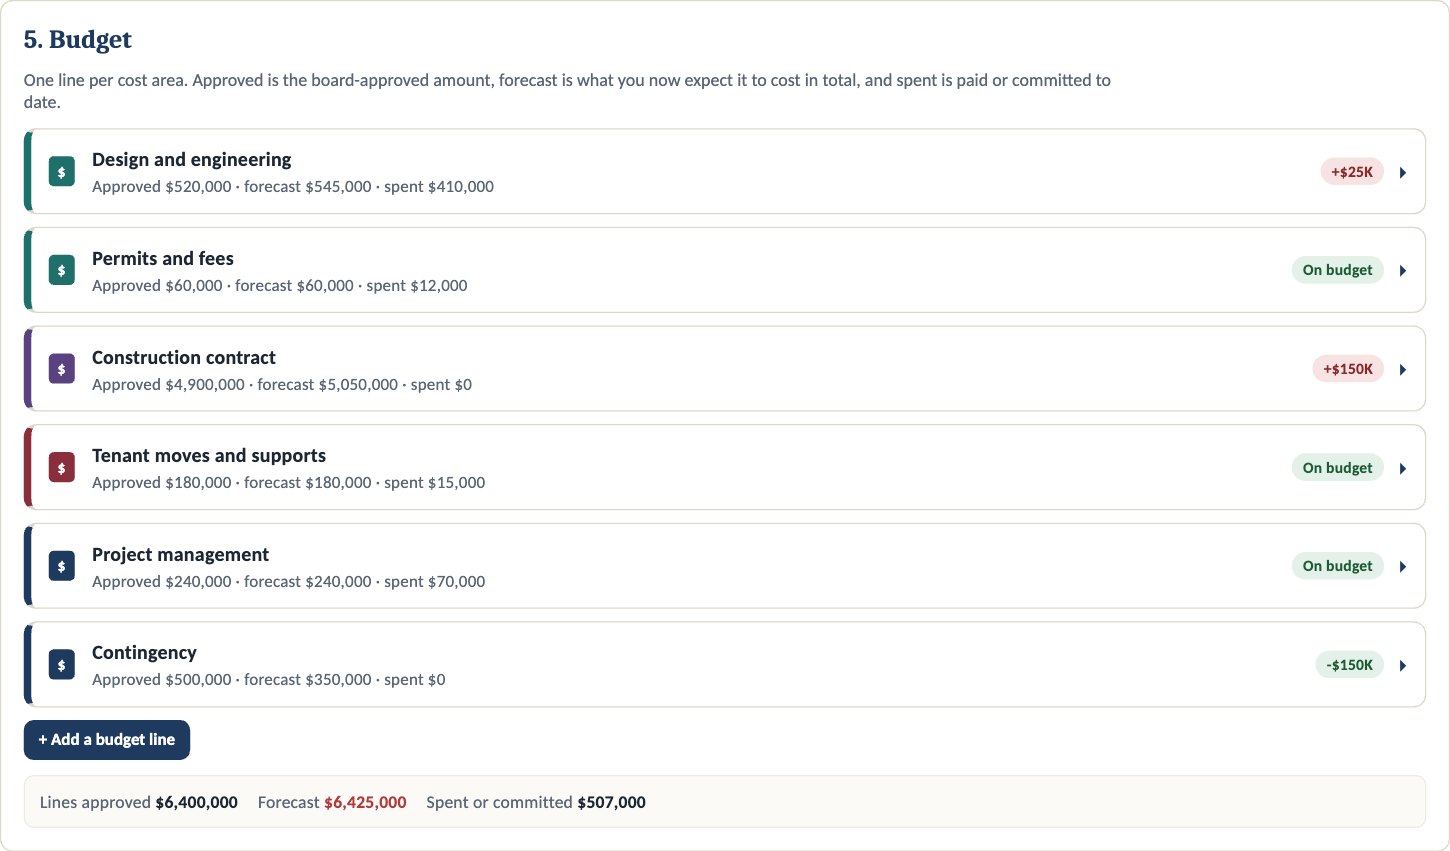
- Enter the approved amount for each cost line.
- Update the forecast at completion whenever you learn something new.
- Update spent or committed after each month-end.
Tip: Keep contingency as its own line. When you draw on it, lower its forecast and raise the line that used it.
Step 6: Risks, issues, and decisions log (section 6)
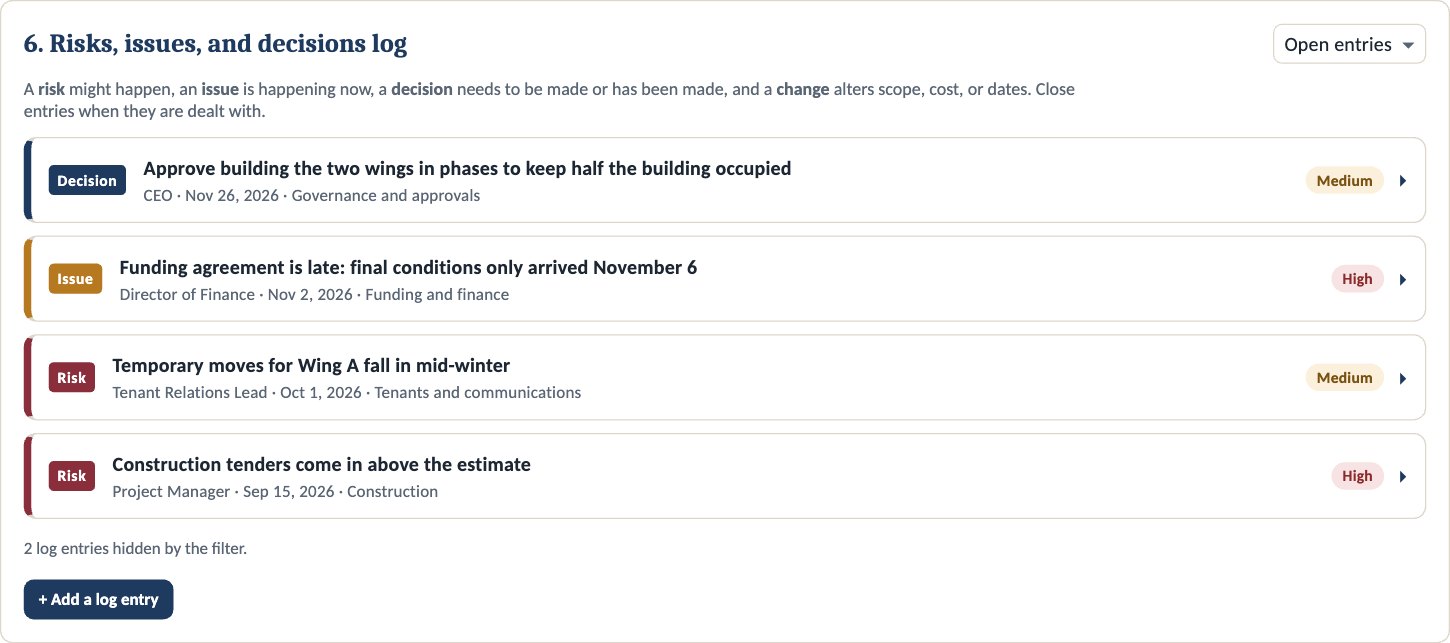
- Add an entry, choose its type (risk, issue, decision, or change), and rate it high, medium, or low.
- Give every high risk an owner and a response.
- For a decision, use the date it is needed. Open decisions go into the board report.
- Close entries when they are dealt with.
Step 7: Strategic priorities and KPIs (section 7, optional)
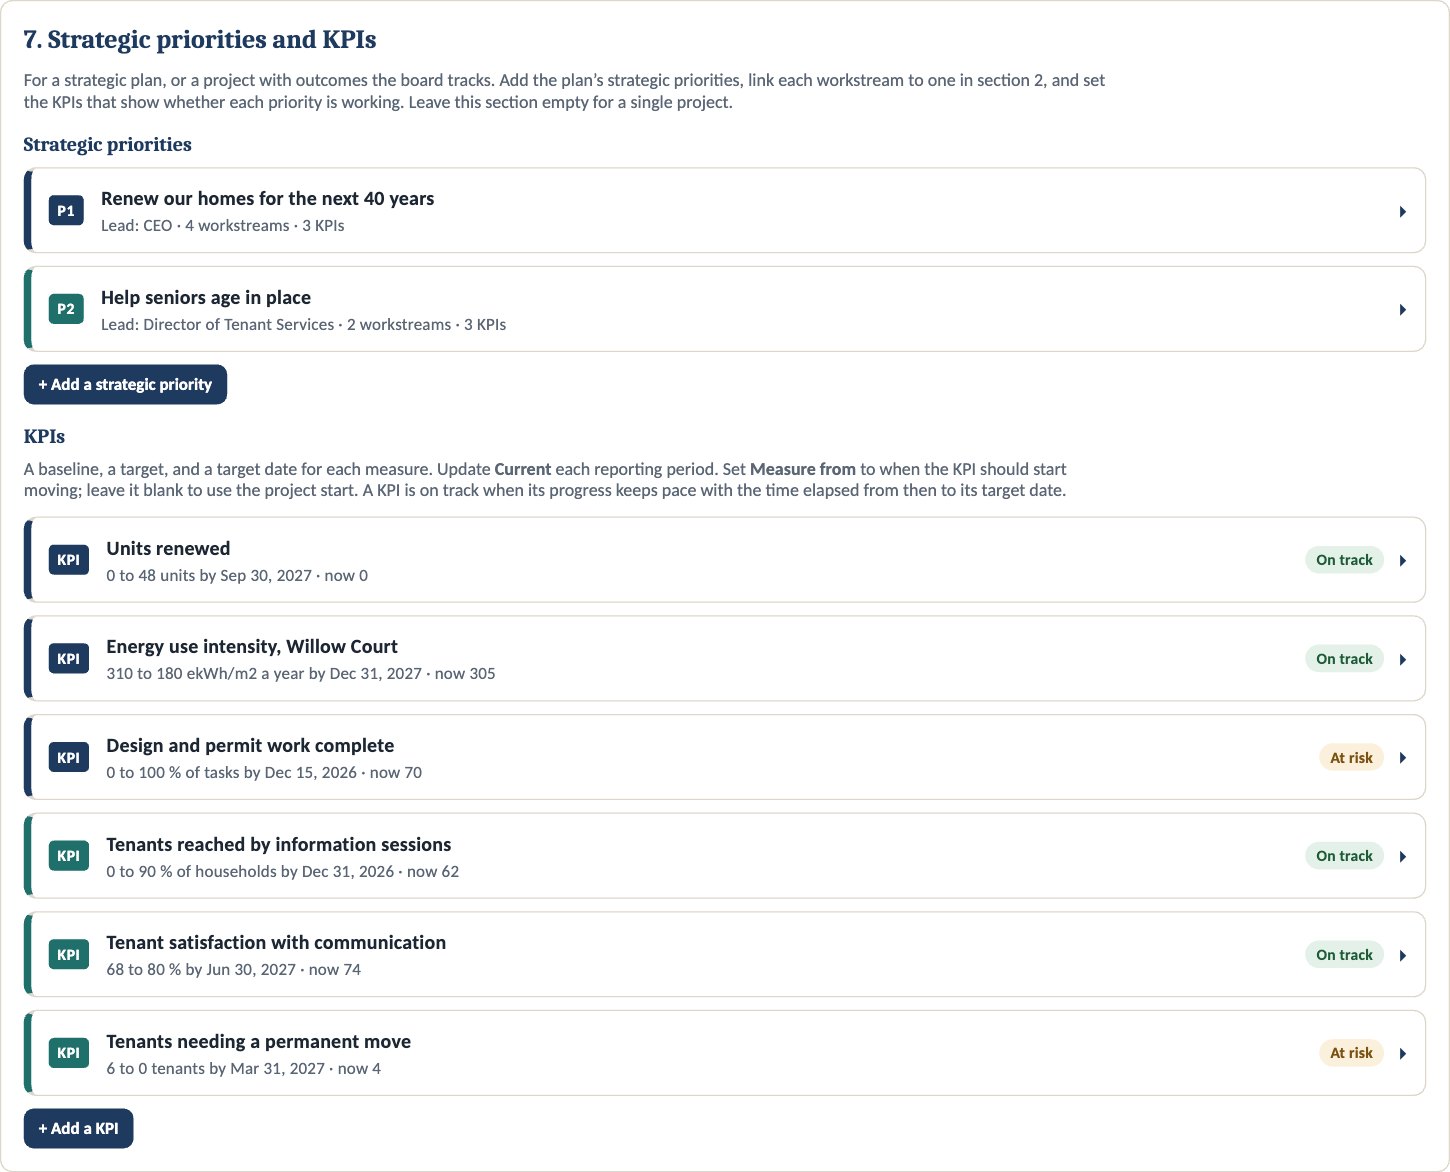
- Add each strategic priority with an executive lead and the outcome you are committing to.
- Add KPIs with a baseline, target, target date, "measure from" date, and whether higher or lower is better.
- Update Current on each KPI every reporting period.
Tip: Leave this section empty for a single project; nothing else changes.
Step 8: Read the results
- Overall status: green, amber, or red at the top, as at the status date.
- Results at a glance: read the summary, and compare percent complete with planned to date.
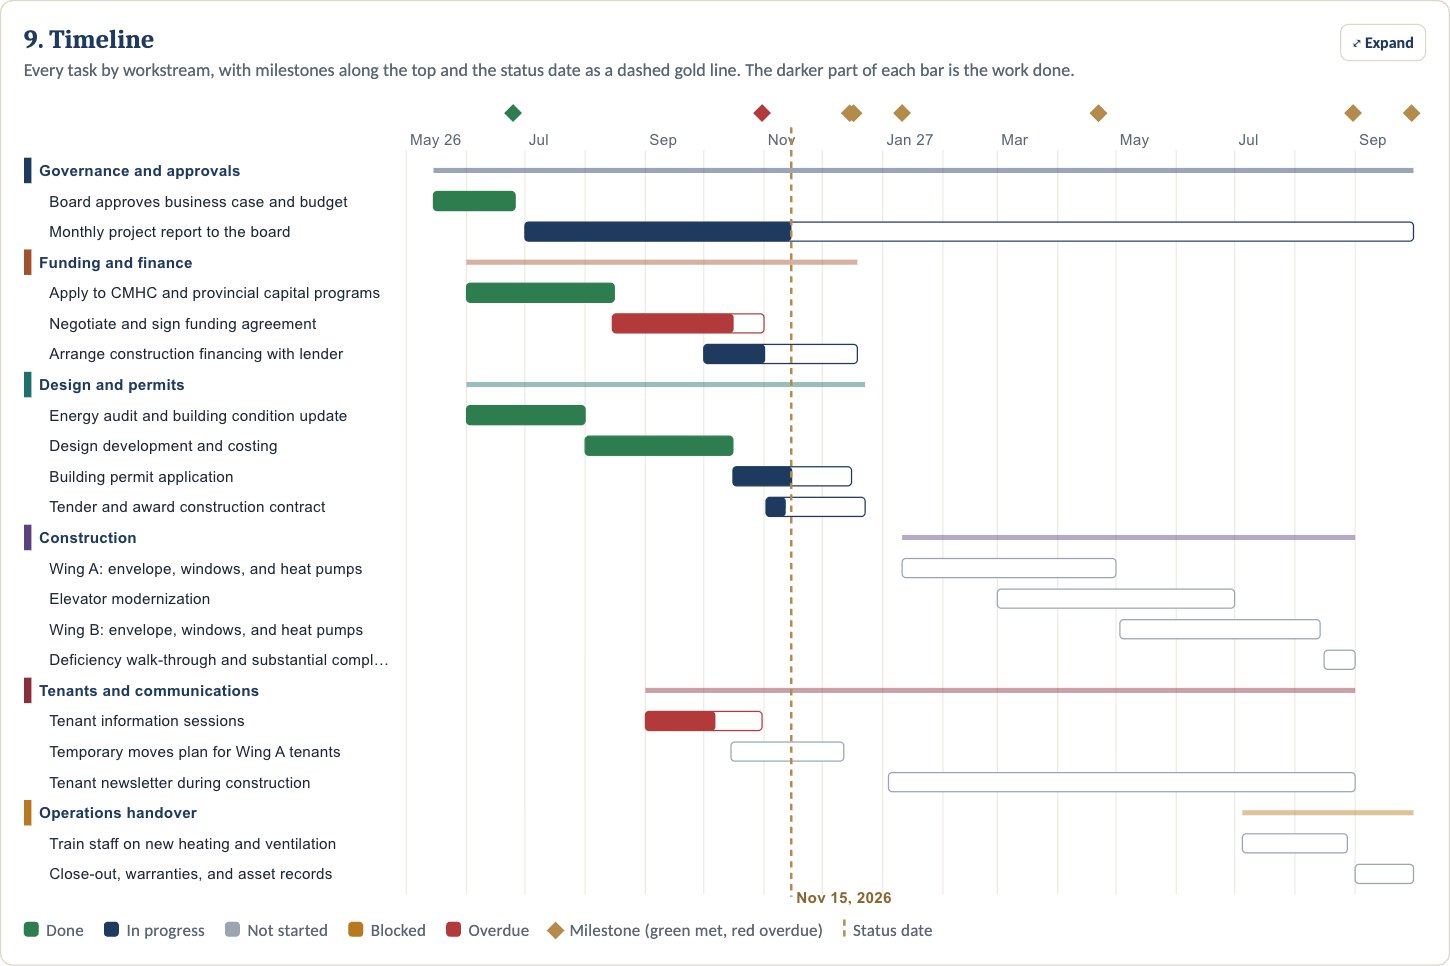
- Timeline: red bars are overdue tasks. The darker part of each bar should reach the status date line.
- Strategic scorecard: each priority and KPI against where it should be by now.
- Workstream status: use it to run the monthly project meeting, one lead at a time.
- Overdue and coming up: agree a fix for each overdue item and confirm owners for the next 30 days.
- Budget summary: red variances are over approved.
Step 9: Clear the health checks
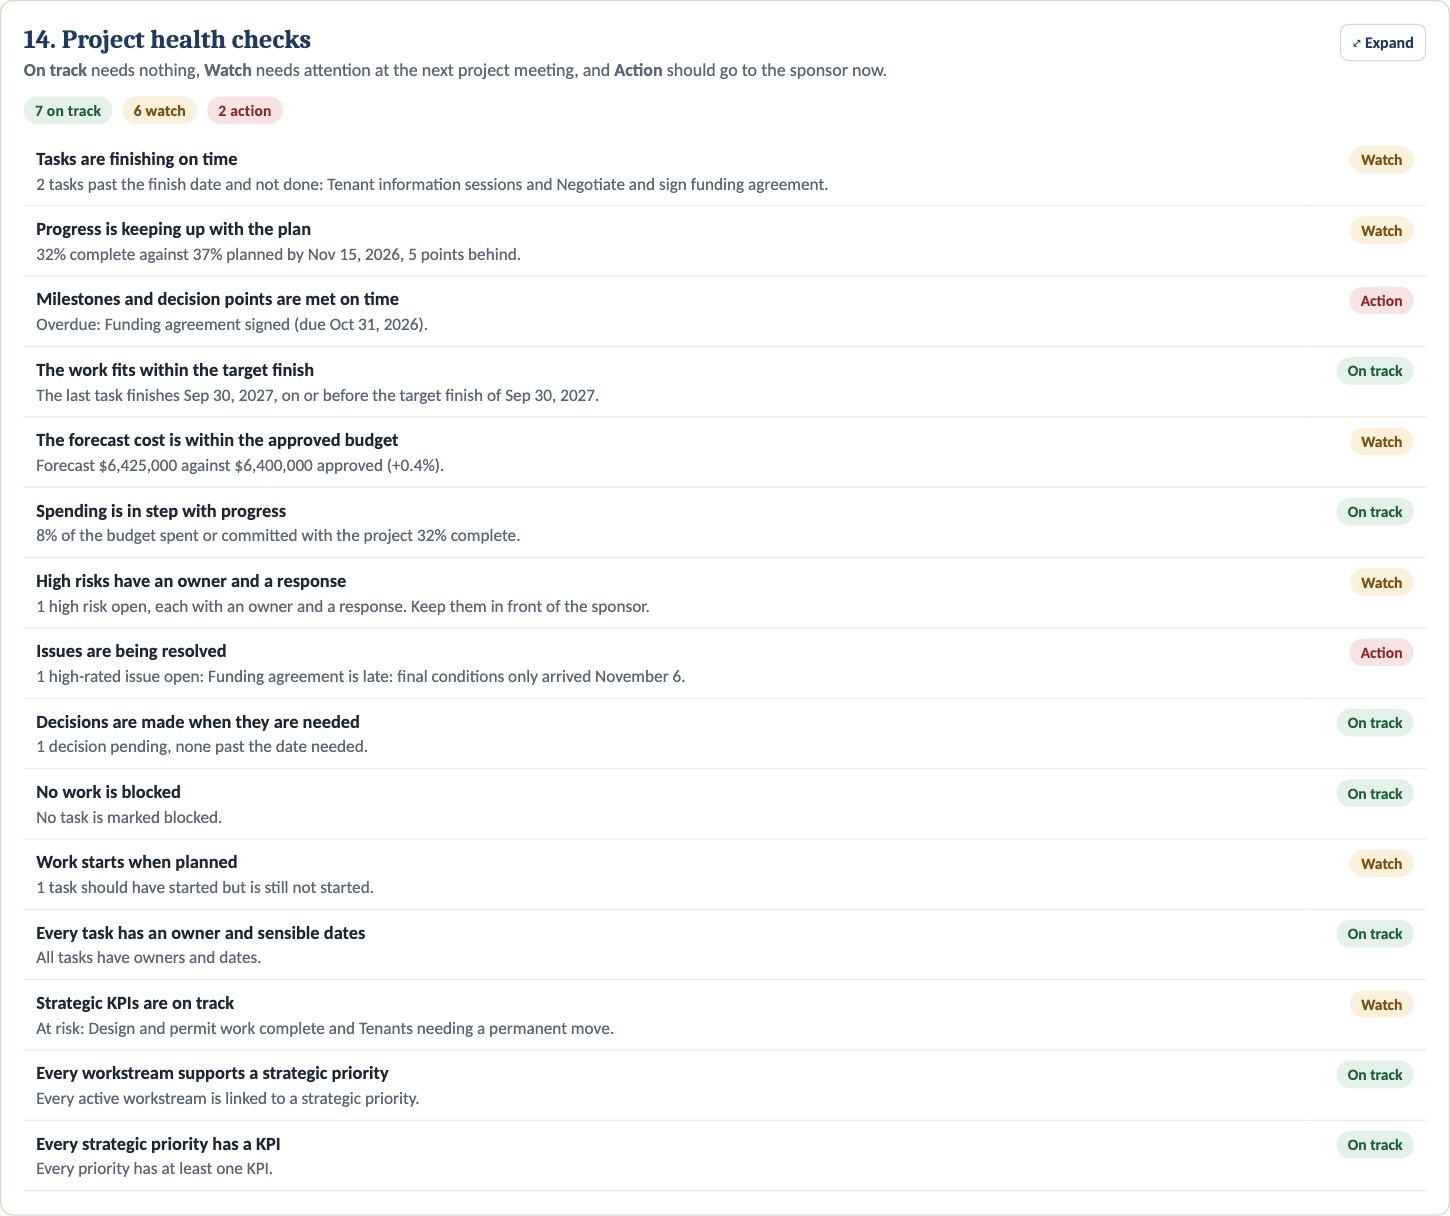
- Take every Action to the sponsor now.
- Review the Watch items at the next project meeting.
How status is set: any Action makes the project red; any Watch makes it amber. An overdue milestone, a forecast more than 5% over budget, or a high-rated open issue each turns it red.
Step 10: Present, report, and save
- Select Present for a full-screen board briefing, or Download status report (PDF).
- Work saves to your account as you go. Save a named version before each board meeting and use Save planner file for a backup.
- Undo and redo with the curved arrows in the bottom-right corner.
Works with: Multifamily Feasibility, Risk Management.
Risk Management Planner Pro: step-by-step guide
Build a board-ready enterprise risk register. Score each risk for probability and impact, before and after controls, on a five-by-five scale. Set the board's risk appetite by category, plan treatment actions, and track key risk indicators. The planner turns it into heat maps, an appetite check, and a report to the board.
Time to set up: two to three hours for a first register; much less for updates.
Have on hand: your current risk register or list of top risks, the board's risk policy, insurance summary, and annual operating budget.
Before you start
- Sign in and select Risk Management Planner Pro on your account page.
- The planner opens with a fictitious example, Kestrel Valley Housing Society, with 15 risks. Select Start a blank register in Save, share, and export when you are ready.
- On a team plan, select Start editing before you make changes and Done editing when you finish.
- Select ? Help & tour for a two-minute guided tour.
Step 1: Organization and scoring (section 1)
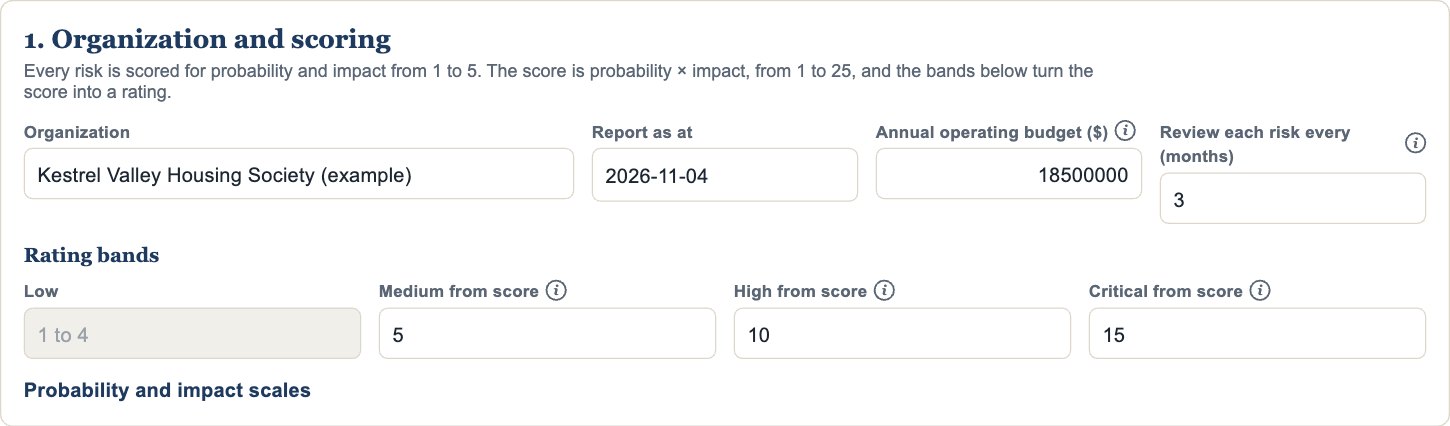
- Enter the organization, the report date, and the annual operating budget. The budget sets the dollar ranges on the financial impact scale.
- Set how often each risk should be reviewed (for example, every 3 months).
- Check the rating bands: the scores (probability × impact, 1 to 25) where Medium, High, and Critical start.
- Open Probability and impact scales and share them, so everyone scores risks the same way.
Step 2: Set risk appetite by category (section 2)
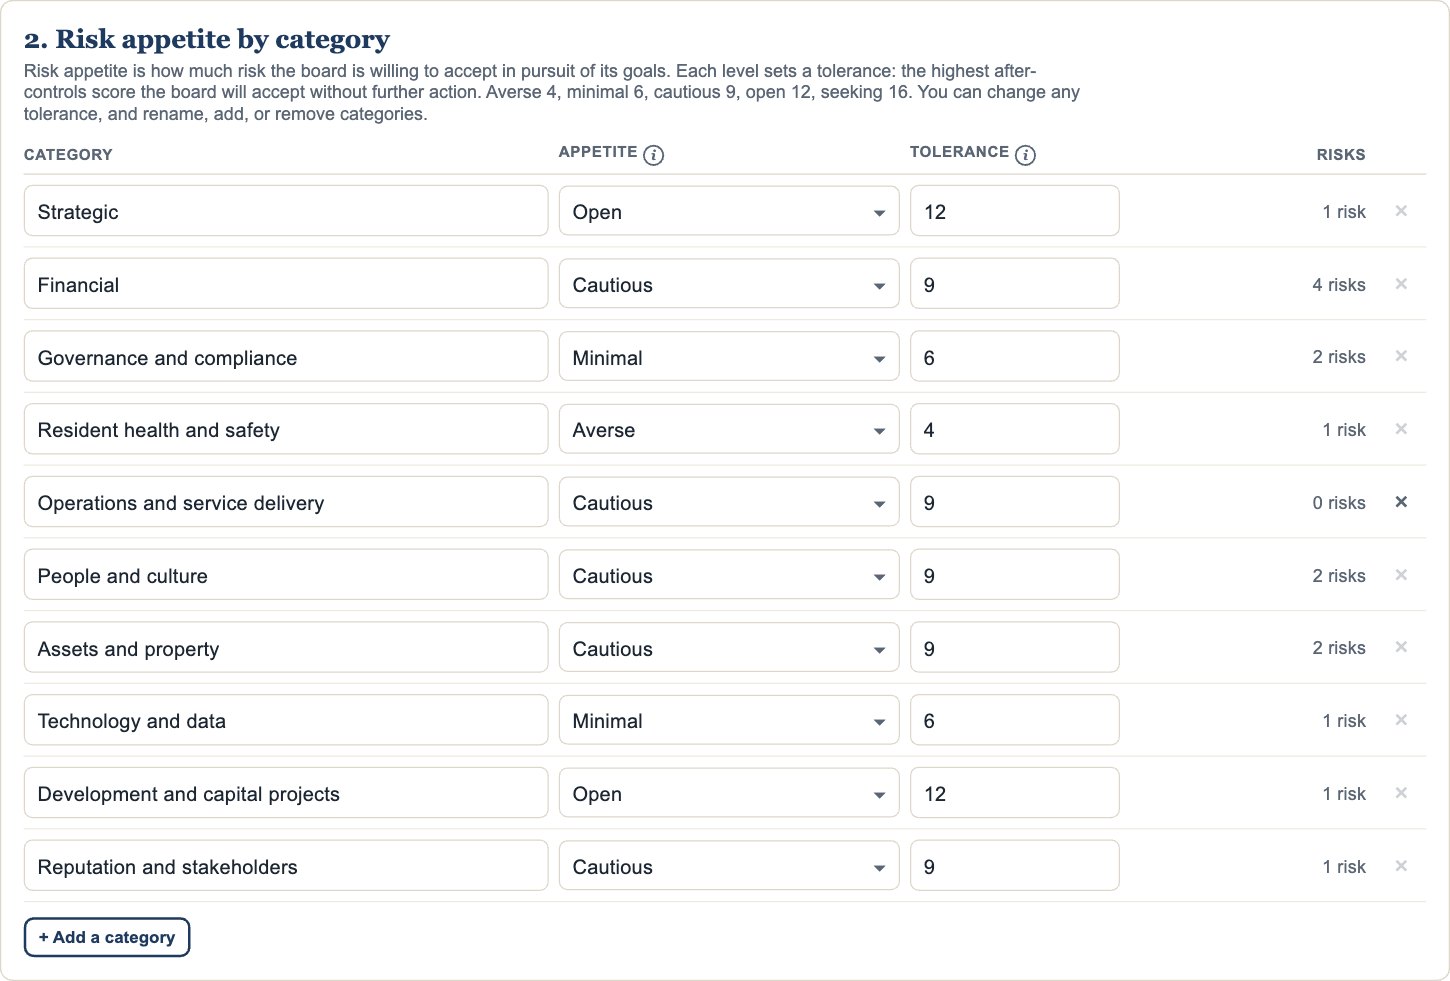
- Choose an appetite for each category: averse, minimal, cautious, open, or seeking. Each sets a tolerance, the highest after-controls score the board accepts without further action.
- Change any tolerance, and rename, add, or remove categories to match your policy.
Step 3: Build the risk register (section 3)
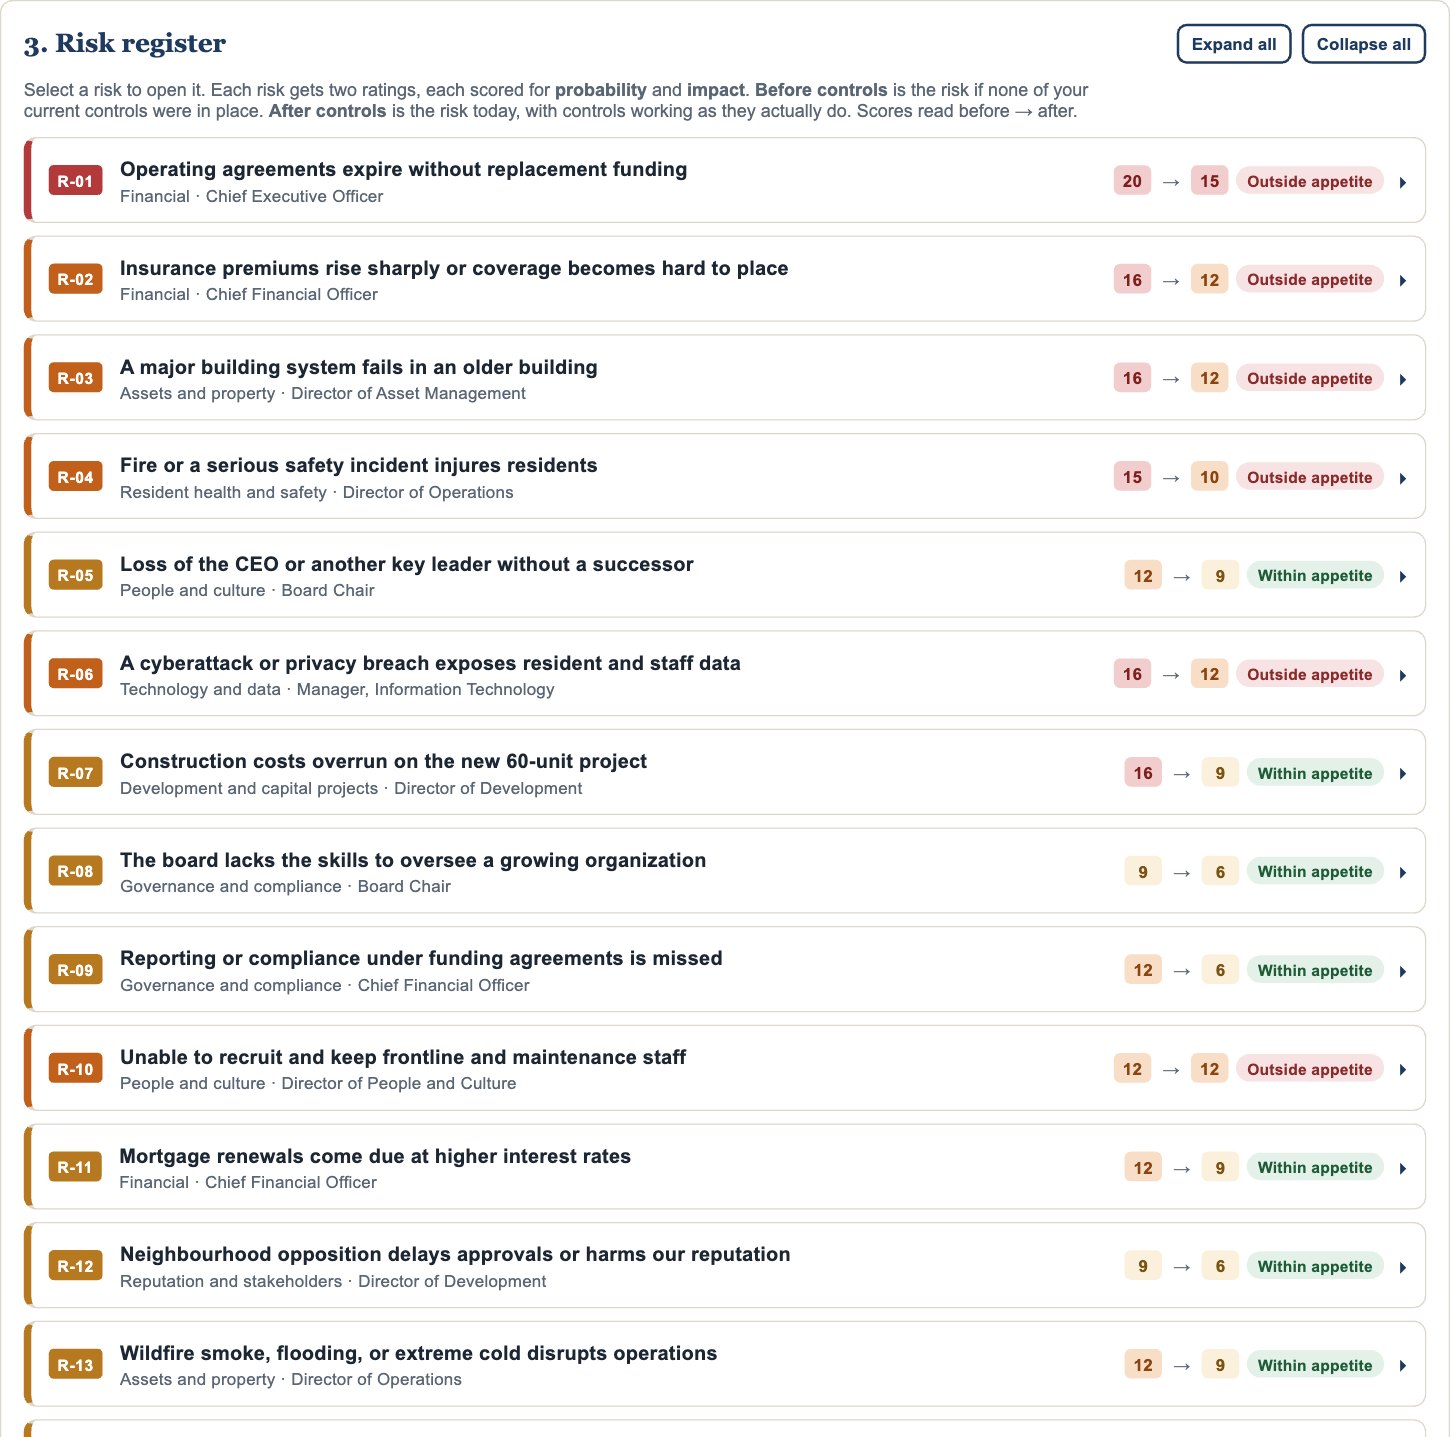
- Select + Add a risk. State it as an event: what could happen.
- Choose the category and name an accountable owner (a role is fine).
- Score Before controls: probability and impact if none of your controls were in place.
- Score After controls: the risk today, with controls working as they actually do.
- Describe the cause and consequence, list current controls, and rate how well they work.
- Choose the response (treat, tolerate, transfer, or terminate), the trend, and the last review date.
Tip: A risk outside appetite with no open action is flagged. Add an action in section 4, or record a board decision to tolerate it.
Step 4: Plan treatment actions (section 4)
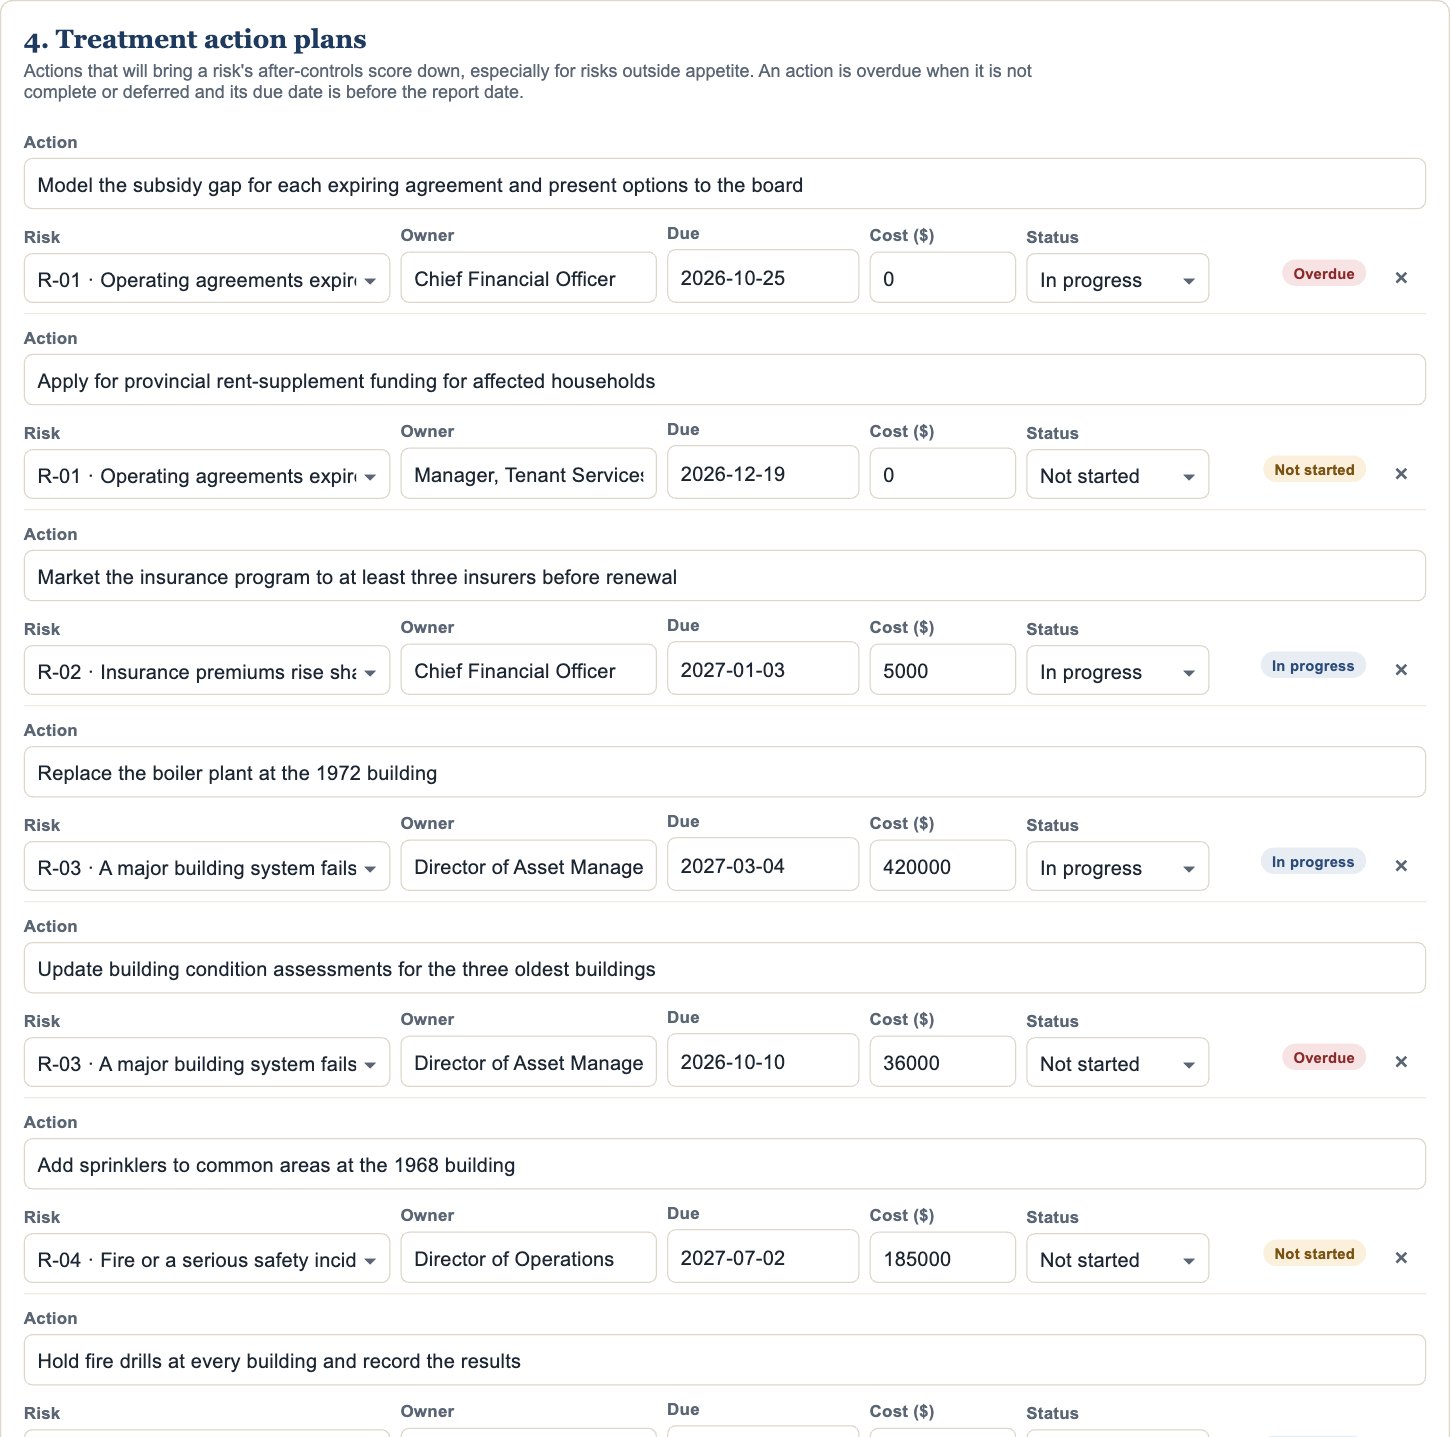
- Select + Add an action and link it to a risk.
- Enter the owner, due date, cost, and status.
Step 5: Add key risk indicators (section 5)
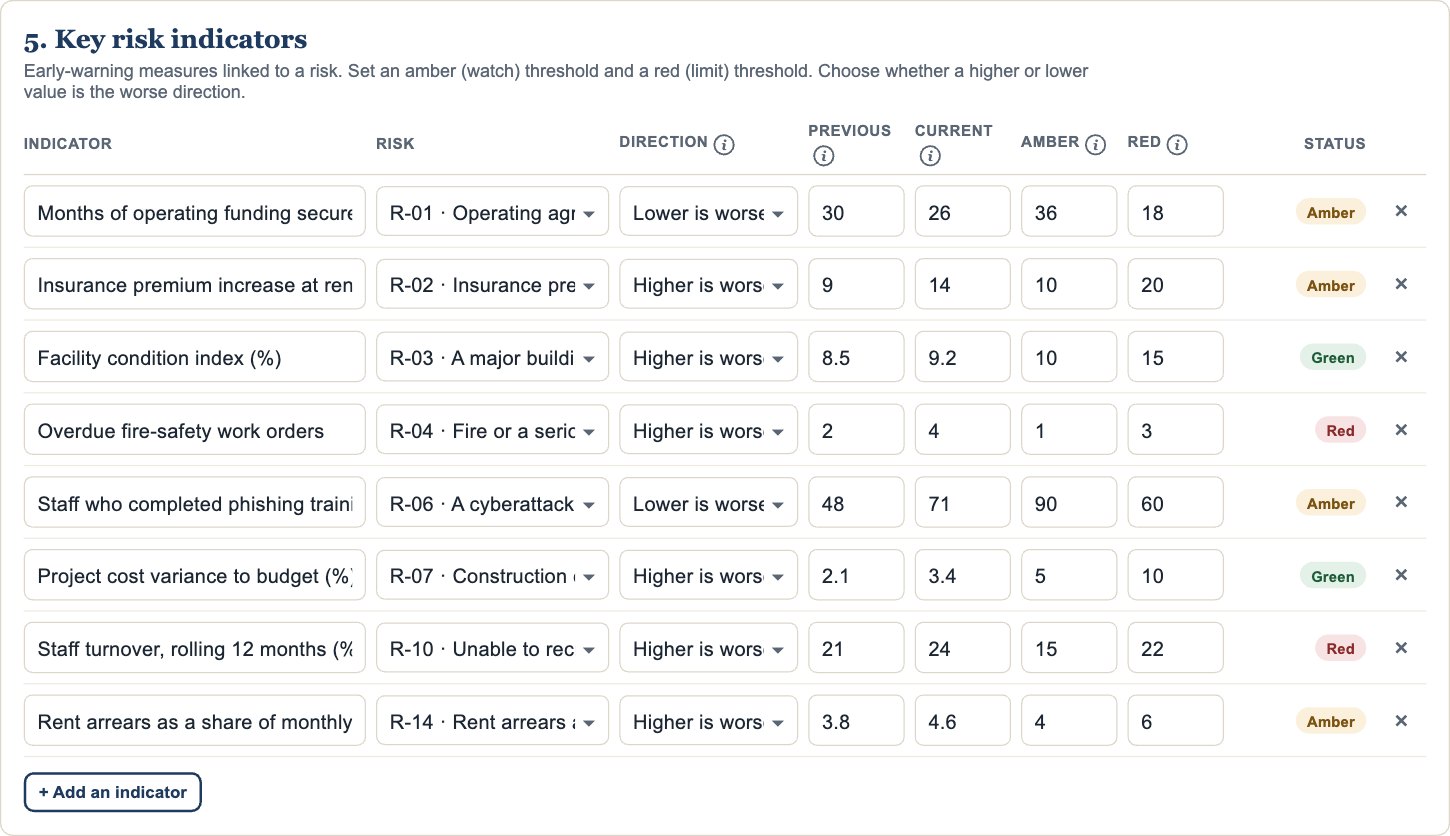
- Select + Add an indicator and link it to a risk.
- Choose whether higher or lower is worse.
- Enter the previous and current values, and the amber (watch) and red (limit) thresholds.
Step 6: Read the results (sections 6 to 12)
- Use Risk category in the toolbar to view all categories or one.
- Risk profile (6): headline measures and a plain-language summary.
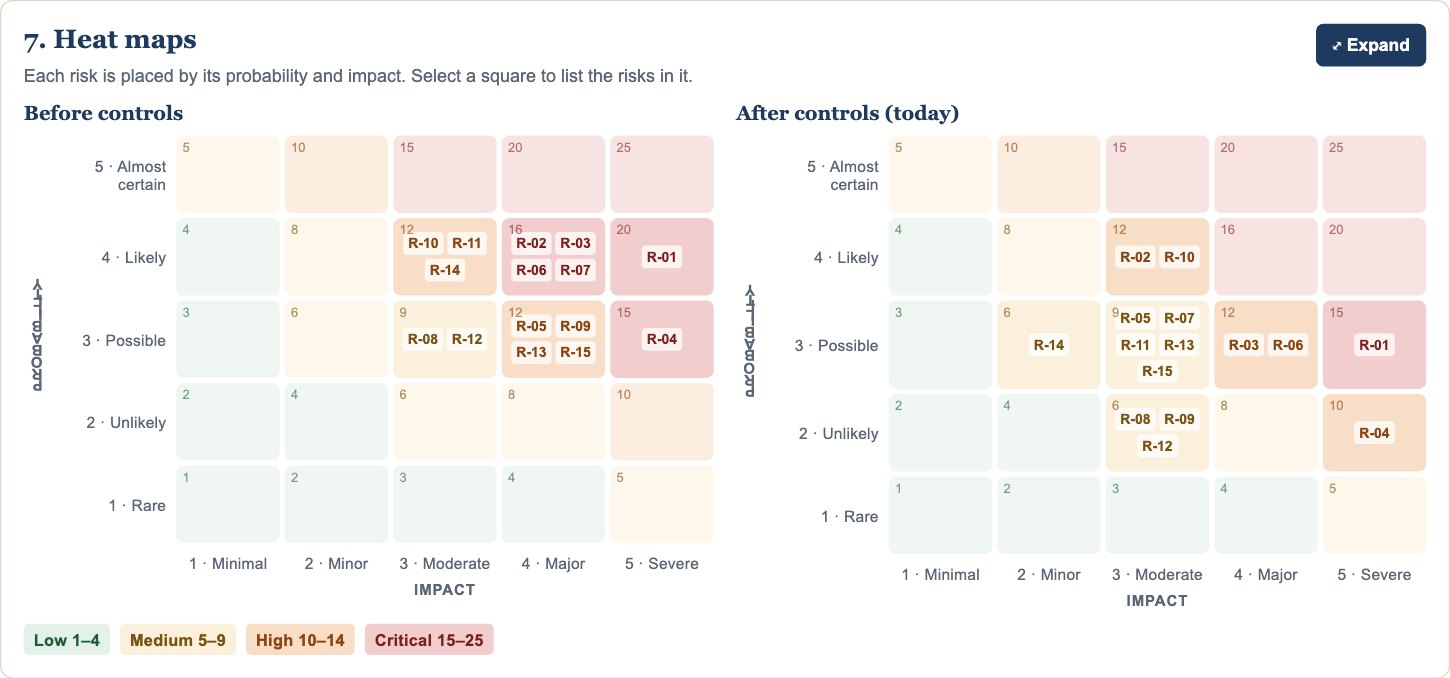
- Heat maps (7): before and after controls. Select a square to list the risks in it.
- Top risks (8): ranked by after-controls score, with appetite status.
- Appetite and control effectiveness (9): a low "reduced by controls" figure means controls are doing little for that category.
- Treatment plan status (10) and key risk indicator dashboard (11).
- Framework health checks (12): fix every Action now and the Watch items before the next report.
Step 7: Present, report, and save
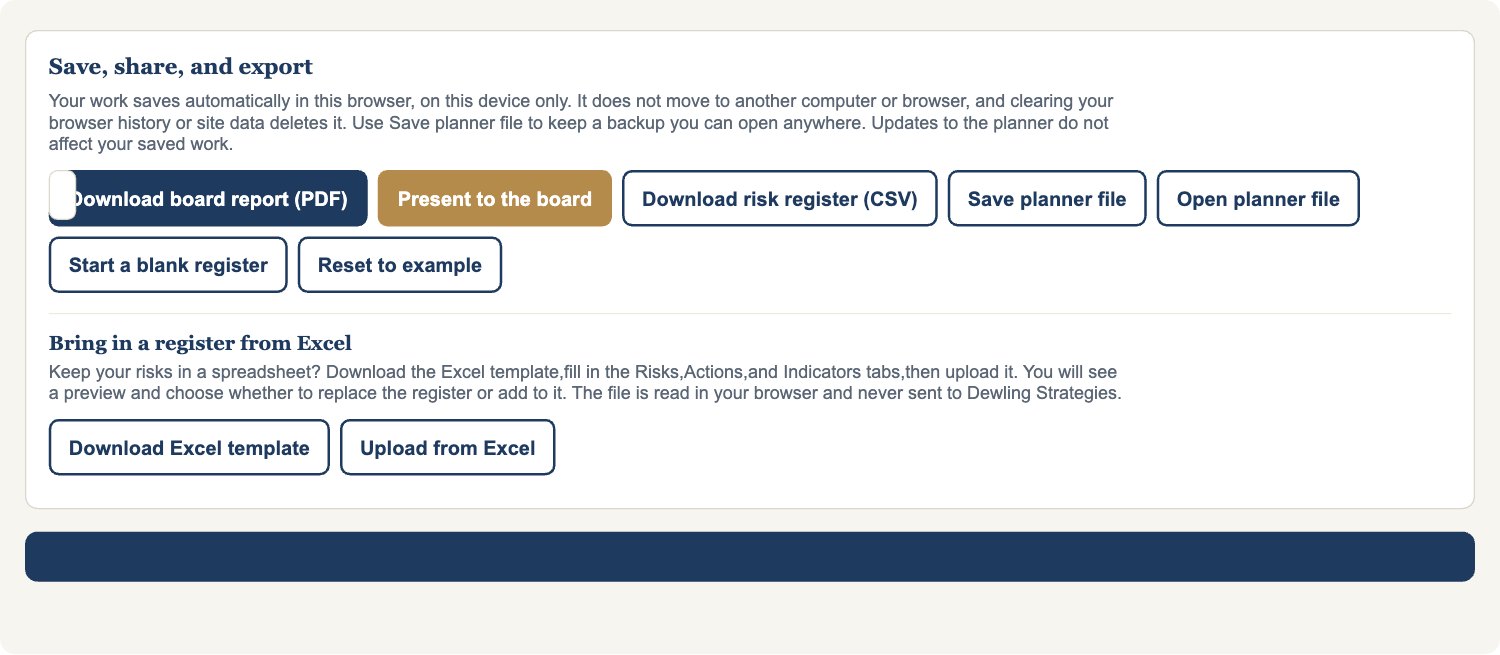
- Select Present for a full-screen board briefing, ending with the decisions asked of the board, or PDF report for the risk report.
- Download risk register (CSV) for Excel.
- Work saves to your account as you go. Save a named version before a board meeting, for example "Board-approved, November 2026".
- Undo and redo with the curved arrows in the bottom-right corner.
Good to know
- After-controls scores should never be higher than before-controls scores. The checks flag any that are.
- Scores are judgements. Align the scales and appetite with your board-approved risk policy.
- The planner is not legal, insurance, or audit advice.
Works with: Business Continuity, Portfolio Asset Strategy.
Business Continuity Planner Pro: step-by-step guide
Build a continuity plan that keeps residents safe and services running when something goes wrong. Built for housing providers that run seniors lodges and supportive living as well as apartments. Rank critical functions by how long they can be down, test each site's night-shift evacuation, transport, backup power, and supplies, write emergency response procedures, and log your exercises.
Time to set up: half a day for a first plan, often over a few sittings.
Have on hand: site fire safety plans, resident evacuation counts (counts only, never names), staffing levels, transport and host-site agreements, generator details, and your drill records.
Before you start
- Sign in and select Business Continuity Planner Pro on your account page.
- The planner opens with a fictitious example, Kestrel Valley Housing Society. Select Start a blank plan in Save, share, and export when you are ready. A blank plan comes with common response roles and audiences filled in.
- On a team plan, select Start editing before you make changes and Done editing when you finish.
- Select Take the guided tour for a two-minute walkthrough. Select i beside a field for what to enter, and ? beside a section heading for what the section is for.
Step 1: Plan and settings (section 1)
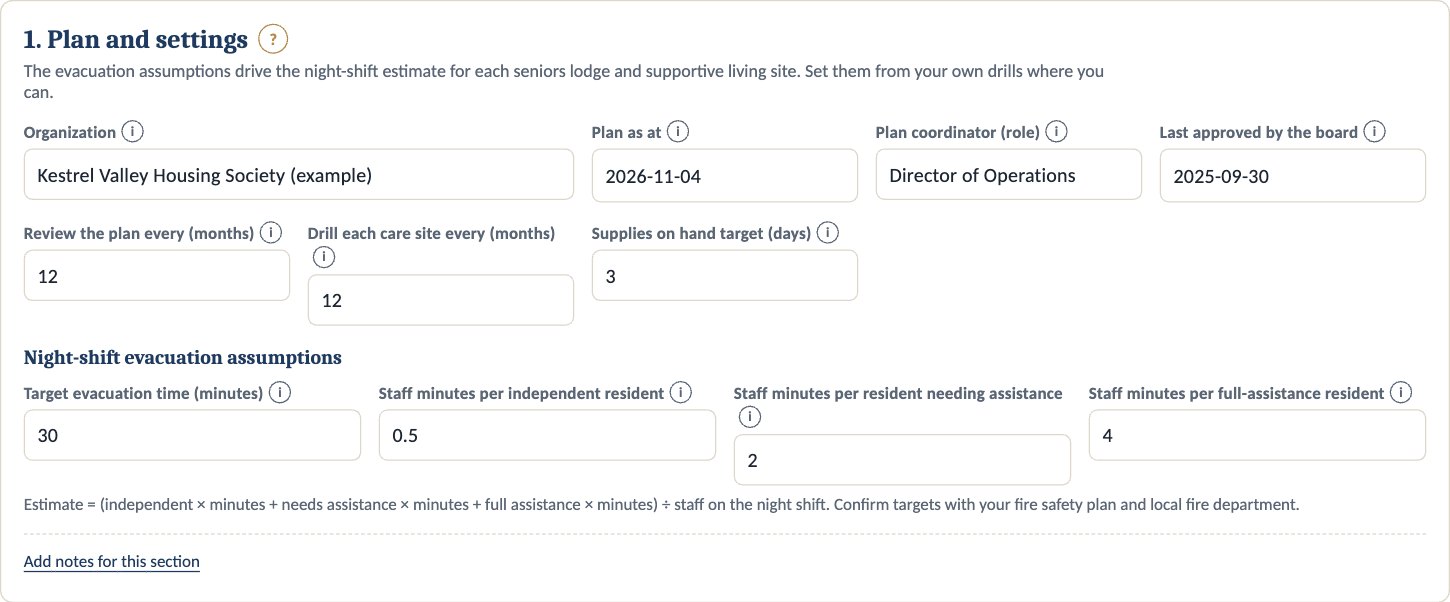
- Enter the organization, plan date, plan coordinator (a role), and the date the board last approved the plan.
- Set how often to review the plan and how often each care site must drill.
- Set the days of supplies each site should hold (3 days is the usual minimum).
- Set the night-shift evacuation assumptions: target minutes, and staff minutes per independent, assisted, and full-assistance resident. Replace the presets with times from your own drills.
Step 2: Sites and residents (section 2)
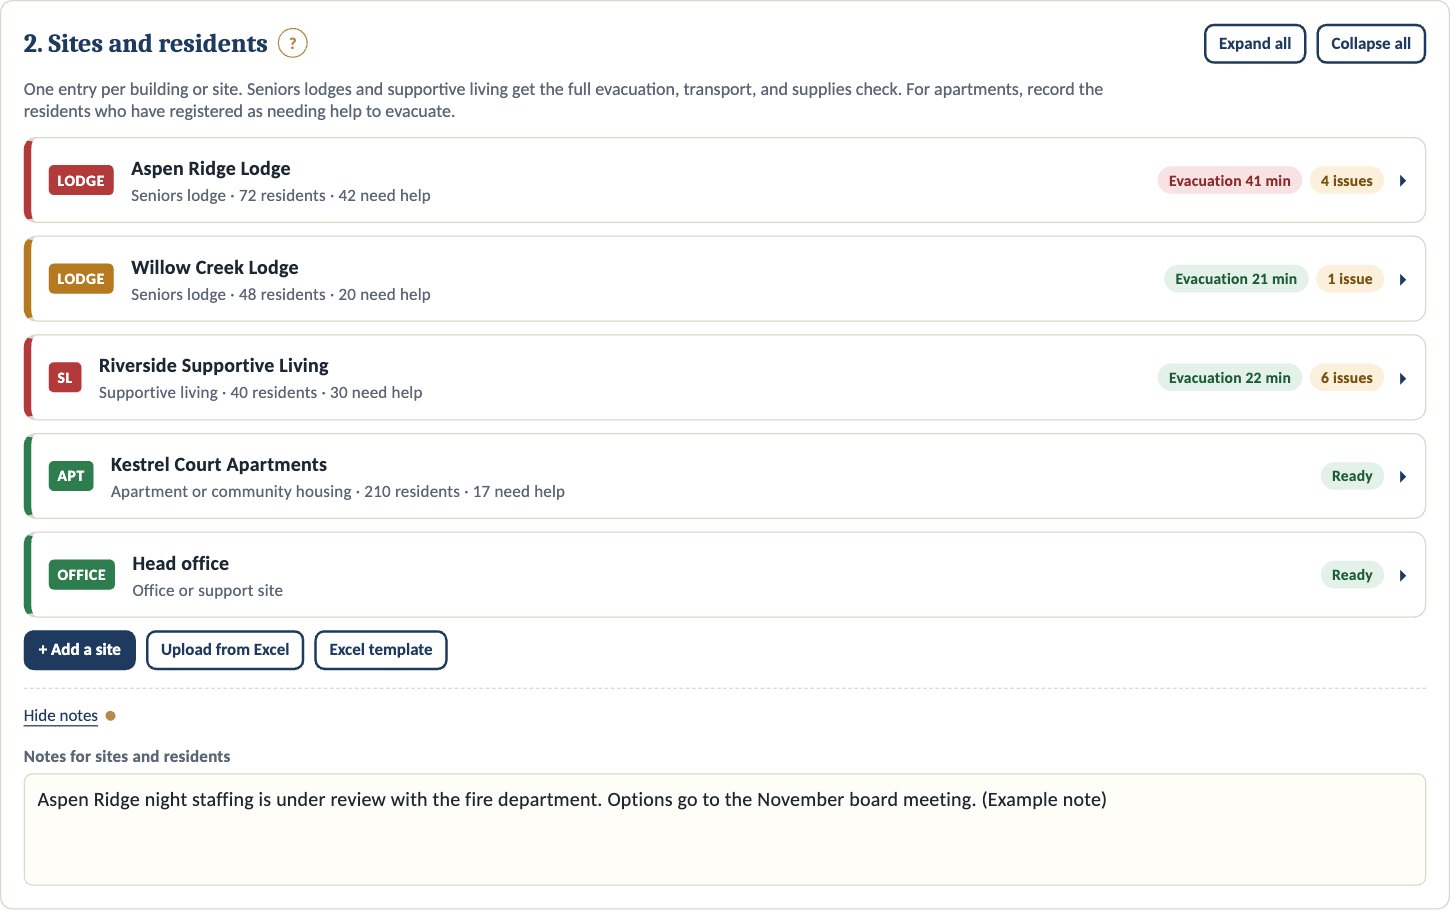
- Select + Add a site for each building or office, and choose its type.
- For seniors lodges and supportive living, enter residents, those needing assistance or full assistance, medically dependent residents, night-shift staff, arranged wheelchair spaces and seats, host site, backup power, fuel, and days of water, food, and medication.
- For apartments, record the residents registered as needing help to evacuate.
- Open each site to see its issues and its night-shift evacuation estimate.
Step 3: Critical functions (section 3)
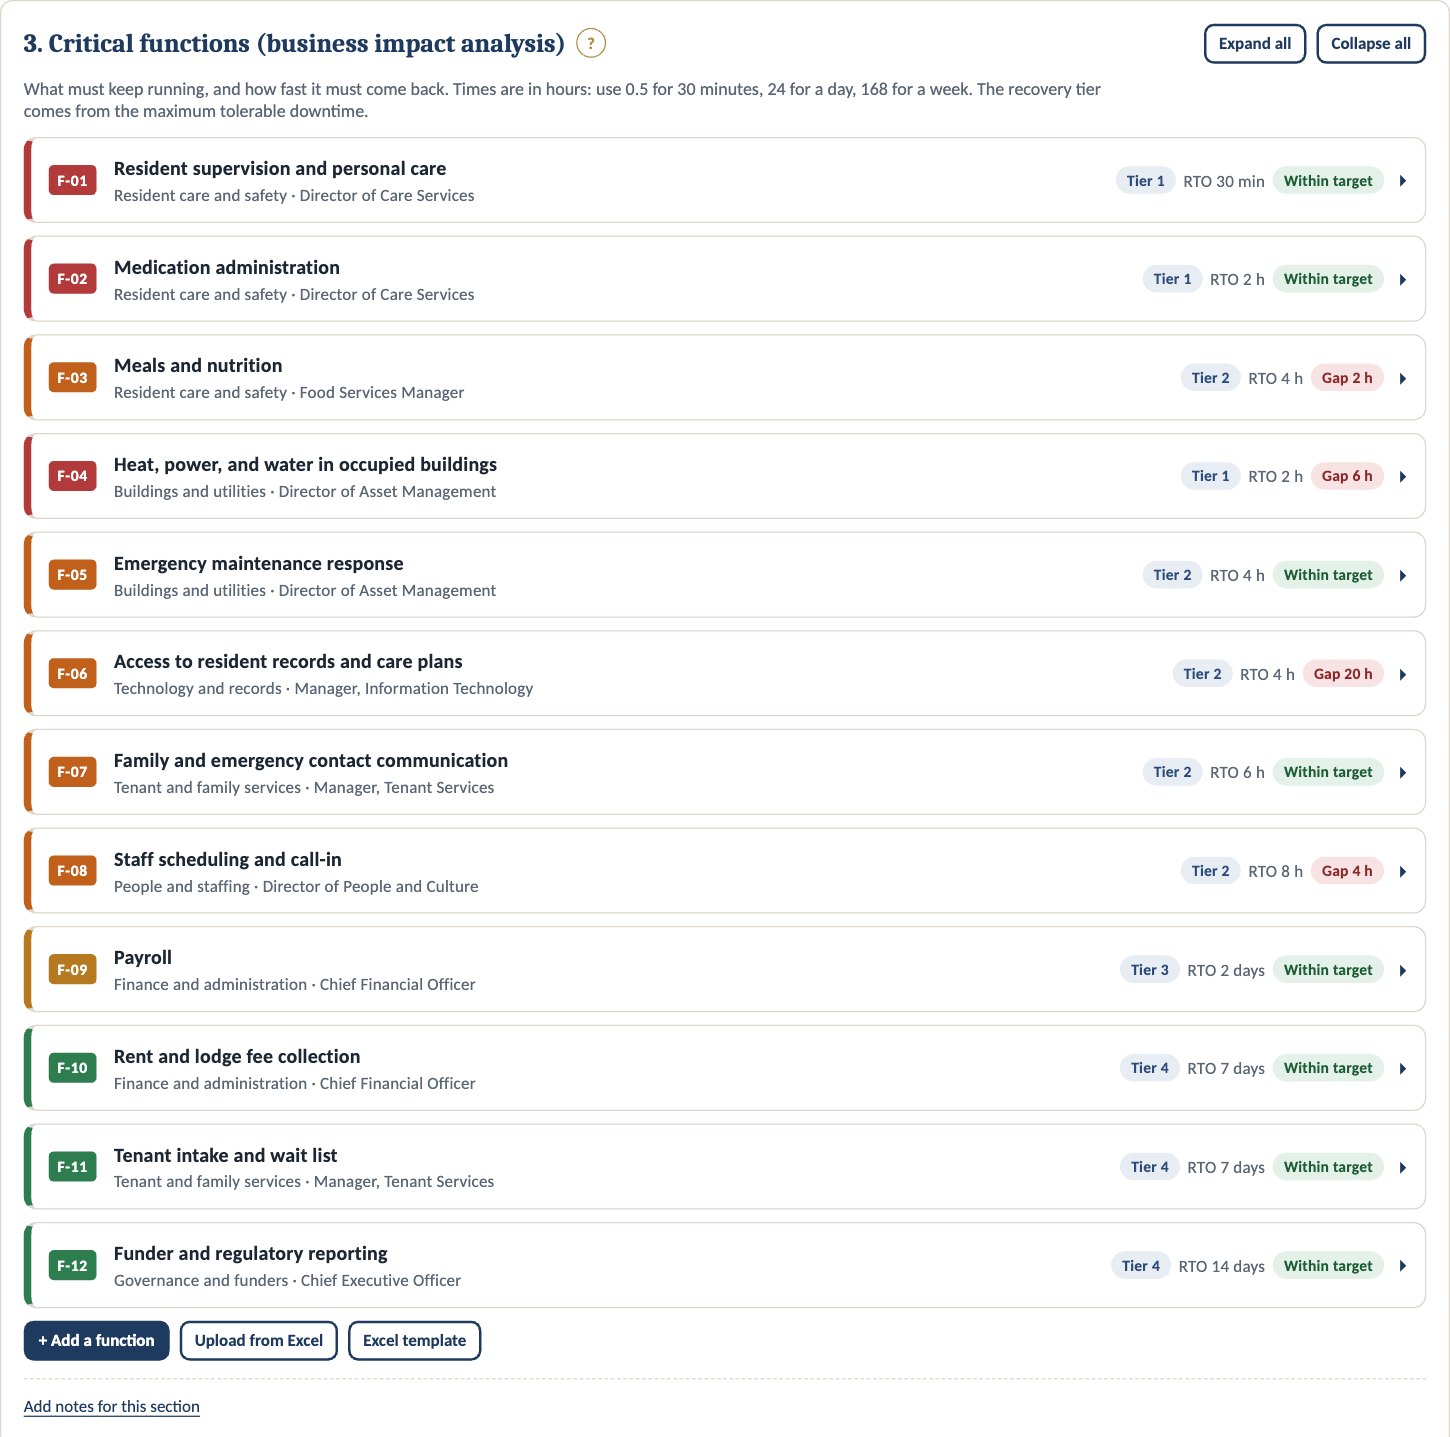
- Select + Add a function for each thing that must keep running.
- Name an owner and enter, in hours: the maximum tolerable downtime, the recovery time objective, and the current recovery capability (0.5 = 30 minutes, 24 = a day).
- Record dependencies and the recovery strategy.
Tip: Where today's recovery takes longer than the target, the planner shows a recovery gap.
Step 4: Disruption scenarios (section 4)
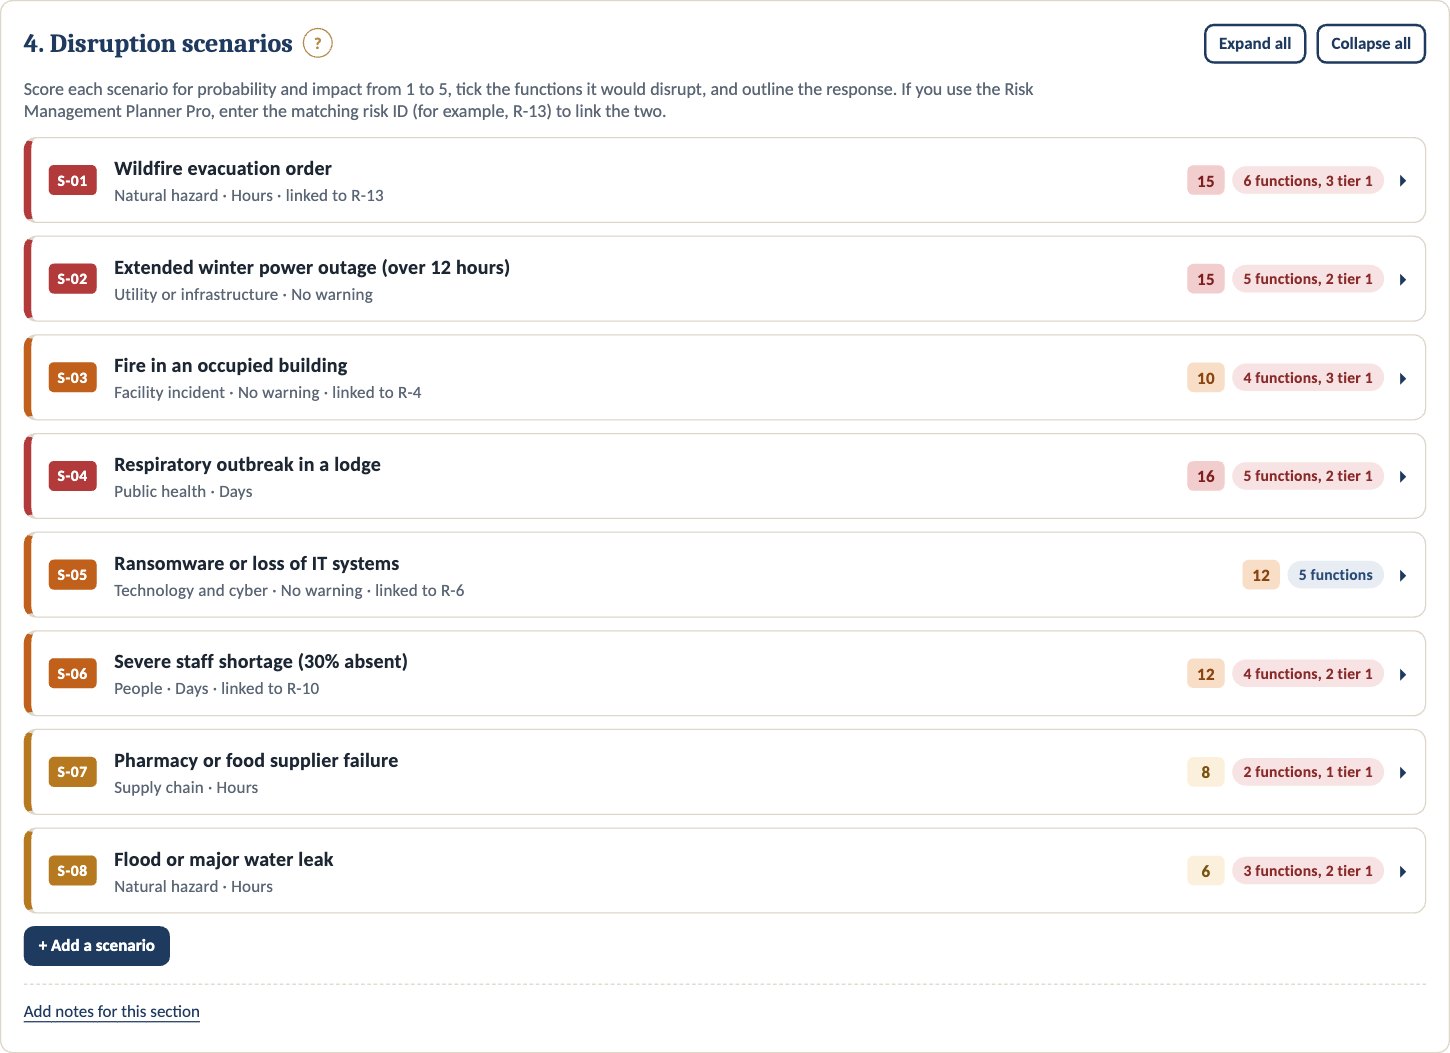
- Select + Add a scenario. Choose its type and warning time, and score probability and impact from 1 to 5.
- Tick the functions it would disrupt and outline the response.
- If you use the Risk Management Planner, enter the matching risk ID (for example, R-13).
Step 5: Emergency response procedures (section 5)
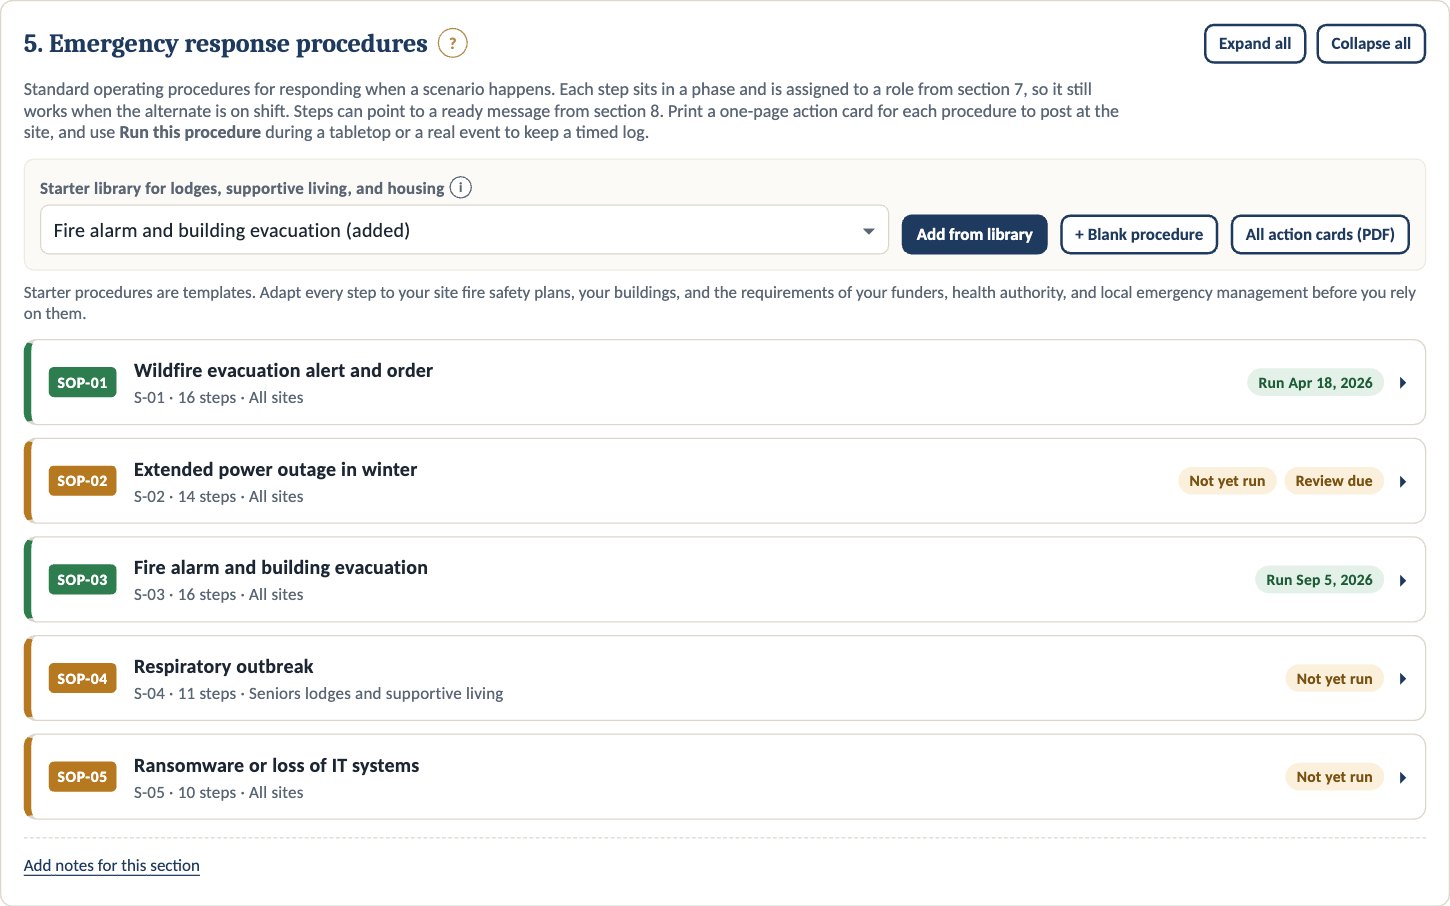
- Choose a procedure from the Starter library (fire, wildfire, winter power outage, smoke, missing resident, outbreak, ransomware, staff shortage, flood) and select Add from library, or start a Blank procedure.
- Link it to a scenario, set where it applies and the lead role, and write the Activate when trigger.
- Adapt the steps in each phase (first 15 minutes, first hour, first 24 hours, recovery). Assign each step to a role and, where needed, a ready message.
- List the go-kit and supplies.
- Select Action card (PDF) to print a one-page card for the site.
- During a tabletop or real event, select Run this procedure. Tick steps as they are done; times are recorded, and the run saves to the exercise log.
Tip: Starter procedures are templates. Adapt every step to your site fire safety plans and your funders' requirements.
Step 6: Supporting pieces (sections 6 to 9)
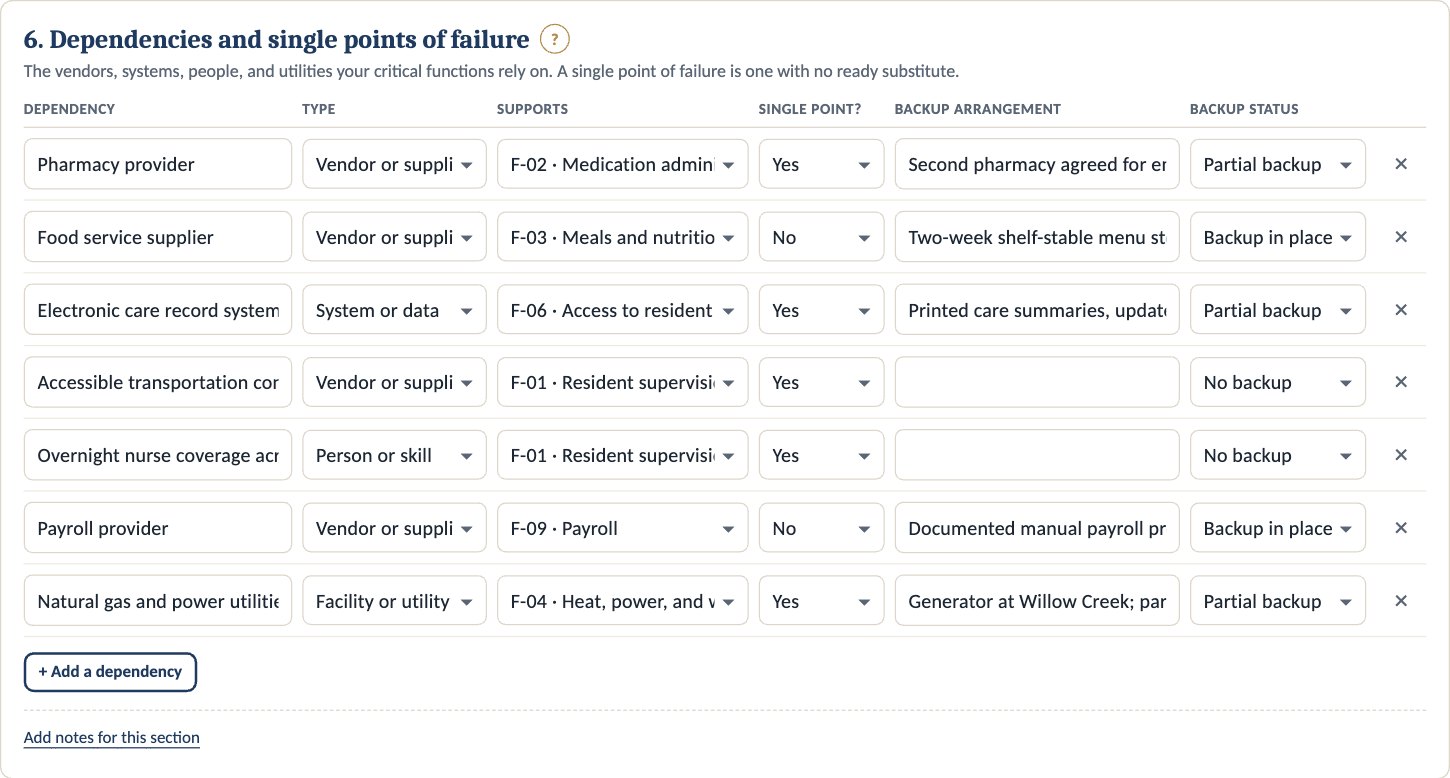
- Dependencies (6): vendors, systems, people, and utilities, marking single points of failure and backup status.
- Response team (7): a primary and a trained alternate for every role. Roles or names only; keep phone numbers in your own systems.
- Communication plan (8): for each audience, how fast, by what channel, and who sends. Draft the first message now, with [square brackets] for details.
- Exercises (9): log every drill, tabletop, and real event, with evacuation minutes for drills.
Step 7: Read the results (sections 10 to 14)
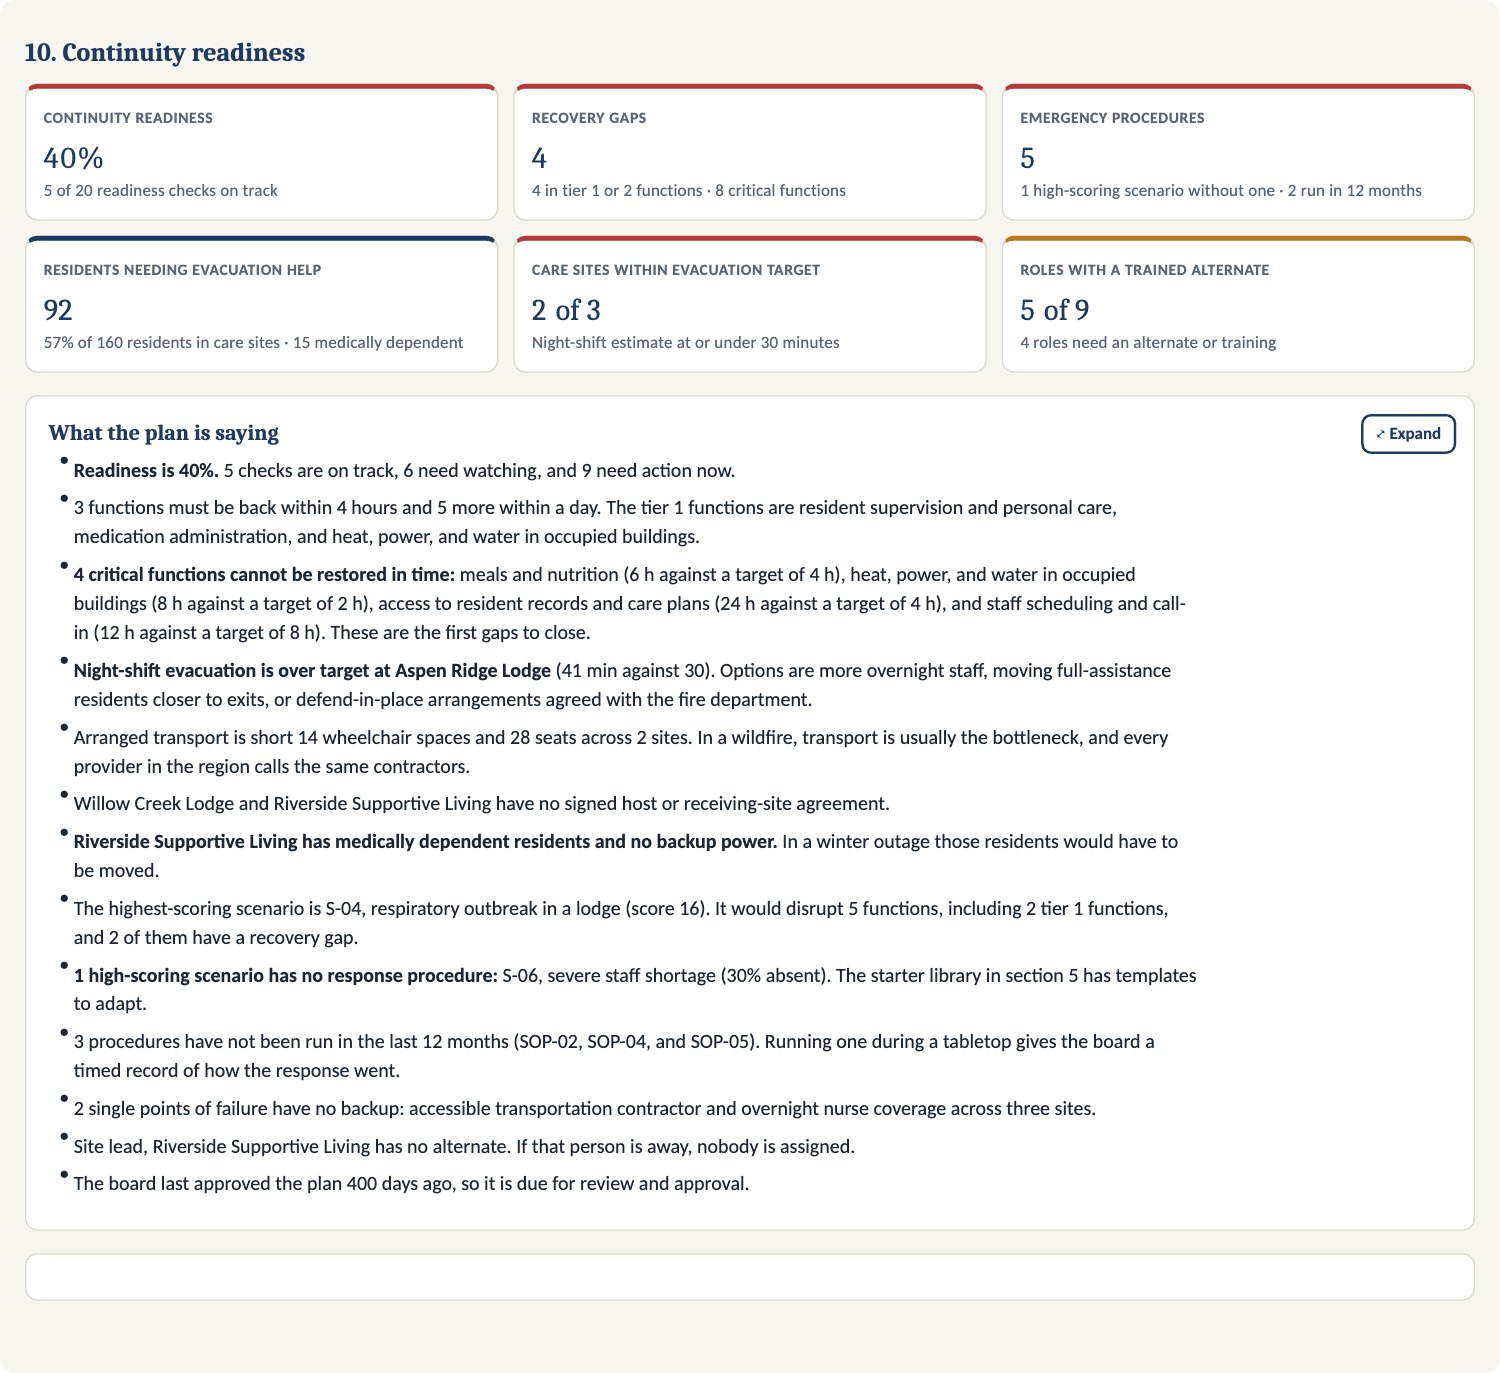
- Continuity readiness (10): the readiness score and a plain-language summary.
- Recovery priorities (11): red bars are recovery gaps to close first.
- Site readiness (12): evacuation, transport, host site, power, and supplies by site.
- Scenario coverage (13): which functions each scenario hits.
- Readiness checks (14): fix every Action now and the Watch items before the next review.
Step 8: Present, report, and save
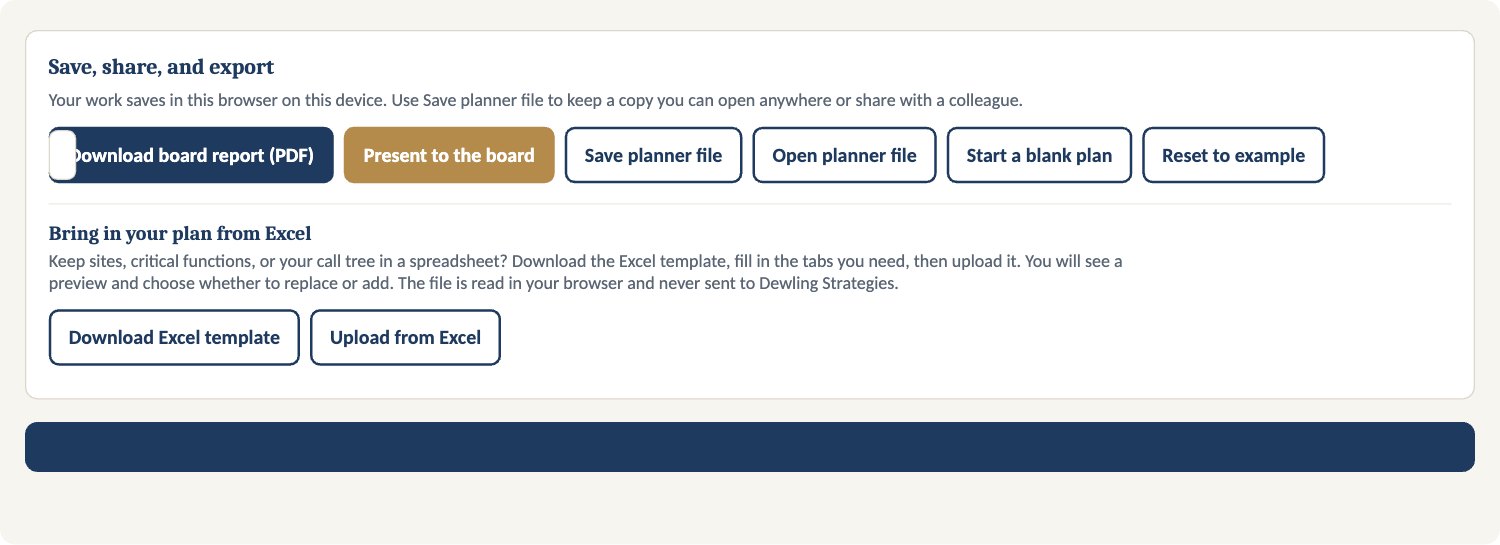
- Select Present for a full-screen board briefing, or PDF report for the continuity report. All action cards (PDF) prints every procedure.
- Add notes at the foot of any section; they print in the board report.
- Work saves to your account as you go. Use Save planner file for a backup. Undo and redo with the toolbar buttons or Ctrl+Z and Ctrl+Y.
Good to know
- The evacuation estimate is a planning estimate, not a fire code calculation. Confirm targets with your fire department.
- The structure follows CSA Z1600 and ISO 22301 but does not certify a plan.
Works with: Risk Management.
Board Governance Scorecard Pro: step-by-step guide
Run your board's yearly self-assessment: a confidential survey of directors, combined results, a board skills matrix, and an action plan. Facilitated reviews are also available from Dewling Strategies.
Time to set up: about 30 minutes, plus two to three weeks for directors to respond.
Have on hand: a list of directors with their term end dates, and last year's results if you have them.
Before you start
- Sign in and select Board Governance Scorecard Pro on your account page.
- The planner opens with a fictitious example, Kestrel Valley Housing Society. Select Start a blank review in Save, share, and export when you are ready for your own board.
- On a team plan, select Start editing before you make changes and Done editing when you finish. Only admins and editors can create an online survey.
- Select ? Help & tour for a two-minute guided tour.
Step 1: Board and review (section 1)
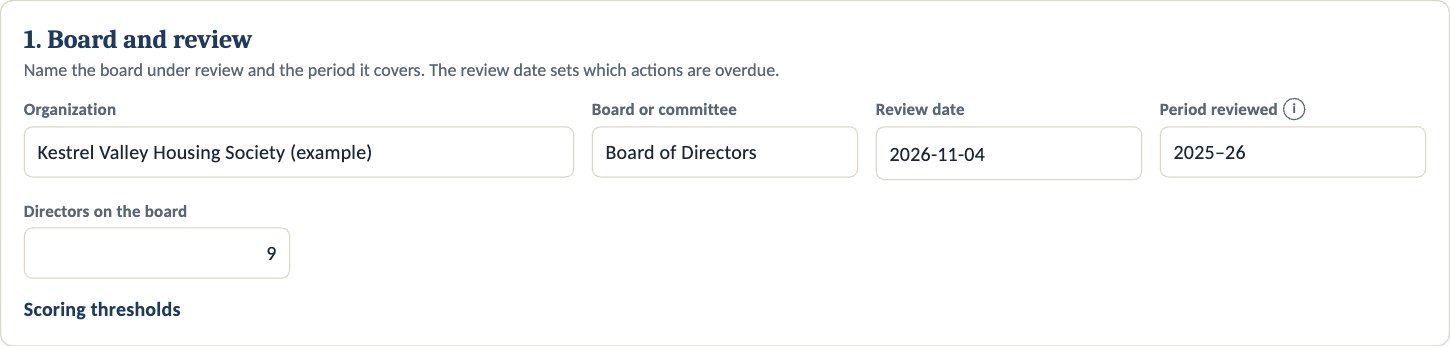
- Enter your organization, board name, review period, and number of directors.
- Open Scoring thresholds only if you want to change the defaults: 4.0 or more is a strength, below 3.0 is a gap.
Tip: Keep the same thresholds every year so results compare fairly.
Step 2: Choose the survey questions (section 2)
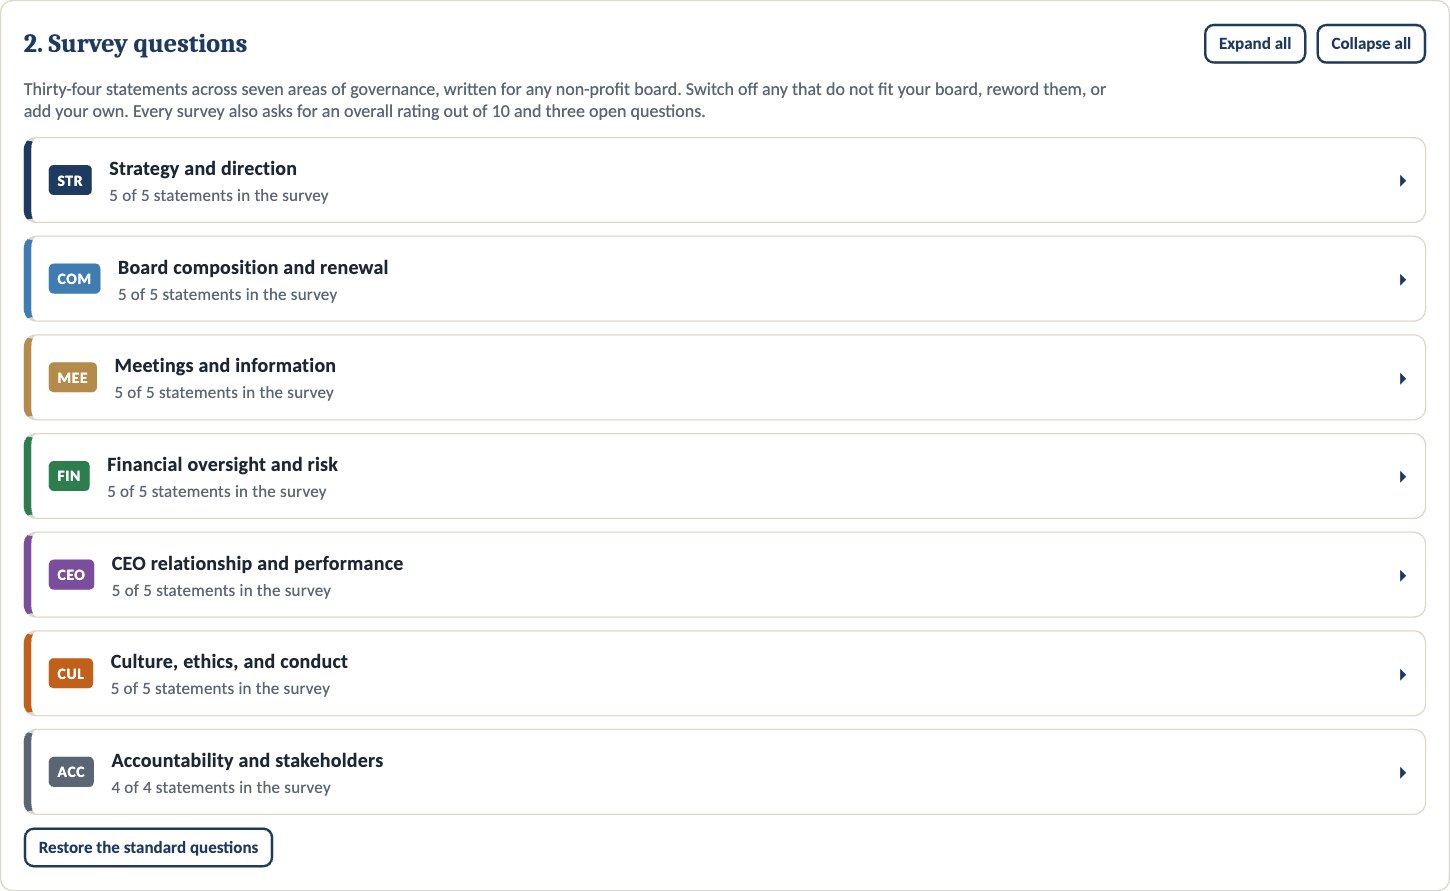
- Open each of the seven governance areas to see its statements (34 in all, plus an overall rating and three open questions).
- Untick any statement that does not fit your board.
- Select + Add a statement to add your own.
Tip: Questions lock once an online survey opens, so every director answers the same set.
Step 3: Collect responses (section 3)
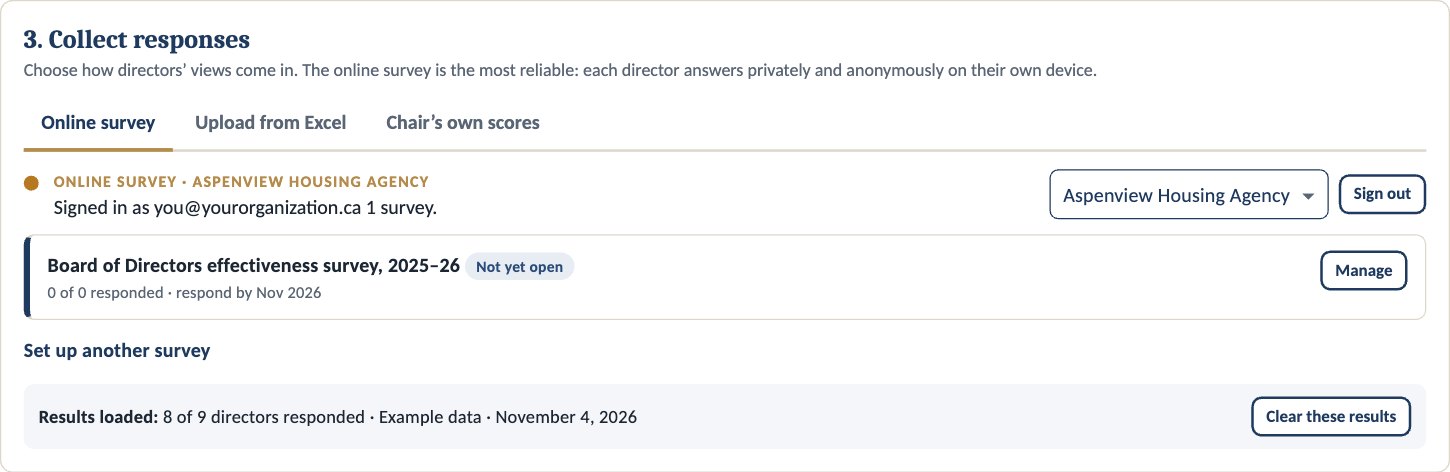
Choose one way:
- Online survey (team plans): create the survey, add your directors, and open it. Each director gets a private link. Watch responses come in, then select Load results into the scorecard. Close the survey when done.
- Upload from Excel: download the template, collect one row per director, and upload it.
- Chair's own scores: rate each statement yourself for a quick first look.
Tip: Online answers are anonymous. Results stay locked until the minimum number of directors has responded, and answers are deleted after the keep period (180 days by default).
Step 4: Read the results (sections 4 to 9)
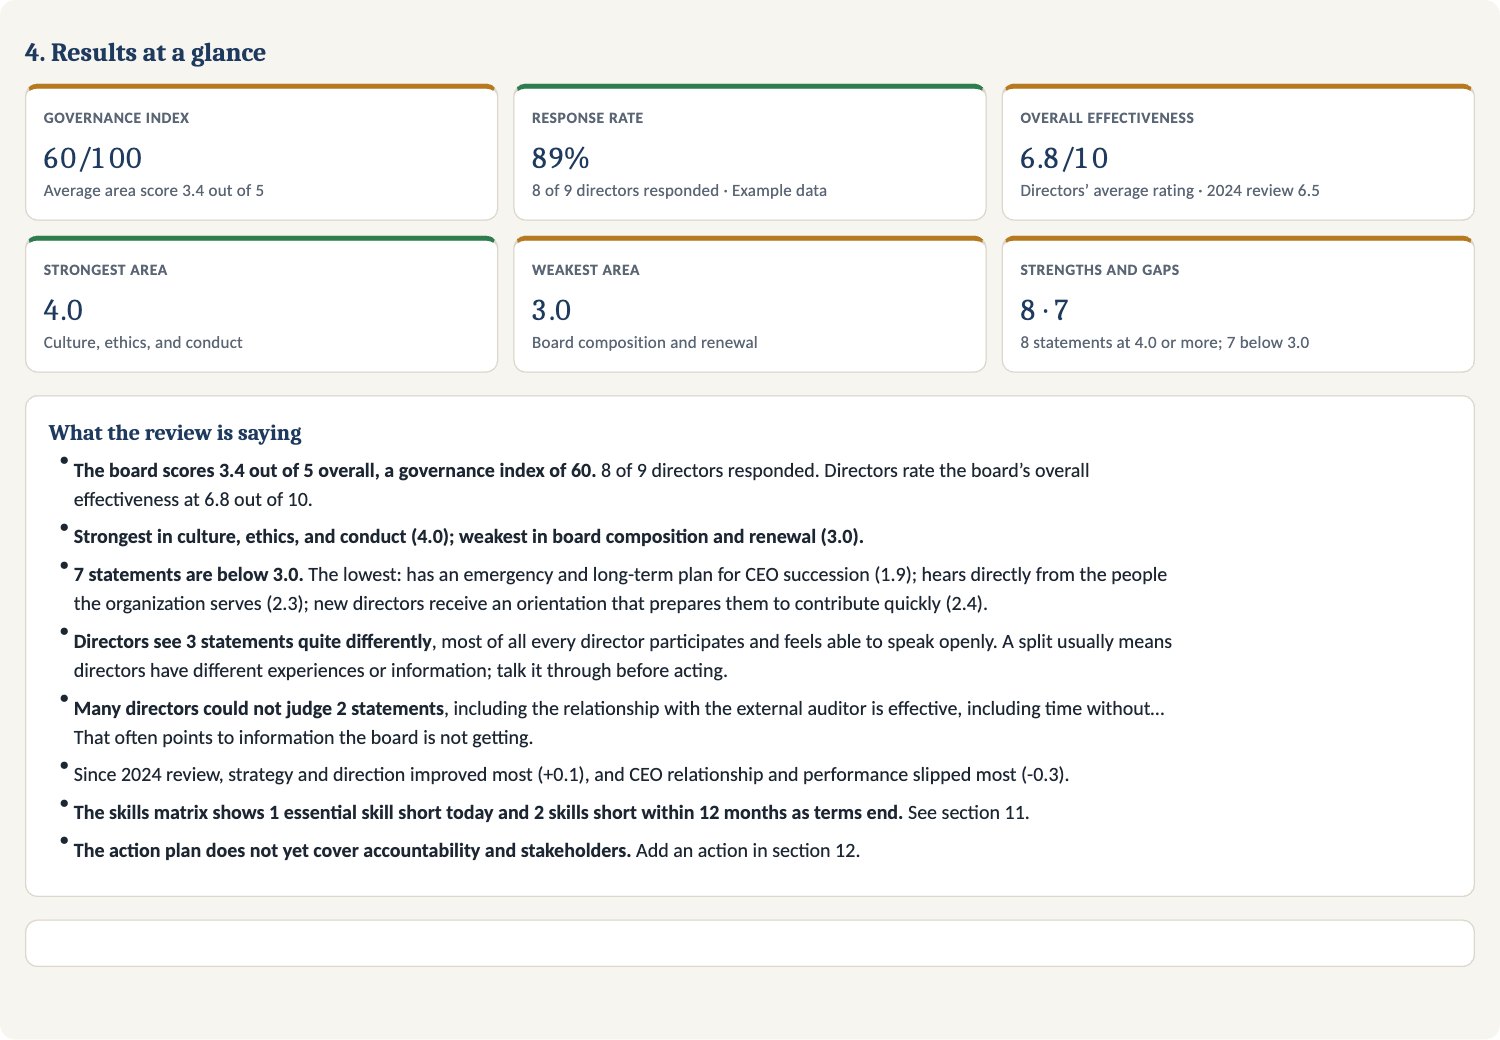
- Results at a glance (4): the governance index out of 100, response rate, overall rating, and findings. Read the findings first.
- Scores by area (5): compare each bar with the red gap line and green strength line. Open Compare with a previous review to enter last year's scores.
- Statement by statement (6): sort by any column. Look for wide spreads and many "Don't know" answers, which often point to information the board is not getting.
- Strengths and gaps (7): select Add an action for this gap to send a gap to the action plan.
- Where directors disagree (8): talk these through as a board (needs three or more responses).
- What directors said (9): comments, word for word, without names, in random order.
Step 5: Board skills matrix (section 10)
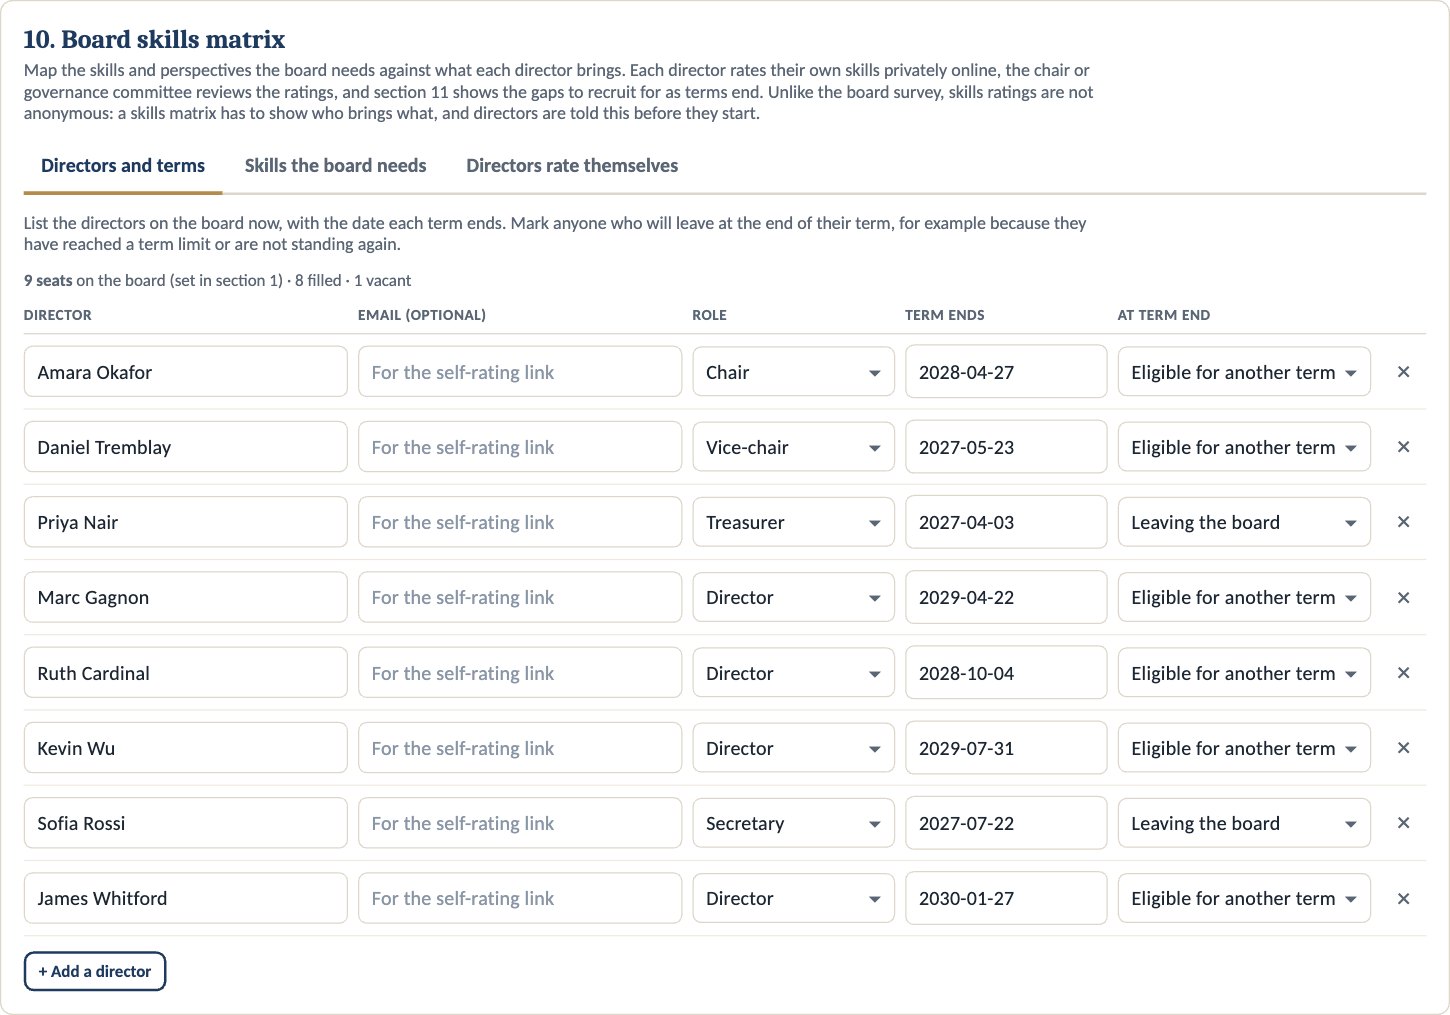
- On Directors and terms, list each director with their term end date, and mark anyone leaving.
- On Skills the board needs, adjust the standard list of sixteen skills, mark each essential or desirable, and set how many directors you need for each.
- On Directors rate themselves, create a self-rating survey, open it, and send each director their own link.
- When directors have responded, select Load ratings into the matrix.
Important: Skills ratings are not anonymous. They come back with each director's name, and directors are told this before they start. Share the matrix only with the governance committee.
Step 6: Skills coverage and renewal (section 11)
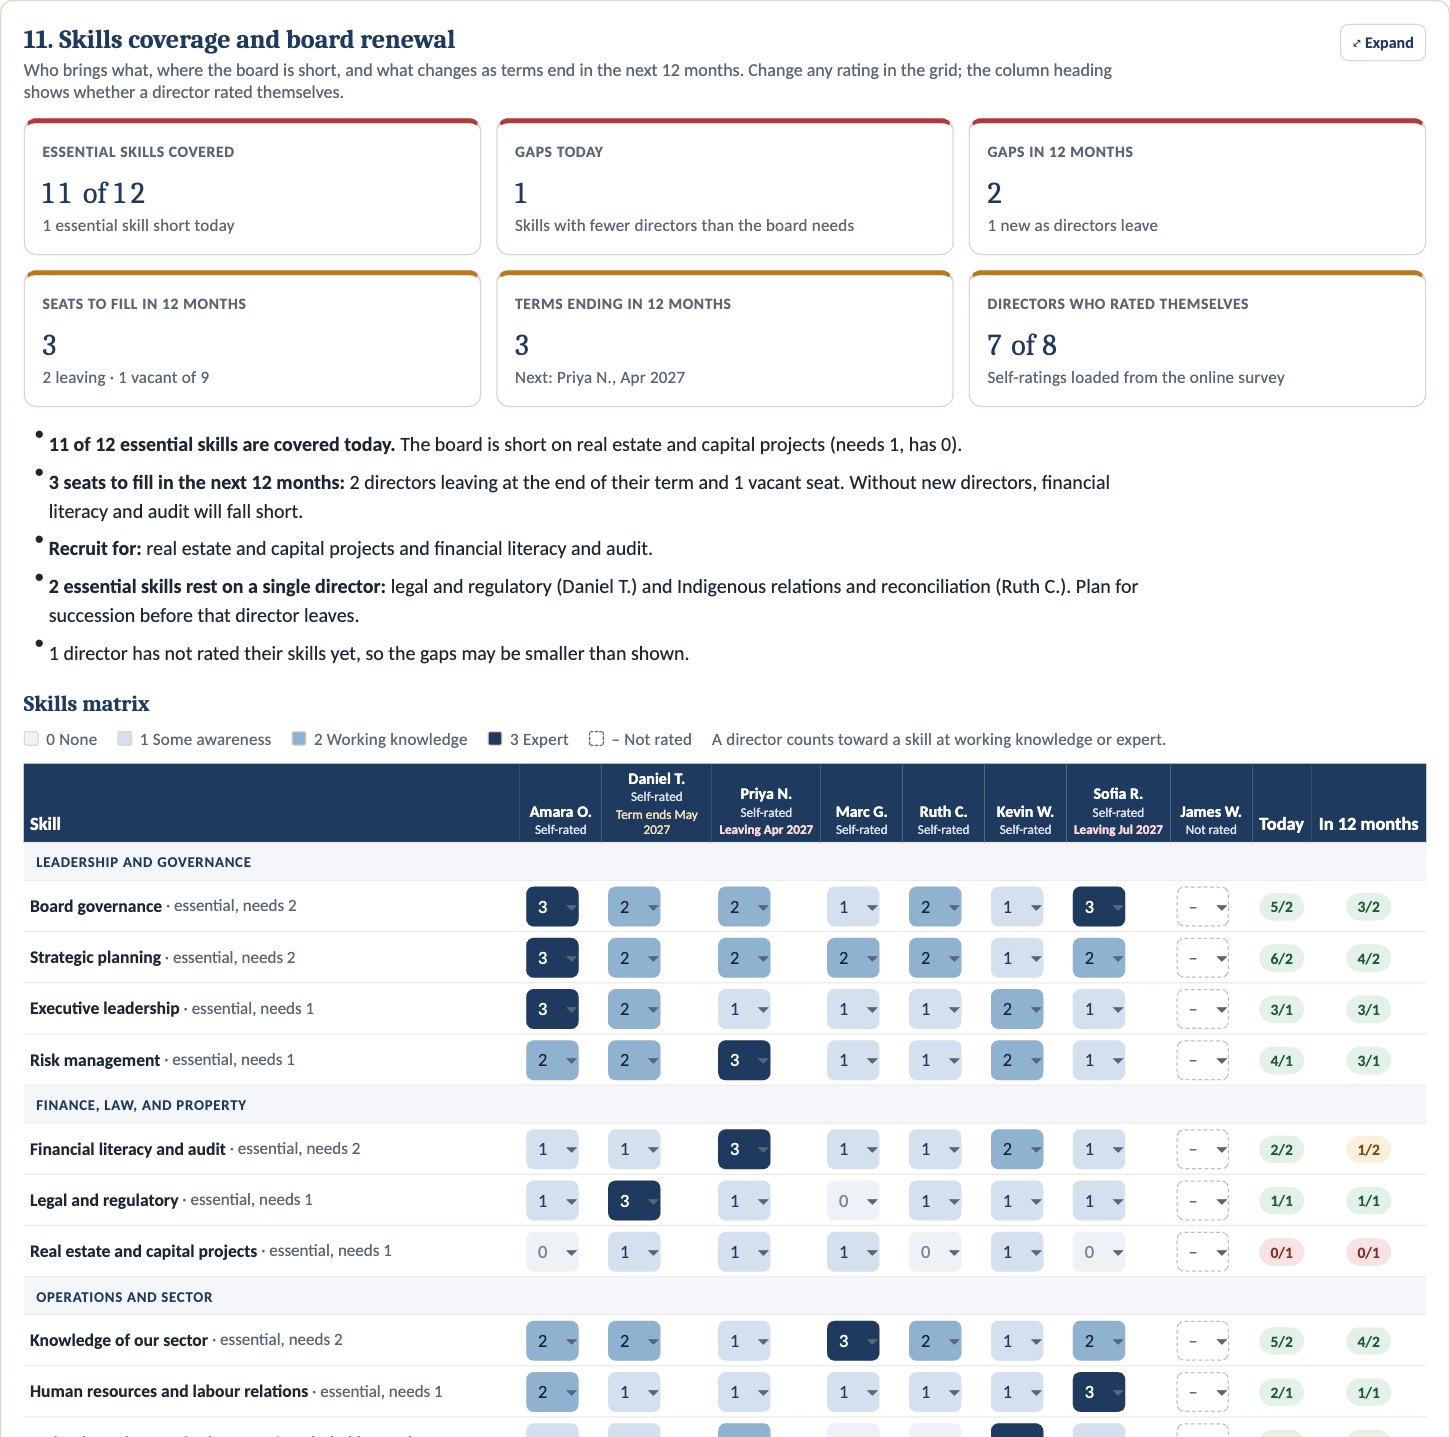
- Read the findings and recruitment priorities first.
- Adjust any rating in the grid: 0 none, 1 some awareness, 2 working knowledge, 3 expert.
- Select Add a recruitment action to put a priority into the action plan.
Tip: "In 12 months" leaves out directors whose term ends next year and who are marked as leaving.
Step 7: Action plan and checks (sections 12 and 13)
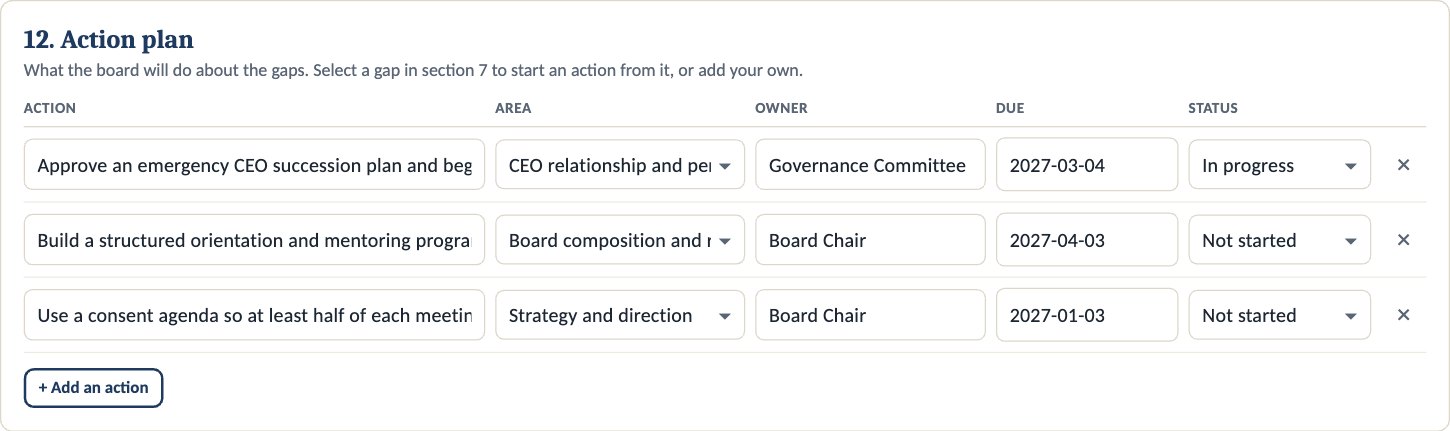
- Select + Add an action, or add one from a gap. Give each an owner and a due date.
- Clear every Action in the review checks before the report goes to the board.
Step 8: Present, report, and save
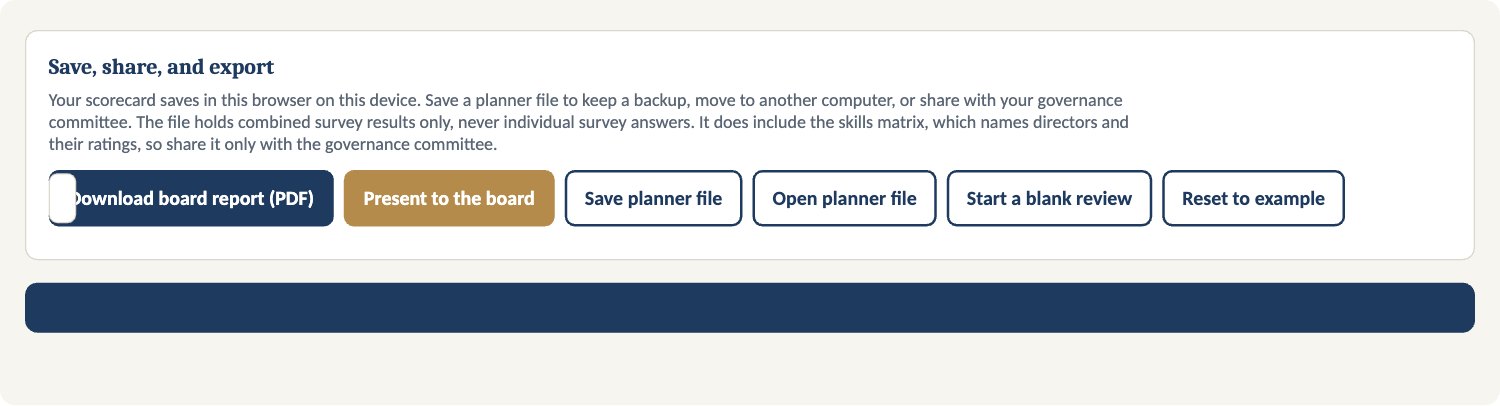
- Select Present for a full-screen briefing, or PDF report for the governance review report.
- Select Start next year's review from this one to carry these results forward as next year's comparison.
- Work saves to your account as you go. The planner file holds combined results only, never individual survey answers.
Works with: Organizational Assessment.
Organizational Assessment Pro: step-by-step guide
A health check for your whole organization in about 30 minutes. Answer 41 plain-language questions across eight areas and get a score for each area, red flags, your top three priorities, and a recommended next step for each, ready to take to your board. Organizations in British Columbia also see their results against the BCNPHA Strategic Plan 2025–2027.
Time to complete: about 30 minutes.
Have on hand: a general sense of your board practices, finances, buildings, and operating agreement dates. "Not sure" is a fine answer.
Before you start
- Sign in and select Organizational Assessment Pro on your account page.
- On a team plan, select Start editing before you answer and Done editing when you finish. Consider completing it together with your board chair or leadership team.
Step 1: Fill in your profile
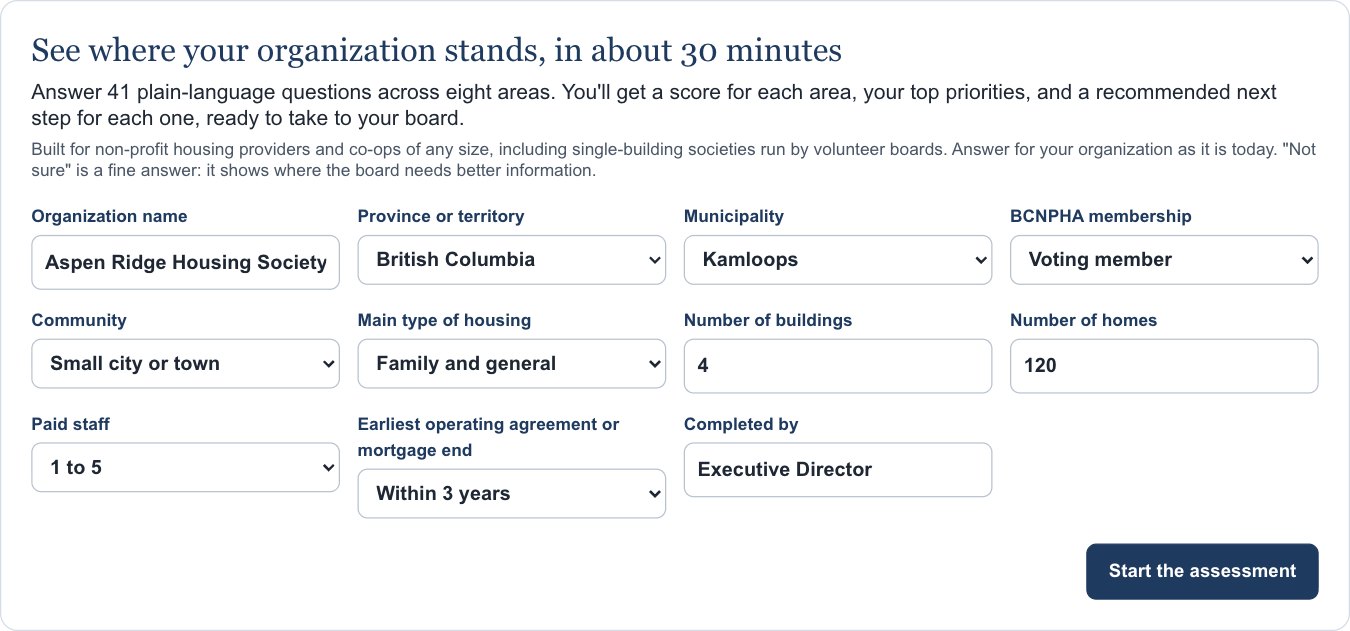
- Enter your organization name and choose your province or territory.
- Choose your municipality. In British Columbia, the regional district fills in for you, and you can record your BCNPHA membership.
- Choose your community type, main type of housing, number of buildings and homes, and paid staff.
- Choose when your earliest operating agreement or mortgage ends. If you have no operating agreement, that area is left out.
- Enter who is completing it, then select Start the assessment.
Step 2: Answer the questions
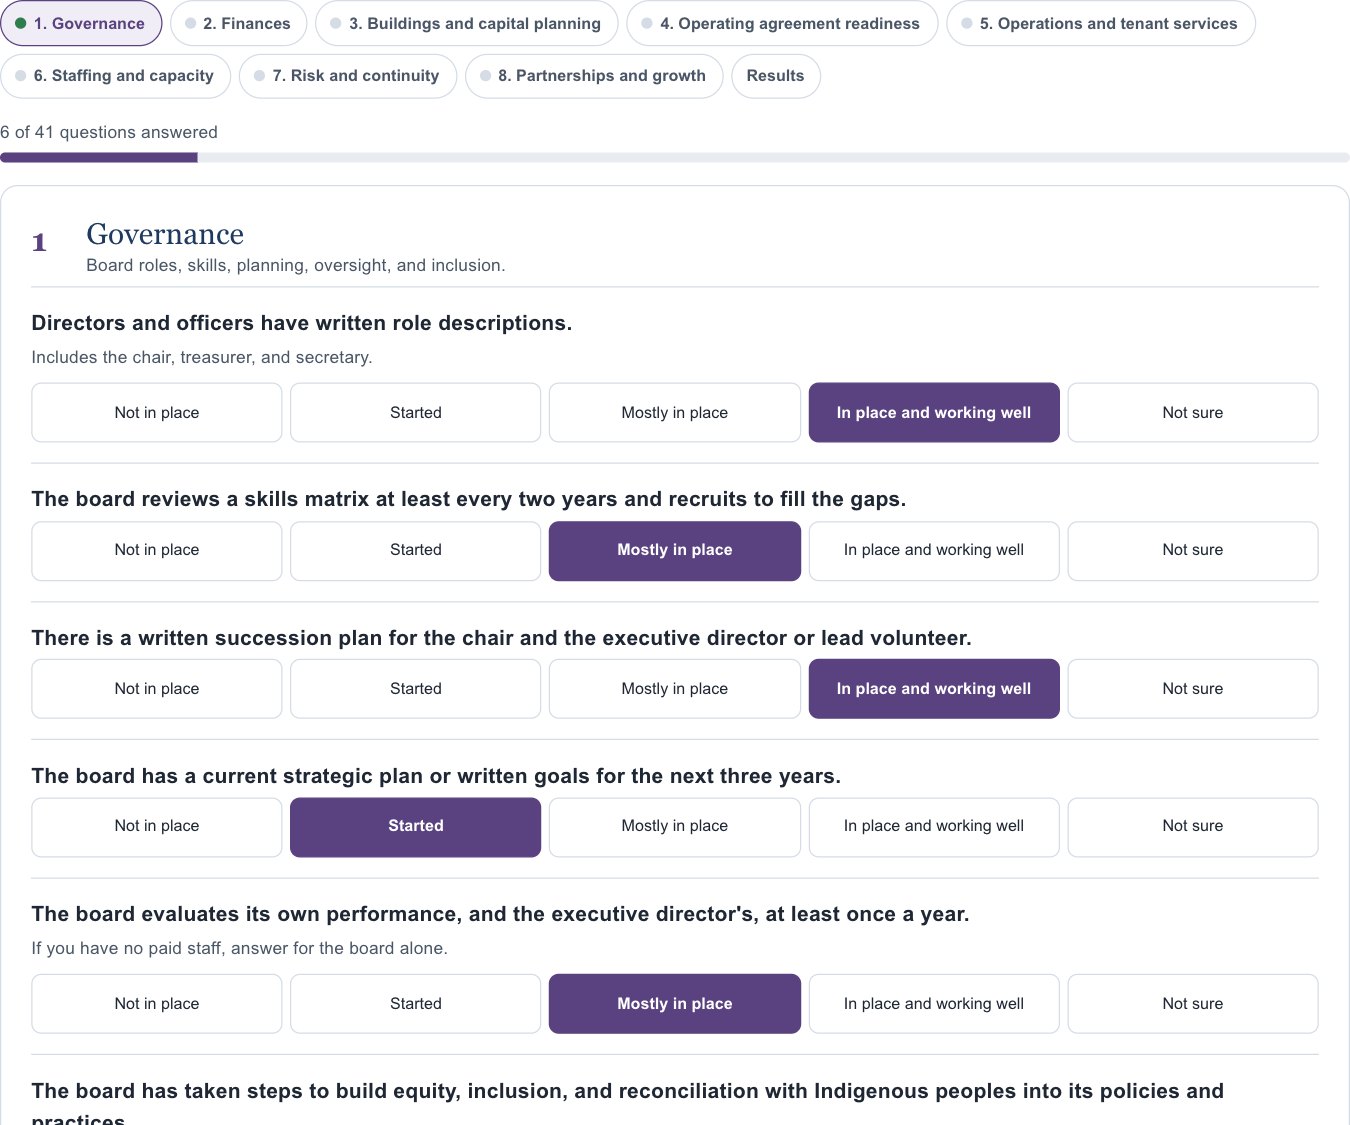
- Work through the eight areas: Governance; Finances; Buildings and capital planning; Operating agreement readiness; Operations and tenant services; Staffing and capacity; Risk and continuity; and Partnerships and growth.
- For each statement, choose Not in place, Started, Mostly in place, In place and working well, or Not sure.
- Answer for your organization as it is today.
- Use Next area and Back, or the area buttons at the top to jump around. A green dot means an area is complete; amber means partly done.
- Your answers save as you go, so you can stop and pick up later.
Step 3: Read your results
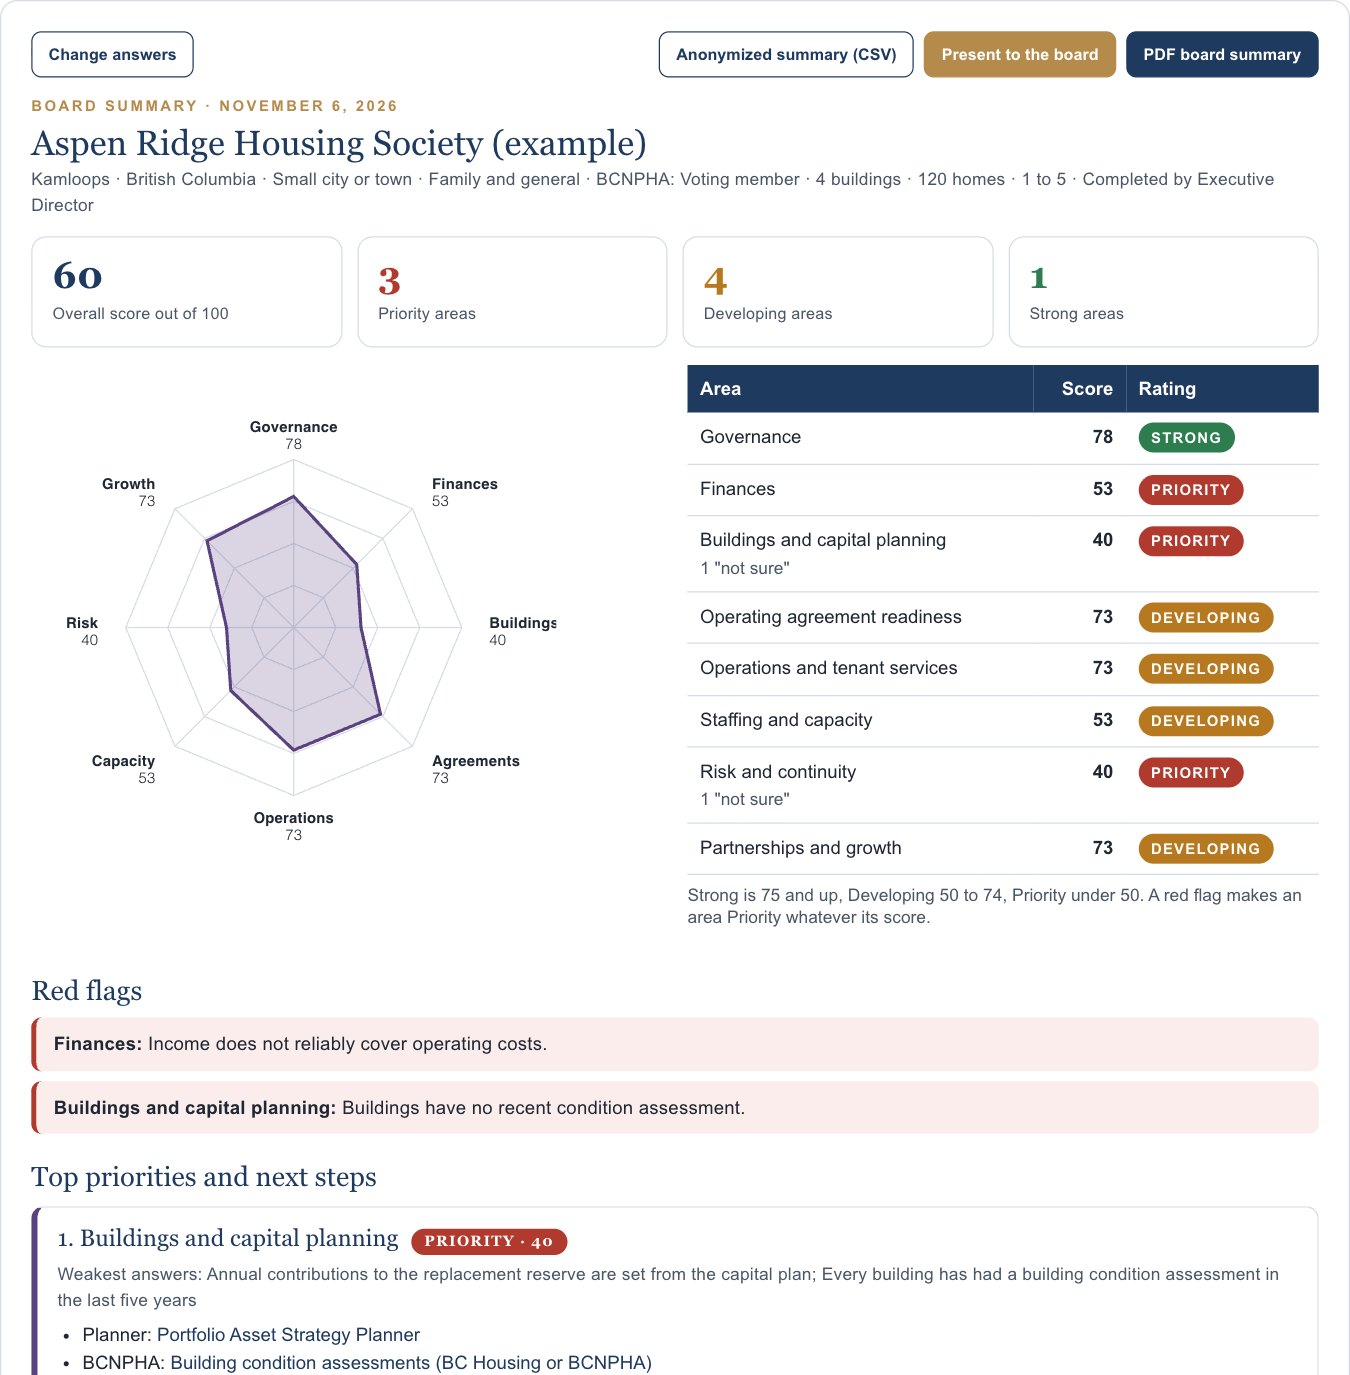
- On the last area, select See my results.
- Check the overall score out of 100 and the count of Priority, Developing, and Strong areas.
- Read the radar chart and the area table. Strong is 75 and up, Developing 50 to 74, Priority under 50. A red flag makes an area Priority whatever its score.
- Read any Red flags. These need attention first.
- Read Top priorities and next steps. Each lists your weakest answers and the planner, training, or advisory help that fits.
- In British Columbia, read how your results connect to BCNPHA's Sector Resilience and Sector Growth goals.
Tip: Each "Not sure" counts as zero and points to information the board should ask for. Unanswered questions also count as zero; select Change answers to finish them.
Step 4: Share with your board

- Select Present to the board for a full-screen briefing. Use the arrow keys, and Esc to exit.
- Select PDF board summary for the board package.
- Select Anonymized summary (CSV) to share your scores and a general profile, with no names or individual answers, with your housing association. Nothing is shared unless you send the file yourself.
Step 5: Save and retake

- Select Save planner file to keep a copy, and Open planner file to load one.
- Retake the assessment in 6 to 12 months to show progress. Save a named version to keep this year's results for comparison.
- Start over clears every answer (select it twice to confirm).
Good to know
- Your answers are visible only to you and your team.
- This is a planning aid, not an audit, a compliance review, or legal or financial advice.
Works with: Board Governance Scorecard, and every planner it points you to.